

The word “class” is the root of the word “classification”. When we create our class we systematically arrange information and behavior into a meaningful entity. We don’t use classification only in software development, we are doing the same in real-life situations. So as it is important in a real-life, it is important in software development. The classes are reference data types, and if you want to learn more about data types you can visit our module about C# basics.
If you want to see the complete navigation of this tutorial, you can do that here C# Intermediate Tutorial.
To download the source code, you can visit Classes and Constructors in C# Source Code.

In this article, we are going to talk about:
- Adding New Elements in Solution Explorer
- Defining Classes and How to Use Them
- Constructors
- Constructor Overloading
- Partial Classes
- Conclusion
Adding New Elements in Solution Explorer
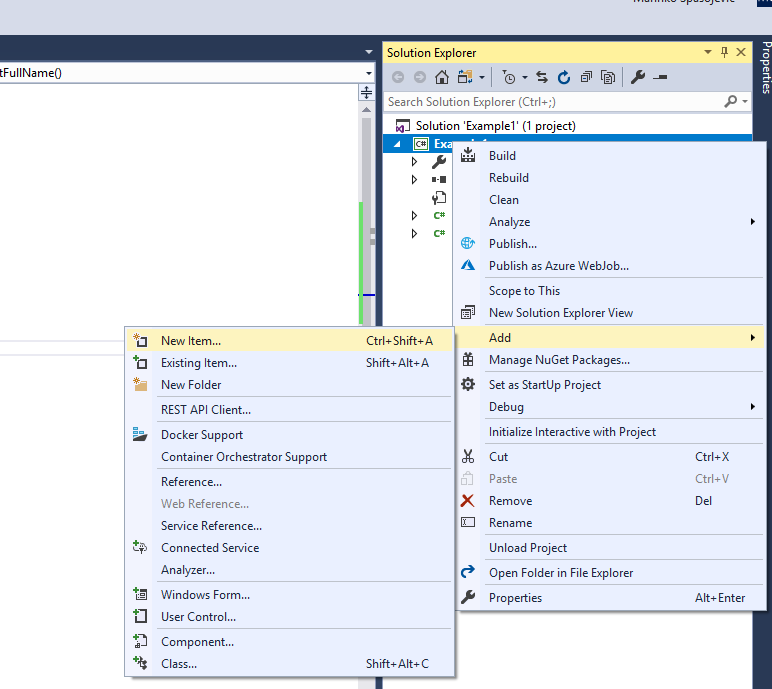
Even though we can create new classes inside the Program.cs file, it is much better to create a new class in a separate file. To do that, we need to right-click on our project name, choose Add and then New Item (Ctrl+Shift+A):
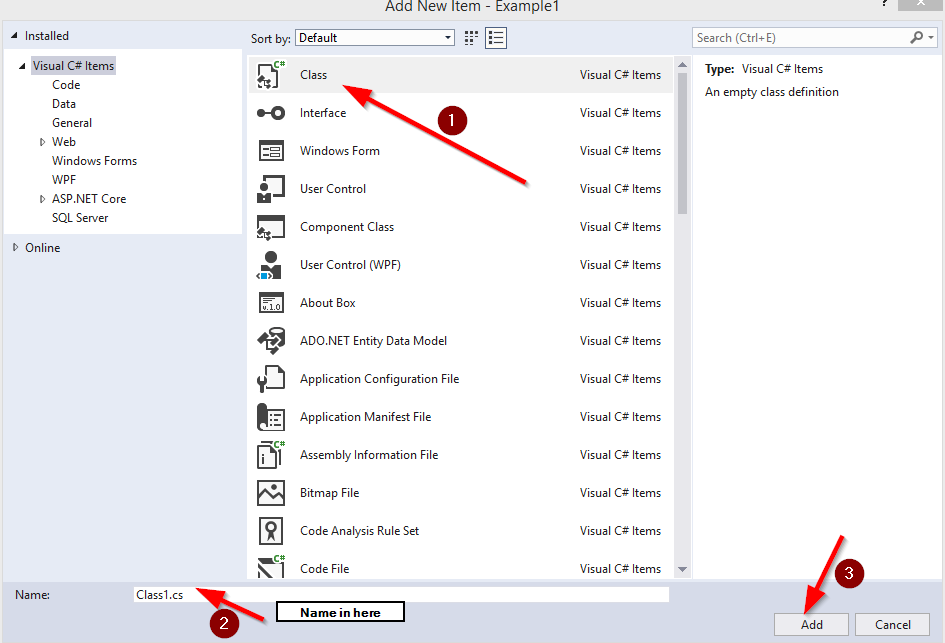
Then, we need to choose a class file and add a name:
Defining Classes and How to Use Them
In C#, to define a class, we need to use the class keyword. The class consists of members. All the class members are defined in the class body between two curly braces:
public class Student
{
    private string _name;
    private string _lastName;

    public string GetFullName()
    {
        return _name + ' ' + _lastName;
    }
 }
We see that the body contains two private fields (variables in the class body are called fields) _name and _lastName and one public method GetFullName (if you are not familiar with the access modifiers: private, public, etc. you can read more about them in our module 1 about C# basics).
As we know from our module 1 C# basics, the class is a reference type, so to initialize it we need to use the new keyword:
class Program
{
    static void Main(string[] args)
    {
        Student student = new Student();
    }
}
Now the student object can access the members from the Student class. For now, we have only one method inside the Student class and we can call it with the student.GetFullName() syntax. This will return an empty string, but we are going to fix that as soon as we introduce constructors.
It is so important not to confuse the terms class and object. The class is a type definition but an object is an instance of that type. We can have several object instances of the same class:
Student student = new Student();
Student student10 = new Student();
Student student20 = new Student();
Student student30 = new Student();
Constructors
When we use the new keyword to create an object, the CLR (Common Language Runtime) uses the class definition to construct that object for us by calling a constructor method.
The constructor is a special method that has the same name as the class it is defined in, doesn’t return any value (not even void) and can take parameters. It runs automatically when we create an instance of a class. So, every time we use the new keyword to instantiate a class, we are calling a constructor of that class.
Every class must have a constructor. If we don’t write one, the compiler automatically generates one for us. This type of constructor is called a default constructor. A default constructor will set all the data inside a class, to their default values (assigned values if we don’t assign them). So, in our example, the fields _name and _lastName will have a null as a value at the beginning because this is a default value for the reference types.
We can write our own default constructor as well:
public class Student
{
    private string _name;
    private string _lastName;

    public Student()
    {
        _name = string.Empty;
        _lastName = string.Empty;
    }

    public string GetFullName()
    {
        return _name + ' ' + _lastName;
    }
}
Constructor Overloading
Our classes are not restricted to having just one constructor method. We can create more of them in a single class:
public class Student
{
    private string _name;
    private string _lastName;

    public Student()
    {
        _name = string.Empty;
        _lastName = string.Empty;
    }

    public Student(string name, string lastName)
    {
        _name = name;
        _lastName = lastName;
    }

    public string GetFullName()
    {
        return _name + ' ' + _lastName;
    }
}
Now we have two options to instantiate our class, first one with the default values (which we don’t have to write) and the overloaded one, which gives us the ability to set the values of our fields:
class Program
{
    static void Main(string[] args)
    {
        Student student = new Student(); //default constructor

        Student student1 = new Student("John", "Doe");//overloaded constructor
        Console.WriteLine(student1.GetFullName());
    }
}
There is one important thing to have in mind. If we create our own constructor for a class, the compiler won’t create a default one for us. So if we want to have a default one and the overloaded one, we must create both of them.
Partial Classes
In a real-world project, our class can be pretty large with so many lines of code. That kind of class could become less readable and tough to maintain. To avoid that, we can use partial classes. Partial classes have even more advantages because multiple developers can work on the same class at the same time. Furthermore, we can create a partial method inside those classes as well.
A partial class is nothing more than a part of a single class. To define partial classes, we need to use the partial keyword in each file:
partial class Student
{
    private string _name;
    private string _lastName;

    public Student()
    {
        _name = string.Empty;
        _lastName = string.Empty;
    }
}

partial class Student
{
    public Student(string name, string lastName)
    {
        _name = name;
        _lastName = lastName;
    }

    public string GetFullName()
    {
        return _name + ' ' + _lastName;
    }
}
Conclusion
In this article, we have learned:
- What the classes are and how to use them
- How to use constructors and how to overload them
- How to use partial classes and why are they useful
In the next article, we are going to talk about Properties in C#Properties in C#.
Great website, a gem for learning c# & .net! Keep up the good work.
One question, if the compiler going to generate a default constructor, then why do we need to create any scenario?
Hello James. Thanks for the kind words. Regarding your question, well we have to do that in many different cases. But we do that mainly because we want to do some sort of custom logic in that constructor and we don’t want a default constructor to set the values of all our members to default values. Also, on many occasions, we want to send some parameters to the constructors and then use them to do some business logic inside the class.