

In the second part of this series, we have learned how to configure non-relational properties in Entity Framework Core. So as a logical continuation, this article will be dedicated to learning about database relationships configuration with Entity Framework Core (EF Core Relationships).
We will show you how to create additional entities in the database model and how to create relationships between them. We are going to use all three ways: by Convention, Data Annotations, and Fluent API, to create those relationships.
You can download the source code for this article on our GitHub repository.

To see all the basic instructions and complete navigation for this series, visit Entity Framework Core with ASP.NET Core Tutorial.
EF Core Relationships – Concepts and Navigational Properties
Right now, we have only one entity (model) class, the Student class, but soon enough we are going to create the rest of the database model in our application. But before we do that, it is quite important to understand some basic concepts when working with relational databases and models.
When we create a relationship between two entities, one of them becomes the Principal entity and another one is the Dependent entity. The Principal entity is the main entity in a relationship. It contains a primary key as a property that the dependent entity refers to via the foreign key. The Dependent entity, from the other side, is the entity that holds the foreign key that refers to the principal entity’s primary key.
Our entity classes will contain Navigational properties which are the properties containing a single class or a collection of classes that EF Core uses to link entity classes.
Additionally, let’s explain the Required and Optional relationships in EF Core. The required relationship is a relationship where a foreign key cannot be null. This means that the principal entity must exist. The optional relationship is a relationship where a foreign key could be null and therefore the principal entity can be missing.
Configuring One-to-One Relationship
The one-to-one relationship means that a row in one table can only relate to one row in another table in a relationship. This is not that common relationship because it is usually handled as “all the data in one table”, but sometimes (when we want to separate our entities) it is useful to divide data into two tables.
The easiest way to configure this type of relationship is to use by the Convention approach, and that is exactly what we are going to do. So let’s first create another class in the Entities project, named StudentDetails:
public class StudentDetails
{
    [Column("StudentDetailsId")]
    public Guid Id { get; set; }
    public string Address { get; set; }
    public string AdditionalInformation { get; set; }
}
Now, to establish a relationship between the Student and the StudentDetails classes we need to add a reference navigation property at both sides. So, let’s first modify the Student class:
public class Student
{
    [Column("StudentId")]
    public Guid Id { get; set; }

    [Required]
    [MaxLength(50, ErrorMessage = "Length must be less then 50 characters")]
    public string Name { get; set; }

    public int? Age { get; set; }
    public bool IsRegularStudent { get; set; }

    public StudentDetails StudentDetails { get; set; }
}
And let’s modify the StudentDetails class:
public class StudentDetails
{
    [Column("StudentDetailsId")]
    public Guid Id { get; set; }
    public string Address { get; set; }
    public string AdditionalInformation { get; set; }

    public Guid StudentId { get; set; }
    public Student Student { get; set; }
}
We can see that the Student class has a reference navigation property towards the StudentDetails class and the StudentDetails class has a foreign key and the navigation property Student.
As a result, we can create a new migration and apply it:
PM> Add-Migration OneToOneRelationshipStudent_StudentDetails
PM> Update-Database
This is the result:

Excellent, this works great.
Additional Explanation
If we take a look at the first article of this series, we are going to see that we had to create a DbSet<T> property for the Student class in order to be created in the database. But as we can see, we haven’t done the same thing for the StudentDetails class but it is still created in db.
Why is that?
Well, as we explained in the first article, EF Core searches for all the public DbSet<T> properties in the DbContext class to create tables in the database. Then it searches for all the public properties in the T class to map the columns. But it also searches for all the public navigational properties in the T class and creates additional tables and columns related to the type of the navigation property. So, in our example, in the Student class, EF Core finds the StudentDetails navigation property and creates an additional table with its columns.
One-to-Many Relationship Configuration
In this section, we are going to learn how to create One to Many relationships with all three ways. So, before we start, let’s create an additional model class Evaluation in the Entities project:
public class Evaluation
{
    [Column("EvaluationId")]
    public Guid Id { get; set; }
    [Required]
    public int Grade { get; set; }
    public string AdditionalExplanation { get; set; }
}
Let’s continue on.
Using by Convention Approach to Create One-to-Many Relationship
Let’s take a look at the different conventions which automatically configure the one-to-many relationship between the Student and Evaluation classes.
The first approach includes the navigation property in the principal entity, the Student class:
public class Student
{
    [Column("StudentId")]
    public Guid Id { get; set; }

    [Required]
    [MaxLength(50, ErrorMessage = "Length must be less then 50 characters")]
    public string Name { get; set; }

    public int? Age { get; set; }
    public bool IsRegularStudent { get; set; }

    public StudentDetails StudentDetails { get; set; }

    public ICollection<Evaluation> Evaluations { get; set; }
}
We have in the ApplicationContext class a DbSet<Student> property and as we explained, EF Core searches through the Student class to find all the navigational properties to create appropriate tables in the database.
Another way to create a One-to-Many relationship is by adding a Student property in the Evaluation class without ICollection<Evaluation> property in the Student class:
public class Evaluation
{
    [Column("EvaluationId")]
    public Guid Id { get; set; }
    [Required]
    public int Grade { get; set; }
    public string AdditionalExplanation { get; set; }

    public Student Student { get; set; }
}
For this approach to work, we have to add a DbSet<Evaluation> Evaluations property in the ApplicationContext class.
The third approach by Convention is to use a combination of the previous ones. So, we can add the ICollection<Evaluation> Evaluations navigational property to the Student class and add the Student Student navigational property in the Evaluation class. Of course, with this approach, we don’t need the DbSet<Evaluation> Evaluations property in the ApplicationContext class.
This is the result of any of these three approaches:
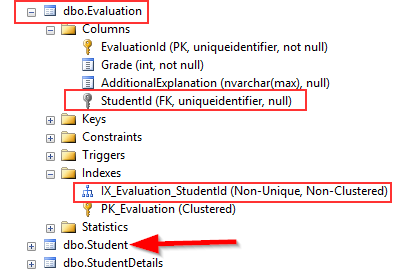
We can see that the relationship was properly created, but our foreign key is a nullable field. This is because both navigational properties have a default value of null. This relationship is also called an Optional Relationship (we have talked about it in the first part of this article).
If we want to create a required relationship between the Student and Evaluation entities, we have to include the foreign key into the Evaluation class:
public class Student
{
    [Column("StudentId")]
    public Guid Id { get; set; }

    [Required]
    [MaxLength(50, ErrorMessage = "Length must be less then 50 characters")]
    public string Name { get; set; }

    public int? Age { get; set; }
    public bool IsRegularStudent { get; set; }

    public StudentDetails StudentDetails { get; set; }

    public ICollection<Evaluation> Evaluations { get; set; }
}

public class Evaluation
{
    [Column("EvaluationId")]
    public Guid Id { get; set; }
    [Required]
    public int Grade { get; set; }
    public string AdditionalExplanation { get; set; }

    public Guid StudentId { get; set; }
    public Student Student { get; set; }
}
Now when we execute our migration, we are going to see the following result:
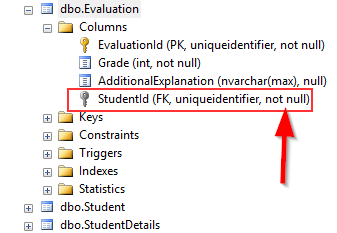
It is obvious that our relationship is now required.
Data Annotations Approach
The Data Annotations approach contains only two attributes related to relationships. The [ForeignKey] and [InverseProperty] attributes.
The [ForeignKey] attribute allows us to define a foreign key for a navigational property in the model class. So, let’s modify the Evaluation class by adding this attribute:
public class Evaluation
{
    [Column("EvaluationId")]
    public Guid Id { get; set; }
    [Required]
    public int Grade { get; set; }
    public string AdditionalExplanation { get; set; }

    [ForeignKey(nameof(Student))]
    public Guid StudentId { get; set; }
    public Student Student { get; set; }
}
We have applied the [ForeignKey] attribute on top of the StudentId property(which is a foreign key in this class) giving it a name of the navigational property Student. But it also works the other way around:
public class Evaluation
{
    [Column("EvaluationId")]
    public Guid Id { get; set; }
    [Required]
    public int Grade { get; set; }
    public string AdditionalExplanation { get; set; }

    public Guid StudentId { get; set; }
    [ForeignKey(nameof(StudentId))]
    public Student Student { get; set; }
}
The ForeignKey attribute takes one parameter of type string. If the foreign key is a composite key then the ForeignKey attribute should look like this:
[ForeignKey(“Property1”, “Property2”)].
Whichever way we choose, the result is going to be the same as with the “by Convention” approach. We are going to have a required relationship created between these two tables:
Fluent API approach for the One-to-Many Configuration
To create a One-to-Many relationship with this approach, we need to remove the [ForeignKey] attribute from the Evaluation class and to modify the StudentConfiguration class by adding this code:
builder.HasMany(e => e.Evaluations)
    .WithOne(s => s.Student)
    .HasForeignKey(s => s.StudentId);
With a code like this, we inform EF Core that our Student entity (the builder object is of type EntityTypeBuilder<Student>) can be in a relationship with many Evaluation entities. We also state that the Evaluation is in a relationship with only one Student entity. Finally, we provide information about the foreign key in this relationship.
The result is going to be the same:
We need to mention one thing here.
For the database model like we’ve defined, we don’t need to have the HasForeignKey method. That’s because the foreign key property in the Evaluation class has the same type and the same name as the primary key in the Student class. This means that by Convention this relation would still be the required one. But if we had a foreign key with a different name, StudId for example, then the HasForeignKey method would be needed because otherwise, EF core would create an optional relationship between Evaluation and Student classes.
Many-to-Many Relationship Configuration
This is the implementation for the 3.1 EF Core version. It is valid for the EF Core version 5, but in version 5 it could be done a bit differently. We’ll explain that in the next section.
Before we start explaining how to configure this relationship, let’s create the required classes in the Entities project:
public class Subject
{
    [Column("SubjectId")]
    public Guid Id { get; set; }
    public string SubjectName { get; set; }
}

public class StudentSubject
{
    public Guid StudentId { get; set; }
    public Student Student { get; set; }

    public Guid SubjectId { get; set; }
    public Subject Subject { get; set; }
}
Now, we can modify the Student and Subject classes by providing the navigational property for each class towards the StudentSubject class:
public class Subject
{
    [Column("SubjectId")]
    public Guid Id { get; set; }
    public string SubjectName { get; set; }

    public ICollection<StudentSubject> StudentSubjects { get; set; }
}
public class Student
{
    [Column("StudentId")]
    public Guid Id { get; set; }

    [Required]
    [MaxLength(50, ErrorMessage = "Length must be less then 50 characters")]
    public string Name { get; set; }

    public int? Age { get; set; }
    public bool IsRegularStudent { get; set; }

    public StudentDetails StudentDetails { get; set; }

    public ICollection<Evaluation> Evaluations { get; set; }

    public ICollection<StudentSubject> StudentSubjects { get; set; }
}
In Entity Framework Core, we have to create a joining entity for a joining table (StudentSubject). This class contains the foreign keys and navigational properties from the Student and Subject classes. Furthermore, the Student and Subject classes both have navigational ICollection properties towards the StudentSubject class. So basically, the Many-to-Many relationship is just two One-To-Many relationships.
We have created our entities, and now we have to create the required configuration. For that, let’s create the StudentSubjectConfiguration class in the Entities/Configuration folder:
public class StudentSubjectConfiguration : IEntityTypeConfiguration<StudentSubject>
{
    public void Configure(EntityTypeBuilder<StudentSubject> builder)
    {
        builder.HasKey(s => new { s.StudentId, s.SubjectId });

        builder.HasOne(ss => ss.Student)
            .WithMany(s => s.StudentSubjects)
            .HasForeignKey(ss => ss.StudentId);

        builder.HasOne(ss => ss.Subject)
            .WithMany(s => s.StudentSubjects)
            .HasForeignKey(ss => ss.SubjectId);
    }
}
As we said, the Many-to-Many is just two One-to-Many EF Core relationships and that’s exactly what we configure in our code. We create a primary key for the StudentSubject table which is, in this case, a composite key. After the primary key configuration, we use a familiar code to create relationship configurations.
Now, we have to modify the OnModelBuilder method in the ApplicationContext class:
protected override void OnModelCreating(ModelBuilder modelBuilder)
{
    modelBuilder.ApplyConfiguration(new StudentConfiguration());
    modelBuilder.ApplyConfiguration(new StudentSubjectConfiguration());
}
After these modifications, we can create a migration and apply it:
PM> Add-Migration ManyToManyRelationship
PM> Update-Database
This is the result:
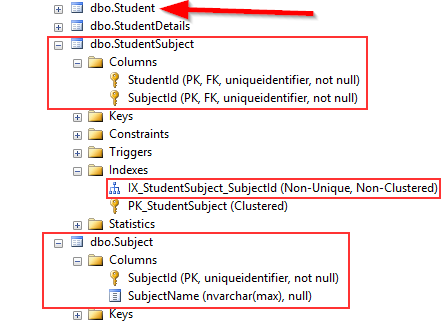
Excellent work. Let’s press on.
.NET 5 Note
In .NET 5, we don’t need the StudentSubject table nor the StudentSubjectConfiguration class. By default, if our Student class has a navigational property to the Subject class, and the Subject class has the navigational property to the Student class, this is quite enough. No additional configuration is needed.
Basically, the Student class should have public ICollection<Subject> Subjects { get; set; } property, and the Subject class should have public ICollection<Student> Students { get; set; } property. There is no need for the third class nor the navigational properties to that class.
But, if you want to initially seed the data for both Student and Subject tables and populate the third table with both tables ids, you’ll have to use the implementation we used for the 3.1 version.
OnDelete Method
The OnDelete method configures the delete actions between relational entities. We can add this method to the end of the relationship configuration to decide how the delete actions will execute.
The values that can be used in the OnDelete method are:
- Restrict – The delete action isn’t applied to dependent entities. This means that we can’t delete the principal entity if it has a related dependent entity.
- SetNull – The dependent entity isn’t deleted but its foreign key property is set to null.
- ClientSetNull – If EF Core tracks a dependent entity its foreign key is set to null and that entity is not deleted. If it doesn’t track the dependent entity, the database rules apply.
- Cascade – The dependent entity is deleted with the principal entity.
If we look at our entities: Student and Evaluation, we are going to see that we have a required relationship between them. For this type of relationship, the Cascade deleting action is configured by default.
We can also see that from the code in our migration file:
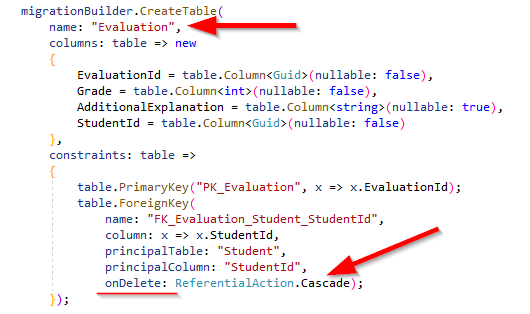
We can change this type of behavior by modifying the configuration code in the StudentConfiguration class:
builder.HasMany(e => e.Evaluations)
     .WithOne(s => s.Student)
     .HasForeignKey(s => s.StudentId)
     .OnDelete(DeleteBehavior.Restrict);
Let’s create another migration:
PM> Add-Migration StudentEvaluationRestrictDelete
And take a look at the migration generated code:
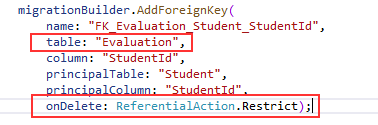
Great job.
Conclusion
Configuring EF Core Relationships in our database model is a very important part of the modeling process.
We have seen that EF Core provides us with several ways to achieve that and to make the process as easy as it can be.
Now that we know how to establish relationships in our database, we can continue to the next article where we are going to learn how to access data from the database.
Excellent article to understand the relationships between entities with EF Core. This article helped me a lot. I thank you for the quality work.
Thank you for the kind words, Borjess. Glad you like the article.
actuakky in “Using by Convention Approach to Create One-to-Many Relationship” The third approach makes the FK not nullable and therefore the relationship required
With the Ef Core and .NET version I was using, you didn’t need it. As you can see in the image. Maybe something changed in a newer .NET versions. With .NET 6 I think you have explicitly to state that the navigational property is nullable (?) but currently I am not 100% sure.
yes in .NET 6, you have to explicitly set the property to nullable by adding “?” after the type
or by adding “.IsRequired(false)” to its configuration. for example;
builder.Property(a => a.ArtistId).HasMaxLength(30).IsRequired(false); // this is my FK column.
It has helped me a lot.
Thank you.
Thank you too, for reading the article, and for the comment.
A clear and concise article on how to establish relationships between entities and the options of each of the three ways, with their advantages and disadvantages.
Fantastic. It has helped me a lot.
Thank you.
Thank you too Usuario for reading this article and for your comment as well. This means us a lot. Have a great day.