
In all the previous parts of this series, we have been working with the in-memory IDP configuration. But, every time we wanted to change something in that configuration, we had to restart our Identity Server to load the new configuration. Well, in this article we are going to learn to migrate the IdentityServer4 configuration to the database using EntityFramework Core, so we could persist our configuration across multiple IdentityServer instances.
We highly recommend visiting the IdentityServer4 series page to learn about all the articles in this series because this article is strongly related to the previous ones.
So, let’s go to work.

Adding Required Nuget Packages
Let’s add several NuGet packages required for the IdentityServer4 configuration migration process.
The first package, we require is IdentityServer4.EntityFramework:

This package implements the required stores and services using two context classes: ConfigurationDbContext and PersistedGrantDbContext. It uses the first context for the configuration of clients, resources, and scopes. Additionally, it uses the second context for the temporary operational data like authorization codes, and refresh tokens.
The second library we require is Microsoft.EntityFrameworkCore.SqlServer:

As the package description states, it is a database provider for the EF Core.
Finally, we require Microsoft.EntityFrameworkCore.Tools to support our migrations:

That is it. We can move on to the configuration part.
Configuring Migrations for the IdentityServer4 Configuration
Let’s first modify the appsettings.json file:
"ConnectionStrings": {
    "sqlConnection": "server=.; database=CompanyEmployeeOAuth; Integrated Security=true"
  }
After this, we have to modify the Startup class. Let’s start with the constructor:
public IConfiguration Configuration { get; set; }

public Startup(IConfiguration configuration)
{
    Configuration = configuration;
}
Take note that IConfiguration interface resides in the Microsoft.Extensions.Configuration namespace.
Then, let’s modify the ConfigureServices method:
public void ConfigureServices(IServiceCollection services)
{
    var migrationAssembly = typeof(Startup).GetTypeInfo().Assembly.GetName().Name;

    services.AddIdentityServer()
        .AddTestUsers(InMemoryConfig.GetUsers())
        .AddDeveloperSigningCredential() //not something we want to use in a production environment
        .AddConfigurationStore(opt =>
        {
            opt.ConfigureDbContext = c => c.UseSqlServer(Configuration.GetConnectionString("sqlConnection"),
                sql => sql.MigrationsAssembly(migrationAssembly));
        })
        .AddOperationalStore(opt =>
        {
            opt.ConfigureDbContext = o => o.UseSqlServer(Configuration.GetConnectionString("sqlConnection"),
                sql => sql.MigrationsAssembly(migrationAssembly));
        });

    services.AddControllersWithViews();
}
So, we start by extracting the assembly name for our migrations. We need that because we have to inform EF Core that our project will contain the migration code. Additionally, EF Core needs this information because our project is in a different assembly than the one containing the DbContext classes.
After that, we replace the AddInMemoryClients, AddInMemoryIdentityResources, and AddInMemoryApiResources methods with the AddConfigurationStore and AddOperationalStore methods. Both methods require information about the connection string and migration assembly.
Nicely done.
Creating Migrations
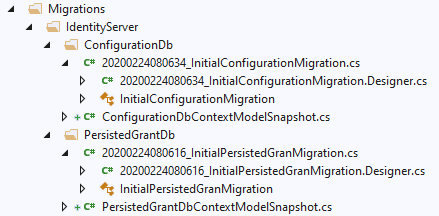
As we have mentioned, we are working with two db context classes and for both of them, we have to create a separate migration:
PM> Add-Migration InitialPersistedGranMigration -c PersistedGrantDbContext -o Migrations/IdentityServer/PersistedGrantDb
PM> Add-Migration InitialConfigurationMigration -c ConfigurationDbContext -o Migrations/IdentityServer/ConfigurationDb
As we can see, we are using two flags for our migrations (- c and – o). The – c flag stands for Context and the – o flag stands for OutputDir. So basically, we have created migrations for each context class in the separate folder:
Once we have our migration files, we are going to create a new Extensions folder with a new class to seed our data:
public static class MigrationManager
{
    public static IHost MigrateDatabase(this IHost host)
    {
        using (var scope = host.Services.CreateScope())
        {
                scope.ServiceProvider.GetRequiredService<PersistedGrantDbContext>().Database.Migrate();

           using (var context = scope.ServiceProvider.GetRequiredService<ConfigurationDbContext>())
           {
               try
               {
                   context.Database.Migrate();

                   if (!context.Clients.Any())
                   {
                       foreach (var client in InMemoryConfig.GetClients())
                       {
                           context.Clients.Add(client.ToEntity());
                       }
                       context.SaveChanges();
                    }

                    if (!context.IdentityResources.Any())
                    {
                        foreach (var resource in InMemoryConfig.GetIdentityResources())
                        {
                            context.IdentityResources.Add(resource.ToEntity());
                        }
                        context.SaveChanges();
                    }

                    if(!context.ApiScopes.Any())
                    {
                        foreach (var apiScope in InMemoryConfig.GetApiScopes())
                        {
                            context.ApiScopes.Add(apiScope.ToEntity());
                        }

                        context.SaveChanges();
                    }

                    if (!context.ApiResources.Any())
                    {
                        foreach (var resource in InMemoryConfig.GetApiResources())
                        {
                            context.ApiResources.Add(resource.ToEntity());
                        }
                        context.SaveChanges();
                    }
                }
                catch (Exception ex)
                {
                    //Log errors or do anything you think it's needed
                    throw;
                }
            }
        }

        return host;
    }
}
So, we create scope and use it to migrate all the tables from the PersistedGrantDbContext class. Soon after that, we create a context for the ConfigurationDbContext class and use the Migrate method to apply migration. Then we go through all the clients, identity resources, and api resources, add each of them to the context and call the SaveChanges method.
To learn more about automatic migrations with Entity Framework Core, we strongly recommend reading Migrations and Seed Data with the EF Core article.
Now, all we have to do is to modify Program.cs class:
public static void Main(string[] args)
{
    CreateHostBuilder(args)
        .Build()
        .MigrateDatabase()
        .Run();
}
That’s all it takes.
Now, let’s start our Identity Server application. As soon as it is started, we can inspect our database:
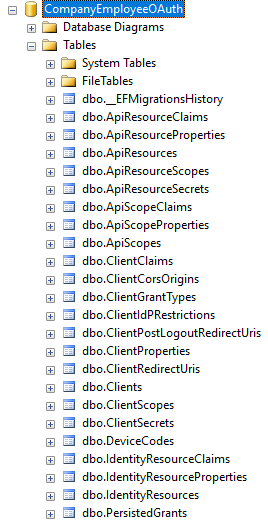
Additionally, you can inspect the content of some tables like dbo.ApiResources or dbo.Clients and you are going to find our in-memory configuration in these tables for sure.
As a final step, we can start both additional applications and check if everything works as it did prior migrations. Of course, it should work, but this time, we use the configuration from the database.
Conclusion
Excellent job.
We have seen how to migrate our in-memory configuration to the MS SQL database in a few easy steps. Additionally, we have learned what libraries we require for the process and how to prepare migrations for both context classes.
Hi,
your article is helpful, I am trying to add a new custom filed in Clients entity. Have created a new db context inherited from configure db context. But everytimg ends up creating a new table, not able to add new filed in existing table/entity using migrations.. Please help if you have an idea.
internal class MyConfigurationDbContext : ConfigurationDbContext
{
public MyConfigurationDbContext(DbContextOptions options, ConfigurationStoreOptions storeOptions)
: base(options, storeOptions)
{
}
protected override void OnModelCreating(ModelBuilder modelBuilder)
{
base.OnModelCreating(modelBuilder);
modelBuilder.Entity()
.Ignore(“AllowedGrantTypes”).Ignore(“RedirectUris”).Ignore(“PostLogoutRedirectUris”).Ignore(“AllowedScopes”)
.Ignore(“AllowedCorsOrigins”).Ignore(“AllowedIdentityTokenSigningAlgorithms”).Ignore(“IdentityProviderRestrictions”)
.Ignore(“Properties”)
.HasNoKey()
.Property(typeof(string), “ClientNewName”);
}
}
First of all, you don’t have to create a new context class. You should be able to do it with the existing one. If you want to extend the ASP.NET Core Identity’s table, you have to create a new class that inherits from the Identity… class as I did for the User in the previous article of this series. Now, that we talk about this, take a look here: https://stackoverflow.com/questions/58911337/how-to-add-new-column-in-client-table-in-identityserver-4-using-codefirst-approa , I never did it, but here you can read that it can’t be done for the client table.
Thanks for the reply, yes it is seems we can’t do it with Client as with User. Because IdentityDbContext can take different supported types but here that doesn’t seems possible with ConfigurationDbContext.
IdentityDbContext<TUser, IdentityRole, string, IdentityUserLogin, IdentityUserRole, IdentityUserClaim>
thanks for the stackoverflow link, will check with that how we can pass custom properties as ClientProperties.
Thanks
This is really an amazing articles, tons of information, plus you made it so easier to understand the Identityserver more than how IdentityServer explained it themselves!
Really so helpful, I just have couple more questions if you don’t mind:-
1- for admin operations like adding a new clients or modifying existing ones, do you recommend completely diff application that connect to the same database or just add the admin features within the IdentityServer project ?
2- for the identity users do you recommend to be in the same database related to the IdentityServer or in the client application of the IdentityServer ?
3- If decided to move the IdentityServer to production, is there any recommendations ?
Thank you for all your amazing articles
Hello Khaled, thanks a lot for the kind words. Regarding your questions:
1) You can do what ever you like, but if your admin page has a couple of features, maybe you can just add a few more views in the IS4 project.
2) You can implement the user management inside the IS4 project, but I would definitely use a different database. We did that in our IdentityServer4 Security book
3) Just to pay attention that IS4 is now transferred to Duende project, which is no free of charge 🙂 The implementation is the same tough.
Marinko,
Thanks again, Really appreciate your quick response and answering all the questions !
btw I love this web site, I love that you give the best practice production level of experience about each topic
Keep up the great work
Regards,
Khaled Dehia
You are most welcome. And one more time, thanks a lot for the kind words, it means a lot to us.
What would be the best way to evolve the IS4 Config in production, after the first seed has already been performed?
Let’s say I’ll need to add more and more clients, scopes, resources etc.
I can’t trash everything and reseed them (due to foreign keys etc.).
I can’t use migrations, because the data seeding method is called after Migrate(), so migrations can’t refer to FKs that haven’t been seeded yet..
I’m sure I’m missing something here 🙂
Great series and very helpful. I found it much better than IdendityServer’s own examples and documentation. The only thing missing is how to use the data that was migrated, such as the clients, instead of the in memory configurations.
Hello Marc. Thanks a lot for reading our series and for the comment as well. Related to your suggestion, we basically like to keep our in memory config class with the database, so everything could be retreived from the in-memory class. But, if you want to query the database, you can just inject the ConfigurationDbContext as you would do with the custom DbContext class and query the DbSet properties (Clients etc.) from it.
Actually, I got it working. I don’t know why, but none of the data from the in memory config had been migrated into the database. I’m pretty sure I ran it last week, but I was doing this on Friday. Maybe I was more focused on the weekend ahead and didn’t actually run it.
When using the in memory configuration though, the clients are hard coded, which means a recompile is necessary when adding new clients, or am I missing something?
You are right. If you modify the configuration, you should delete the db and start the app. But this can me modified, if you just modify the MigrationManager class.