

In this section, we are going to cover Migrations and Seed data features in Entity Framework Core.
In the previous parts of this series, we have created the database model (entity and context classes) and applied different configuration options. Now it is time to transfer this database model to the real database in the SQL server. Our SQL database schema needs to be aligned with our application’s database model and using migrations will help us keep things that way.
EF Core provides a method called Migrate to execute migration actions for us. All we have to do is to create model classes, and a context class, apply configuration (which we already did) and create and execute migrations with the set of simple commands.

VIDEO: Migrations and Seed Data with Entity Framework Core.
To see all the basic instructions and complete navigation for this series, visit Entity Framework Core with ASP.NET Core Tutorial.
Let’s dive in.
What is Migration in EF Core?
Using migrations is a standard way to create and update a database with Entity Framework Core. The migration process has two steps: Creating migration and Applying migration. As we already said, our database schema must be aligned with the database model and every change in a database model needs to be migrated to the database itself.
Those changes might for example be:
- Changes in the properties of the model class
- Configuration changes
- Adding or removing the
DbSet<T>properties from the context class
From ASP.NET Core 3.0, EF Core tools required for migrations are not preinstalled. Therefore, we have to install the Microsoft.EntityFrameworkCore.Tools library. If you are following this series from the start, then you already have the Microsoft.EntityFrameworkCore library installed.
Creating and Applying Migrations in EF Core
To create a migration, we can use Visual Studio’s Package Manager Console window or the command window (Windows command prompt). For the PMC window, the command is:
Add-Migration MigrationName [options]
Or through the dotnet CLI:
dotnet ef migrations add MigrationName [options]
In our application, we are going to use the PMC, so let’s do that by typing:
PM> Add-Migration InitialMigration
After we press the Enter key, our migration will be completed.
Actions that Take Place Behind the Scene
After we execute the Add-Migration command EF Core does several things behind the scenes to prepare our migration. The first thing it does is inspect our class, associated entity classes (in this case only the Student class), and any configuration we applied. After that, it creates three different files in the Migrations folder:
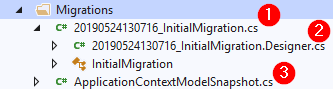
The ApplicationContextModelSnapshot.cs file holds the model of the database and it is updated every time a new migration is added. The other two files: InitialMigration and InitialMigration.Designer are files that contain and describe the newly created migration.
So, if you have followed all the steps from the previous articles, the content of the InitialMigration file should look like this:
public partial class InitialMigration : Migration
{
    protected override void Up(MigrationBuilder migrationBuilder)
    {
        migrationBuilder.CreateTable(
            name: "Student",
            columns: table => new
            {
                StudentId = table.Column<Guid>(nullable: false),
                Name = table.Column<string>(maxLength: 50, nullable: false),
                Age = table.Column<int>(nullable: true),
                IsRegularStudent = table.Column<bool>(nullable: false, defaultValue: true)
            },
            constraints: table =>
            {
                table.PrimaryKey("PK_Student", x => x.StudentId);
            });
    }

    protected override void Down(MigrationBuilder migrationBuilder)
    {
        migrationBuilder.DropTable(
            name: "Student");
    }
}
This file has two methods conveniently named Up() and Down. The Up() method consists of commands that will be executed when we apply this migration. As an opposite action, the Down() method will execute commands when we remove this migration (in this case it will just drop this created table).
Applying Created Migration
After we have successfully created our migration, we have to apply it for changes to take effect in the database. There are several ways of applying migrations (Using SQL scripts, using Database.Migrate method, or using command line methods), and as we did with the creation, we are going to use the command line methods approach.
For the Package Manager Console, the command is :
Update-Database [options]
For the command prompt window, the command is:
dotnet ef database update [options]
Since we already decided on PMC, let’s open the PMC window and execute the command:
PM> Update-Database
After we press the Enter key, we are going to see all the different actions EF Core does for us to apply created migration. As a result, we are going to have our Student table created with all the provided configuration from the previous articles:
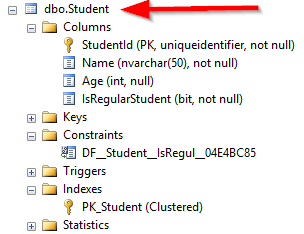
There are few more important facts we have to know about EF Core’s migrations. If we inspect our database, we are going to find another created table: _EFMigrationsHistory. EF Core uses this table to track all the applied migrations. So, this means that if we create another migration in our code and apply it, EF Core will apply only the newly created migration.
But how does EF Core know what migration needs to be applied?
Well, it stores a unique Id in the _EFMigrationsHistory, which is a unique name of the migration file created with the migration, and never executes files with the same name again:

Each migration is applied within an SQL transaction, which means that whole migration either succeeds or fails. If we have multiple migrations to apply, then they will be applied in the exact order they are created.
Adding a Custom Code in a Migration File
We have already explained the purpose of the Up() and Down() methods in our InitialMigration file. But all the code in those methods is generated by EF Core. If needed, we can add our custom code, too. We can use the MigrationBuilder parameter to access the broad range of methods that can help us in the process. One of those methods is the Sql method that we can use to add the custom code we like.
So, let’s open the InitialMigration class and modify it by adding our custom code:
public partial class InitialMigration : Migration
{
    protected override void Up(MigrationBuilder migrationBuilder)
    {
        migrationBuilder.CreateTable(
            name: "Student",
            columns: table => new
            {
                StudentId = table.Column<Guid>(nullable: false),
                Name = table.Column<string>(maxLength: 50, nullable: false),
                Age = table.Column<int>(nullable: true),
                IsRegularStudent = table.Column<bool>(nullable: false, defaultValue: true)
            },
            constraints: table =>
            {
                table.PrimaryKey("PK_Student", x => x.StudentId);
            });

        migrationBuilder.Sql(@"CREATE PROCEDURE MyCustomProcedure
                               AS
                               SELECT * FROM Student");
    }

    protected override void Down(MigrationBuilder migrationBuilder)
    {
        migrationBuilder.DropTable(
            name: "Student");

        migrationBuilder.Sql(@"DROP PROCEDURE MyCustomProcedure");
    }
}
We should make sure to have the SQL method in the Down() method to execute the opposite actions if we decide to remove our migration.
Now, we can delete our database (just to simulate the initial state in the SQL server) and only apply our migration again (we don’t need to create it, it is already created).
Creating Migration if Entities and Dbcontext Files are in a Separate Project
Right now, our model and context classes are in the main project together with the migration files. But in many real-life projects, models and context classes are in a separate project (repository pattern might be one of the reasons for example). For such projects, executing migrations couldn’t be possible with the setup we have in our project.
Let’s try to demonstrate what we mean.
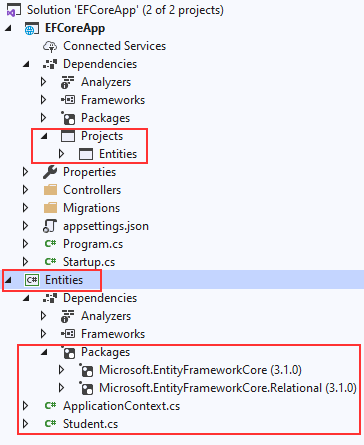
The first thing to do is to create another .NET Core Class Library project and name it Entities and install Microsoft.EntityFrameworkCore and Microsoft.EntityFrameworkCore.Relational packages via NuGet Package Manager or PMC window:
PM> Install-Package Microsoft.EntityFrameworkCore
PM>Install-Package Microsoft.EntityFrameworkCore.Relational
Then we need to add the reference to the Entities project in our main project.
After that, let’s copy the ApplicationContext and the Student classes, paste them in the Entities project and remove the Entities folder from the main project. Our structure should look like this:
As soon as we do that, we need to change the namespace in the ApplicationContext and Student classes from EFCoreApp.Entities to just Entities. Furthermore, we have to do the same thing for the using directives in the Startup class and in all three migration files.
Having done all that, our project should build successfully.
Adding a New Migration
Now we can try to add another migration by typing:
PM> Add-Migration TestMigrationFromSeparateProject
But, as soon as we hit the Enter key, we are going to get an error message which explains that our EFCoreApp project doesn’t match our migrations assembly Entities. This error message is great because it provides us with an explanation of how to solve our problem.
All we have to do is to change our migrations assembly, so let’s do exactly that in the Startup class:
public void ConfigureServices(IServiceCollection services)
{
    services.AddDbContext<ApplicationContext>(opts =>
        opts.UseSqlServer(Configuration.GetConnectionString("sqlConnection"),
            options => options.MigrationsAssembly("EFCoreApp")));

    services.AddControllers();
}
For .NET 6 and above, we have to modify the Program class and use a slightly different code:
builder.Services.AddDbContext<ApplicationContext>(opts =>
        opts.UseSqlServer(Configuration.GetConnectionString("sqlConnection"),
            options => options.MigrationsAssembly("EFCoreApp")));

builder.Services.AddControllers();
Now, we can run the same command again, but this time it will execute successfully. We have successfully created our new migration along with the migration files in the Migrations folder:
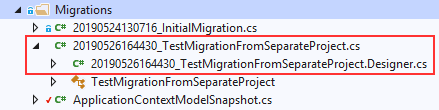
We can see that the TestMigration file has no code in the Up() and Down() methods, and this is normal because we didn’t change anything, but we completed our required task.
Removing a Migration
We’ve learned how to create migrations from a separate project. But as a result of that, we have created an empty migration that does nothing in our database. When we create a migration that we’re not satisfied with, we can easily remove it by typing the Remove-Migration [options]command in the PMC window. So, let’s do that:
PM> Remove-Migration
After a few seconds our previous migration will be removed:

Excellent, now we can move on.
Seed Data in Entity Framework Core
In most of our projects, we want to have some initial data in the created database. So as soon as we execute our migration files to create and configure the database, we want to populate it with some initial data. This action is called Data Seeding.
We can create the code for the seeding action in the OnModelCreating method by using the ModelBuilder, as we did for the Fluent API configuration. So, let’s add a few rows into the Student table:
protected override void OnModelCreating(ModelBuilder modelBuilder)
{
    modelBuilder.Entity<Student>()
        .ToTable("Student");
    modelBuilder.Entity<Student>()
        .Property(s => s.Age)
        .IsRequired(false);
    modelBuilder.Entity<Student>()
        .Property(s => s.IsRegularStudent)
        .HasDefaultValue(true);

    modelBuilder.Entity<Student>()
        .HasData(
            new Student
            {
                Id = Guid.NewGuid(),
                Name = "John Doe",
                Age = 30
            },
            new Student
            {
                Id = Guid.NewGuid(),
                Name = "Jane Doe",
                Age = 25
            }
        );
}
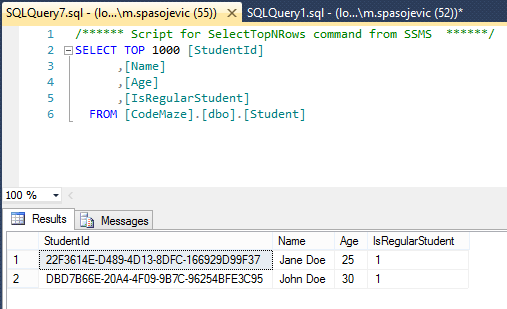
So, we are using the HasData method to inform EF Core about the data it has to seed. The rest of the code is self-explanatory because we are just adding the required data. We are not using the IsRegularStudent property because we created a configuration for that property to have a default value.
Now we can create a new migration:
PM> Add-Migration SeedInitialData
And apply it:
PM> Update-Database
We can check out our table to inspect the result:
A Better Way for Applying Configuration and Data Seed
We can place all of the configuration code inside the OnModelCreating method, and that will work as it supposed to. As we can see, our OnModelCreating method is readable and easy to maintain. But, what if we had a larger project with more classes and more data to seed? Our method would become hard to read and maintain.
EF Core provides a better way for creating a Fluent API configuration by using the IEntityTypeConfiguration<T> interface. By using it, we can divide the configuration for each entity into its own separate configuration class.
So, let’s see how to do that.
In the Entities project, we are going to create a new folder Configuration and inside a new class StudentConfiguration:
public class StudentConfiguration : IEntityTypeConfiguration<Student>
{
    public void Configure(EntityTypeBuilder<Student> builder)
    {
        throw new NotImplementedException();
    }
}
Of course, we don’t want to throw an exception (it is a default code after VS implements an interface), so, let’s modify this method:
public void Configure(EntityTypeBuilder<Student> builder)
{
    builder.ToTable("Student");
    builder.Property(s => s.Age)
        .IsRequired(false);
    builder.Property(s => s.IsRegularStudent)
        .HasDefaultValue(true);

    builder.HasData
    (
        new Student
        {
            Id = Guid.NewGuid(),
            Name = "John Doe",
            Age = 30
        },
        new Student
        {
            Id = Guid.NewGuid(),
            Name = "Jane Doe",
            Age = 25
        },
        new Student
        {
            Id = Guid.NewGuid(),
            Name = "Mike Miles",
            Age = 28
        }
    );
}
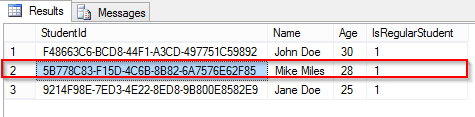
This code is a little bit different from the old OnModelCreating code because we don’t have to use .Entity<Student> part anymore. That’s because our builder object is already of type EntityTypeBuilder<Student>. We have added an additional object to insert, just to have something to create a migration for.
All we have to do is to modify the OnModelCreating method:
protected override void OnModelCreating(ModelBuilder modelBuilder)
{
    modelBuilder.ApplyConfiguration(new StudentConfiguration());
}
And that is all.
We can now add a new migration and apply it:
PM> Add-Migration AdditionalRowInserted
PM> Update-Database
Setup the Initial Migration as Soon as Applications Starts
For every created migration, we had to apply its changes manually. And this is quite okay. But when we deploy our application, it would be nice to have initial data at that moment in the database.
What would be even nicer is that we don’t have to do that manually, but to start all the required migrations and seed all the required data as soon as the application starts.
Of course, besides being useful on deployment, it helps when sharing or developing our application with other people. We would like them to start the app and execute all the migrations before the app configures.
Well, we are going to show you how to do exactly that.
Creating an Extension Method
Let’s create a new class MigrationManager in the Entities project. It is going to be a static class because we are going to create an extension method to start all the migrations at the application’s startup:
public static class MigrationManager
{
}
Let’s continue with the .NET 5 explanation first, and then we will explain the implementation for .NET6 and above.
Now, since we are working on top of the Entities class library project, we have to install Microsoft.ASPNetCore.Hosting.Abstractions library (we need this for the IHost type we are going to use in our extension method) and add the MigrateDatabase extension method to this class:
public static class MigrationManager
{
     public static IHost MigrateDatabase(this IHost host)
     {
         using (var scope = host.Services.CreateScope())
         {
             using (var appContext = scope.ServiceProvider.GetRequiredService<ApplicationContext>())
             {
                 try
                 {
                     appContext.Database.Migrate();
                 }
                 catch (Exception ex)
                 {
                     //Log errors or do anything you think it's needed
                     throw;
                 }
             }
         }

         return host;
    }
}
We are using the IHost type because this allows us to chain this method in the Program.cs file and of course, as you can see, we need it for the main logic.
In .NET 6 and above, we have a different implementation:
public static class MigrationManager
{
    public static WebApplication MigrateDatabase(this WebApplication webApp)
    {
        using (var scope = webApp.Services.CreateScope())
        {
            using (var appContext = scope.ServiceProvider.GetRequiredService<ApplicationContext>())
            {
                try
                {
                    appContext.Database.Migrate();
                }
                catch (Exception ex)
                {
                    //Log errors or do anything you think it's needed
                    throw;
                }
            }
        }

        return webApp;
    }
}
So, we are creating a service scope and using it with the ServiceProvider to obtain an instance of the ApplicationContext class. In the first article, we discussed properties contained in the DbContext class, and now, we are using one of them (Database) to call the Migrate method for migration execution.
Applying the MigrateDatabase method
The next step is to call this method in the Program.cs class:
public static void Main(string[] args)
{
    CreateWebHostBuilder(args)
        .Build()
        .MigrateDatabase()
        .Run();
}
For .NET 6, we have to modify the same class, just a bit differently:
app.MigrateDatabase();
app.Run();
Finally let’s remove the Student and _EFMigrationsHistory tables from the database and remove the stored procedure in the Programmability folder, to simulate an empty database (or just drop your database). Then, we can start our application. We are going to see logs in a console window stating that migrations are executing. After the migrations have finished their work, we can check the database to confirm that all the tables and a procedure have been created again.
Reverting and Scripting Migrations
In one of the previous sections, we learned how to remove migration if we haven’t applied it. But in the case we have, we can’t remove it just like that, we need to revert it to the specific migration.
So, to show how migration reverting works, we are going to add another row in the StudentConfiguration class, create, apply migration and then revert it back to the previous values.
Let’s first add another row to seed:
new Student
{
    Id = Guid.NewGuid(),
    Name = "TEST Name",
    Age = 100
}
Then let’s create:
PM> Add-Migration RevertTestMigration
and apply migration:
PM> Update-Database
We can see in the database that a new row has been added. But as we are not satisfied with this migration (hypothetically), let’s revert it:
PM> Update-Database AdditionalRowInserted
The AdditionalRowInserted migration was the previous one, and if we check our database now, we are going to see that it was reverted to the specific migration values.
Finally, if we want to make a SQL script of all our migrations, we can do that by typing:
PM> Script-Migration
This command will create a script file for us.
Conclusion
Excellent, we have learned a lot of different information about data migration and how to use it in various situations within EF Core.
So, to summarize, we have covered:
- How to create and apply migrations
- The way to add custom code in our migrations
- Using model and context classes from a different project for our migrations
- How to seed data and set up an initial seed as soon as the project starts
- The way to remove, revert migrations, and create script files
In the next article, we are going to learn more about the configuration of relationships in EF core.
Thanks for the article. I thought the series started with .Net Core 3.1 but the MigrationManager is .NET 5 and .NET 6?
I believe for Core 3.1 you inject ApplicationContext into the Startup Configure method and then call applicationContext.Database.Migrate().
Hi Sam. Well in this article, you have both implementations. If I can remember correctly 3.1 and 5 didn’t differ at all, both had Startup classes and you can see that implementation in this article. But also, we provided a code for .NET 6/7 if you are using new versions.
Something is wrong with options => options.MigrationsAssembly(“EFCoreApp”). That does not exist. Changing it to “Entities” also doesn’t work. Where is “EFCoreApp” coming from? Also, I think you meant “opts” instead of “options”.
Never mind, I see your project name is different than mine.
Hello sir , thank you for this post how can we seed database on startup in .net core 6 console application please .Best regards
Well, pretty much the same. Just don’t create an extension method but a regular one and call it in the Main method of the Program class.
Nice article,
Regarding remove/revert migration. Do we have an alternative way something like
<strong>Database.RevertMigration()</strong>same as<strong style="color: rgb(119, 119, 119);">Database.Migration()</strong>instead of running the command line? Because my case is to want to migrate app run time so i can’t run command line.Besides, What does the content of the
<strong>Down</strong>()method looks like in case I want to update the content of Function or Stored Procedure?In your case is creating a new on Stored Procedure, So that You’re using
<span style="background-color: rgb(117, 113, 94); color: rgb(214, 157, 133);">migrationBuilder.Sql(@"</span><span style="background-color: rgb(117, 113, 94); color: rgb(248, 248, 242);">DROP PROCEDURE MyCustomProcedure"</span><strong style="background-color: rgb(117, 113, 94); color: rgb(248, 248, 242);">)</strong><span style="background-color: rgb(117, 113, 94); color: rgb(248, 248, 242);">;</span>Thanks in advance!
Hi. For the first question you can use IMigrator interface, something like this
var migrator = scope.ServiceProvider.GetRequiredService<IMigrator>();
migrator.Migrate(“Name of migration file”);
Regarding the second question, I am not sure, maybe updating the SP to its previous state. Well, this should be the goal, so just add the code to update SP to the way it was before the migration execution.
Yeah, I have the same idea as you for the 2nd question. I’m going to add the current state in Down() method, and expected state in Up() method.
As a result, I want to have the backup plan to revert that migration if needed. So that is the reason why I asked 1st question.
Thanks for your reply @Marinko Spasojević
Nice article!
In addition to the regular seeded data (which goes to production, I also need to have a separate seeded set for QA and developers. What is the recommended practice in that case?
Hello James. For that, you will need some sort of custom logic. Maybe you can add some sort of condition inside the OnModelCreating method based on some value from the configuration, and then prepare different classes for different devs/environments… Again, this is a custom logic and it depends on your implementation. I haven’t tried it, so find this as a suggestion.
can we pull those seed data form some file like a json file or a csv file just for convenience
Well, not that I’ve ever done that. So, I am not sure about that.
thank you for your response but i found a way do to it
Excellent. You can always share the source where you’ve read more about that. It will certainly be valuable information.
Is it possible to migrate production database data to development database and viceversa using EF Core Migration?
I don’t think so. Or at least not that I know. You use migrations to transfer data from the project to the db, not the other way around.
Hello, it is a nice article, but I have a problem with migration. Please, can you help me?
it is asp.net core 5, but I did it earlier and it worked
You are probably using .net 6 but your ef core packages are still in .net 5. I had similar issue. Either update your packages to preview 6 rc 2 for now, or you can use IDesignTimeDbContextFacyory interface implementation.
But I use .net 5
It can happen if your dbcontext is in other project and you don’t specify the correct assembly. I am not sure, what is the reason. But the final solution is to use the mentioned interface. We don’t have an article abot that but you can find more info on Google.
Yes, my dbcontext is in other project like in this article. Okey, I will try, but it is strange because earlier it works on .net 5
Yes that is strange. This should be working without an issue. You can also download our source code and sompate it with yours, maybe you missed something.
Okey, thank you
Hi Manriko,
I’m stuck!
I get an error with ”
PM> dotnet ef”
It’s not installed I guess even tho I see Entity frameworkin the NuGet window!
Can I get someone to have a video chat with me so I can get this worked out?
Thanks!
Jim
[email protected]
Hello Jim. You have to install it globaly first: dotnet tool install –global dotnet-ef after that, running dotnet ef will give you required result. Those are CLI commands. If you want to work with EF Core localy, then install it via PM or NuGet in the project and follow this series of articles.
Hi Manriko,
I bought one of your courses,
I’m stuck at the seeding part and I can’t seem to figure out why,
I have the MySQL server workbench running an instance locally, and when I run: update-database on pmc i get this error:
“A network-related or instance-specific error occurred while establishing a connection to SQL Server. The server was not found or was not accessible. Verify that the instance name is correct and that SQL Server is configured to allow remote connections. (provider: Named Pipes Provider, error: 40 – Could not open a connection to SQL Server)”
How do solve this?
I have tried all examples in official microsoft docs, but none syntax seem to resolve my errors.
https://docs.microsoft.com/en-us/dotnet/framework/data/adonet/connection-string-syntax
“Persist Security Info=False;Integrated Security=true; Initial Catalog=AdventureWorks;Server=MSSQL1”
“Persist Security Info=False;Integrated Security=SSPI; database=AdventureWorks;server=(local)”
“Persist Security Info=False;Trusted_Connection=True; database=AdventureWorks;server=(local)”
Hello Landry. All of these connection strings looks like SQL connection strings not MySQL. If you have MySQL as a database, you have to modify the connection string, the way you register your dbContext class and you need to have additional library for MySQL access. Please take a look at this series https://code-maze.com/net-core-series/ . It is a DB First approach, but you will get enough info to create a connection string, register DbContext class and which library to install. The rest is the same.
Many thanks for the pointer, and you doing a great job with these tuts!
Hi Marinko, nice article, I got useful information but I have a question, what about you want to seed just when the app is running in a specific environment? I know we can inject IHostingEnvironent, but how to condition-specific migrations?
You can always use a statement like this: var env = Environment.GetEnvironmentVariable(“ASPNETCORE_ENVIRONMENT”);
The valu of the ASPNETCORE_ENVIRONMENT variable is used by IWebHostEnvironment do determine the environemnt you app is running in, so you can do the same inside the Migrate extension method. Based on the result, you can perform your actions.
Hi Marinko, thanks for your quick response, but doo I said I know I can get the environment I am working, but how do you run specific migations? For example tengo 4 migrations: modify table, modify columns, seed data, and add table. So I want to update the database with all migrations when I am en de environment, but I don’t want to migrate seed data when it is in production. How I do “appContext.Database.Migrate()” for specific migrations?
Any suggestions?
I didn’t have time to test this. So, currently, I have no suggestions.
Hi Marinko,
thank you for this very useful article.
I have a question regarding the seeding of data: what if ‘Student’ has a foreign key? How could I seed data with relations in your example?
For example, let say I have another table (e.g. ‘Exams’ with its PK). I want to keep configurations on separate classes. When I seed the data I need to know the primary key from the ‘Exams’ table before creating a new ‘Student’ record. Am I right?
How could I achieve this?
Hello Domenico. When initially seeding data, also the good practice is to have a fixed key. In this example, we had only the student entity, so we applied a random guid value for each student. But you can always instead of Guid.NewGuid use new Guid(“c9d4c053-49b6-410c-bc78-2d54a9991870”). Then you would know about guids in your related table. So, if as you say, you have Student and Evaluation tables and one student is in relation to multiple evaluations then you can write something like this:
Student configuration:
 builder.HasData

            (

                new Student

                {

                    Id = new Guid("660ed4cd-1361-4216-9faa-9636e4df681a"),

                    Name = "John Doe",

                    Age = 30

                }, . . .
And for the Evalutaion table:
builder.HasData

            (

                new Evaluation

                {

                    Id = Guid.NewGuid(),

                    Grade = 5,

                    AdditionalExplanation = "First test...",

                    StudentId = new Guid("660ed4cd-1361-4216-9faa-9636e4df681a")

                },
Please, read our other articles from the series and check their source code as well, you will see this in the example.
Hope this helps you. All the best.
Hi Marinko,
Thank you for a very useful article.
Regarding the seeding data, I notice that the StudentId GUID for the existing students have changed after the change is implemented for Mike.
Am I right to assume that this is because the seeding code is effectively generating a new GUID each time?
If I wanted to keep this data static, would it be necessary to hard code the GUID value after it has been initially generated?
Hello Stephen. You are correct. I have used
Guid.NewGuid()which generates a new value every time. If you want to hard code those values, and trust me it is a good approach as well to have initial data with the static guids, you can usenew Guid("guid goes here")expression.Thank you very much for reading this article and all the best.
Gained a lot of information, very clear and well explained.
Thanks a lot 🙂
You are welcome Sharan. I hope you will find other articles from this series or this site useful to you. All the best.