

The Get Request is something we can’t miss while creating API because it is the most common request. So, it is very important to learn more about handling that kind of request.
In the previous post, we have created a repository pattern for collecting the data from the database.
Now, it is time to use that repository for business logic.

We are going to keep all the database logic inside the repository classes. Controllers will be responsible for handling requests, model validation, and returning responses to the frontend part of the application.
By doing so, our controllers won’t be overwhelmed with the code thus making the code easier to read and maintain as well.
VIDEO: How to Hadndle GET Requests video.
If you want to see all the basic instructions and complete navigation for this series, please follow the following link: Introduction page for this tutorial.
For the previous part check out: Creating .NET Core WebApi project – Repository pattern in .NET Core
So, let’s start.
Controllers and Routing in WEB API
To create a controller, right-click on the Controllers folder inside the main project and Add/Controller. Then from the menu choose API Controller - Empty and name it OwnerController.cs:
using Microsoft.AspNetCore.Mvc;

namespace AccountOwnerServer.Controllers
{
    [Route("api/[controller]")]
    [ApiController]
    public class OwnerController : ControllerBase
    {
    }
}
Every web API controller class inherits from the ControllerBase abstract class that provides all the necessary behavior for the derived class.
Also, above the controller class we can see this part of the code:
[Route("api/[controller]")]
This represents the routing and we will talk a little bit about the routing inside Web APIs.
Web API routing routes the incoming HTTP requests to the particular action method inside the Web API controller.
There are two types of routings:
- Convention based routing and
- Attribute routing
Convention-based routing is called that way because it establishes a convention for the URL paths. The first part makes the mapping for the controller name, the second part makes the mapping for the action method, and the third part is used for the optional parameter. We can configure this type of routing in the Startup class in the Configure method:

Attribute routing uses the attributes to map the routes directly to the action methods inside the controller. Usually, we place the base route above the controller class, as you can notice in our Web API controller class. Similarly, for the specific action methods, we create their routes right above them.
GetAllOwners GET Request in .NET Core
Let’s start.
First, let’s change the base route from: [Route("api/[controller]")] to: [Route("api/owner")]. Even though the first route will work just fine, with the second example we are more specific to show that this routing should point to the OwnerController.
Now it is time to create the first action method to return all the owners from the database.
In the IOwnerRepository interface create a definition for theGetAllOwners method :
public interface IOwnerRepository
{
    IEnumerable<Owner> GetAllOwners();
}
Then implement that interface inside the OwnerRepository class:
namespace Repository
{
    public class OwnerRepository : RepositoryBase<Owner>, IOwnerRepository
    {
        public OwnerRepository(RepositoryContext repositoryContext)
            :base(repositoryContext)
        {
        }

        public IEnumerable<Owner> GetAllOwners()
        {
            return FindAll()
                .OrderBy(ow => ow.Name)
                .ToList();
        }
    }
}
Finally, we need to return all the owners by using the GetAllOwners method inside the Web API action.
The purpose of the action methods, inside Web API controllers, is not only to return the results. It is the main purpose, but not the only one. You need to pay attention to the status codes of your Web API responses as well. Additionally, you’ll have to decorate your actions with the HTTP attributes which will mark the type of the HTTP request to that action.
You can read more on HTTP and find some HTTP request examples in part 1 of our HTTP series.
Finally, let’s modify the OwnerController:
using Contracts;
using Microsoft.AspNetCore.Mvc;
using System;

namespace AccountOwnerServer.Controllers
{
    [Route("api/owner")]
    [ApiController]
    public class OwnerController : ControllerBase
    {
        private ILoggerManager _logger;
        private IRepositoryWrapper _repository;

        public OwnerController(ILoggerManager logger, IRepositoryWrapper repository)
        {
            _logger = logger;
            _repository = repository;
        }

        [HttpGet]
        public IActionResult GetAllOwners()
        {
            try
            {
                var owners = _repository.Owner.GetAllOwners();

                _logger.LogInfo($"Returned all owners from database.");

                return Ok(owners);
            }
            catch (Exception ex)
            {
                _logger.LogError($"Something went wrong inside GetAllOwners action: {ex.Message}");
                return StatusCode(500, "Internal server error");
            }
        }
    }
}
Let us explain this code a bit.
First of all, we inject the logger and repository services inside the constructor. Then by decorating the GetAllOwners action with [HttpGet] attribute, we are mapping this action to the GET request. Finally, we use both injected parameters to log the messages and to get the data from the repository class.
The IActionResult interface supports using a variety of methods, which return not only the result but the status codes as well. In this situation, the OK method returns all the owners and also the status code 200 which stands for OK. If an exception occurs, we will return the internal server error with the status code 500.
You can read more about status codes by reading The HTTP series – References.
Because there is no route attribute right above the action, the route for the action GetAllOwners will be api/owner (http://localhost:5000/api/owner).
Code Permissions and Testing the Result
We would like to point out one more thing inside GetAllOwners action. Right now, if you look at the repository structure, its classes inherit from the abstract RepositoryBase<T> class and also from its own interface which then inherits from the IRepositoryBase<T> interface. With this hierarchy in place, by typing _repository.OwnerOwnerRepository class and also all of the methods from the abstract RepositoryBase<T> class.
If you want to avoid that type of behavior and to allow actions inside the controller to call only methods from the repository user classes, all you need to do is to remove IRepositoryBase<T> inheritance from IOwnerRepository. Consequently, only repository user classes will be able to call generic methods from RepositoryBase<T> class. Likewise, action methods communicate only with repository user classes.
It is all up to you, how you want to organize your code and permissions.
To check the result, we are going to use the Postman tool to send requests towards the application.
Also, you can learn more about how to consume web API programmatically using C# by reading A few great ways to consume restful api in c#.
Let’s start the application, start the Postman and create a request:
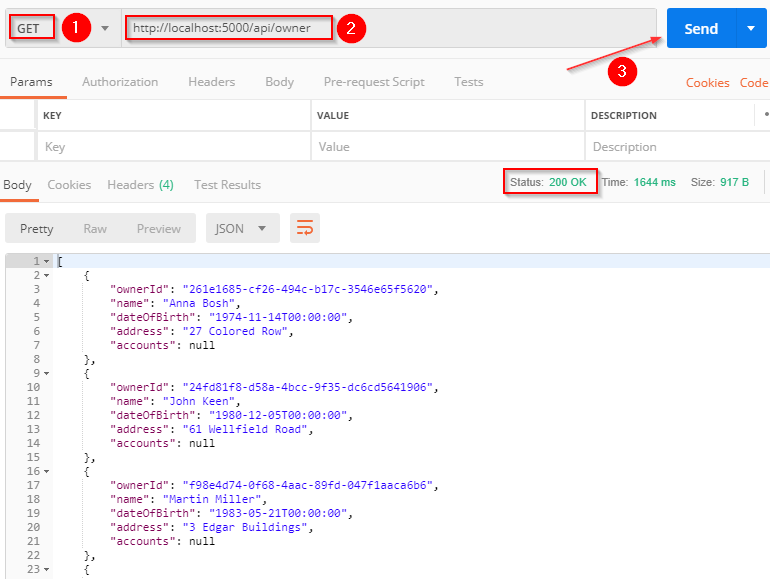
Excellent, everything is working as planned.
As you can see, we return all the data from the database with this action. Of course, you can add paging to this action and optimize it by returning only the part of the data.
Before we continue, we would like to show you one more thing. If you look at the model classes, you’ll notice that all properties have the same name as the columns they are mapped to. But you can have the property with a different name than the column it points to, and still to map each other. To achieve that you need to use attribute [Column].
So, let’s do something like that.
We are going to change the property names from AccountId and OwnerId to just Id in the Owner and Account classes. Also, we are going to add the [Column] property which will map the Id property to the right column in the database:
[Table("Account")]
public class Account
{
    [Column("AccountId")]
    public Guid Id { get; set; }

    [Required(ErrorMessage = "Date created is required")]
    public DateTime DateCreated { get; set; }

    [Required(ErrorMessage = "Account type is required")]
    public string AccountType { get; set; }

    [Required(ErrorMessage = "Owner Id is required")]
    public Guid OwnerId { get; set; }

    [ForeignKey(nameof(Owner))]
    public Guid OwnerId { get; set; }
    public Owner Owner { get; set; }
}
[Table("Owner")]
public class Owner
{
[Column("OwnerId")]
public Guid Id { get; set; }
[Required(ErrorMessage = "Name is required")]
[StringLength(60, ErrorMessage = "Name can't be longer than 60 characters")]
public string Name { get; set; }
[Required(ErrorMessage = "Date of birth is required")]
public DateTime DateOfBirth { get; set; }
[Required(ErrorMessage = "Address is required")]
[StringLength(100, ErrorMessage = "Address can not be loner then 100 characters")]
public string Address { get; set; }
public ICollection<Account> Accounts { get; set; }
}
Now let’s continue.
Using DTO and AutoMapper
DTO or Data Transfer Object serves the purpose to transfer data from the server to the client. That is exactly what are we going to use it for.
If we take a look at the GetAllOwners action, we can see that we use the model Owner class to fetch the data from the database (_repository.Owner.GetAllOwners()returns a list of Owner objects) and also to return that result to the client. And that is not a good practice. A much better practice is to have a model class to fetch the data from the database and to have a DTO class to return that result to the client. The DTO object could be exactly the same as the model object but still, it is much better to use DTO objects because if something changes in the database the model class must change but that doesn’t mean that the client wants changed results. Thus the DTO object will not change.
Having that said, let’s create a new folder DataTransferObjects in the Entities project and let’s create OwnerDto class inside:
public class OwnerDto
{
    public Guid Id { get; set; }
    public string? Name { get; set; }
    public DateTime DateOfBirth { get; set; }
    public string? Address { get; set; }
}
As you can see, we don’t have the Accounts property, because we don’t want to show that information to the client right now.
Now, all we would have to do is to map a returned list of owners from the database to the list of ownerDto. But, doing that manually is a boring job and if we have twenty or even more properties in our DTO class, it would be time-consuming as well. Luckily for us, there is a great tool that could help us a lot in the mapping process. Yes, it is AutoMapper.
Working with AutoMapper
AutoMapper is a library that helps us map different objects. To install it, we have to type this command in the Package Manager Console window:
PM> Install-Package AutoMapper.Extensions.Microsoft.DependencyInjection
After the installation, we have to register it in the Program class:
builder.Services.AddAutoMapper(typeof(Program));
Now, we have to create a mapping profile class to tell AutoMapper how to execute mapping actions. So, let’s create a new class MappingProfile in the main project and modify it:
public class MappingProfile : Profile
{
    public MappingProfile()
    {
        CreateMap<Owner, OwnerDto>();
    }
}
Finally, we can modify the OwnerController:
public class OwnerController : ControllerBase
{
    private ILoggerManager _logger;
    private IRepositoryWrapper _repository;
    private IMapper _mapper;

    public OwnerController(ILoggerManager logger, IRepositoryWrapper repository, IMapper mapper)
    {
        _logger = logger;
        _repository = repository;
        _mapper = mapper;
    }

    [HttpGet]
    public IActionResult GetAllOwners()
    {
        try
        {
            var owners = _repository.Owner.GetAllOwners();
            _logger.LogInfo($"Returned all owners from database.");

            var ownersResult = _mapper.Map<IEnumerable<OwnerDto>>(owners);
            return Ok(ownersResult);
        }
        catch (Exception ex)
        {
            _logger.LogError($"Something went wrong inside GetAllOwners action: {ex.Message}");
            return StatusCode(500, "Internal server error");
        }
    }
}
We can send the same request from Postman and we are going to get the same result (without accounts), but now, with much better implementation. AutoMapper has great capabilities and you can learn more by reading Getting Started With AutoMapper in ASP.NET Core.
GetOwnerById GET Request in .NET Core
To continue, let’s modify the IOwnerRepository interface:
public interface IOwnerRepository
{
    IEnumerable<Owner> GetAllOwners();
    Owner GetOwnerById(Guid ownerId);
}
Then, let’s implement the interface in the OwnerRepository.cs:
public Owner GetOwnerById(Guid ownerId)
{
    return FindByCondition(owner => owner.Id.Equals(ownerId))
            .FirstOrDefault();
}
Finally, let’s change the OwnerController:
[HttpGet("{id}")]
public IActionResult GetOwnerById(Guid id)
{
    try
    {
        var owner = _repository.Owner.GetOwnerById(id);

        if (owner is null)
        {
            _logger.LogError($"Owner with id: {id}, hasn't been found in db.");
            return NotFound();
        }
        else
        {
           _logger.LogInfo($"Returned owner with id: {id}");

           var ownerResult = _mapper.Map<OwnerDto>(owner);
           return Ok(ownerResult);
        }
   }
   catch (Exception ex)
   {
        _logger.LogError($"Something went wrong inside GetOwnerById action: {ex.Message}");
        return StatusCode(500, "Internal server error");
   }
}
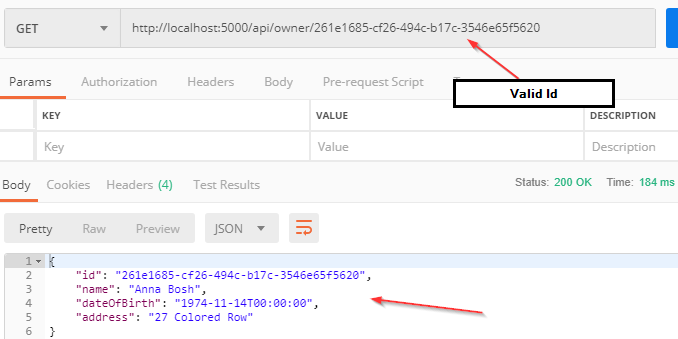
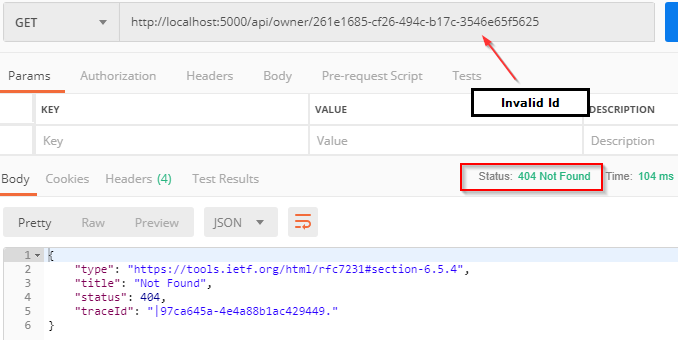
We are going to use the Postman to send valid and invalid requests to check the results:
Invalid request:
Owner Details Request
Let’s continue by creating a logic to return the owner object with its account details.
First, we need to create the AccountDto class:
public class AccountDto
{
    public Guid Id { get; set; }
    public DateTime DateCreated { get; set; }
    public string? AccountType { get; set; }
}
Then, we have to modify our OwnerDto class that will help us return the owner with all related accounts to it. If you want you can create an additional DTO class with name OwnerWithAccountsDto, but for the sake of simplicity, we are going to modify the existing DTO class:
public class OwnerDto
{
    public Guid Id { get; set; }
    public string Name { get; set; }
    public DateTime DateOfBirth { get; set; }
    public string Address { get; set; }

    public IEnumerable<AccountDto>? Accounts { get; set; }
}
Notice the property Accounts which will bind all the accounts related to the certain owner.
Let’s modify the interface accordingly:
public interface IOwnerRepository
{
    IEnumerable<Owner> GetAllOwners();
    Owner GetOwnerById(Guid ownerId);
    Owner GetOwnerWithDetails(Guid ownerId);
}
Also, let’s modify the repository class:
public Owner GetOwnerWithDetails(Guid ownerId)
{
    return FindByCondition(owner => owner.Id.Equals(ownerId))
        .Include(ac => ac.Accounts)
        .FirstOrDefault();
}
We are using the Include method to include all the accounts related to the current owner.
We have to add a new mapping rule in the MappingProfile class:
public MappingProfile()
{
    CreateMap<Owner, OwnerDto>();

    CreateMap<Account, AccountDto>();
}Finally, let’s modify the controller:
[HttpGet("{id}/account")]
public IActionResult GetOwnerWithDetails(Guid id)
{
    try
    {
        var owner = _repository.Owner.GetOwnerWithDetails(id);

        if (owner == null)
        {
            _logger.LogError($"Owner with id: {id}, hasn't been found in db.");
            return NotFound();
        }
        else
        {
            _logger.LogInfo($"Returned owner with details for id: {id}");

            var ownerResult = _mapper.Map<OwnerDto>(owner);
            return Ok(ownerResult);
        }
    }
    catch (Exception ex)
    {
        _logger.LogError($"Something went wrong inside GetOwnerWithDetails action: {ex.Message}");
        return StatusCode(500, "Internal server error");
    }
}
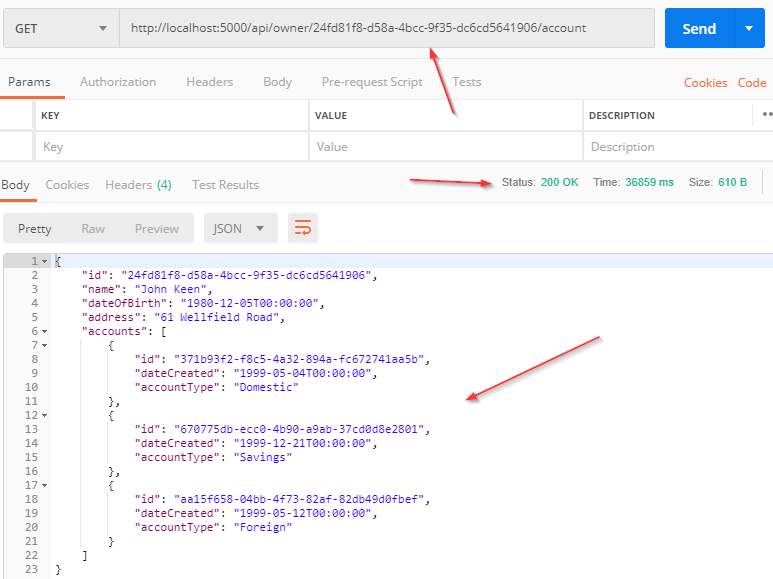
Result:
We have created these actions that use Repository Pattern logic synchronously but it could be done asynchronously as well. If you want to learn how to do that you can visit Implementing Async Repository in .NET Core. Although we strongly recommend finishing all the parts from this series for an easier understanding of the project’s business logic.
Conclusion
Requests using GET should only retrieve the data from the database, and all the actions inside the OwnerController class are written like that.
By reading this post you’ve learned:
- How to work with a controller class
- What is routing and how to use it
- How to handle GET requests in a web API
- The way to use DTOs while handling requests
Thank you all for reading and I hope you found something useful in it.
In the next article, where we are going to apply the same principles learned here to support the POST, PUT and DELETE requests in our application.
Very good article as always. Everything is clear
Thank you Borjess. I’m glad you like it.
Hi Marinko
for example api/processus/category/document
i make :
public IEnumerable<Document> GetDocuments( Guid categoryId, bool trackChanges) =>
FindByCondition(e => e.CategoryId.Equals(categoryId), trackChanges)
.OrderBy(e => e.Name)
.ToList();
or :
public IEnumerable<Document> GetDocuments(Guid processusId, Guid categoryId, bool trackChanges) =>
FindByCondition(e => e.CategoryId.Equals(categoryId), trackChanges)
.OrderBy(e => e.Name)
.ToList();
but processusId no use of it because document depend on category
please helpme or send me community of asp api core dot net6 to follow my problem and resolve it.
thanks for your help.
I must say I don’t understand the problem, and to be honest, don’t have too much spare time to dig into it more deeply. But, if you don’t need any parameter in your repository method, don’t send it. The main goal of the parent parameter is to check whether the entity with that id exists in the database because there is no sense in having a child entity in DB without the parent entity already existing in the same Db.
thanks Mr.
if you could can you give ma small code to implement find by id the basr repository interface and in the base repository
IQueryable<T> FindByCondition(Expression<Func<T, bool>> expression);
is giving null refrence exception when implemented in the repository class
public Branch GetBranchByCode(int code)
{
return FindByCondition(branch => branch.BranchCode.Equals(code))
.FirstOrDefault();
}
I can’t tell why is that. The best way to check your code is to download our source code and compare it with yours.
its almost exactly the same the only difference is that im using id instead of a guid if you want i can provide you the code for some folder you want to see
Don’t get me wrong here, but with our source code, and our data you won’t get a null reference exception, so something must be different in your code. Try debugging your code to see where exactly you get that exception. From the code you shared, all I can assume is that the BranchCode property of the branch object is maybe null. That would throw a null reference exception.
Thanks a lot! Valuable post.
You are most welcome.
Hi Marinko,
Having purchased Ultimate Asp.NET Core Web API, may I congratulate you on a fantastic book.
I am after some advice on resource hierarchy. In Part 4 of the book it recommends we should maintain resource hierarchy e.g.
/api/principalResource/{principalId}/dependentResource.
Now supposing the dependent resource is also a principal for a dependent i.e. A company has employees and employees have tasks. Would it be wise to maintain a hierarchical concept as above e.g. If we were to add a new controller to manipulate tasks for an employee
/api/companies/companyId/employees/employeeId/tasks…
Would it be wise to follow this convention?
Hello David.
First of all, thank you very much for the kind words. I am so glad you like the book.
Regarding your question, well, yes, that would be a recommended way since it follows the RESTful approach, and also as soon as you read that URI: api/companies/companyId/employees/employeeid/tasks it is obvious that you are fetching all the tasks for a single employee inside a single company. That way we achieve great readability of our URIs even though they may become a bit large.
Now, in practice, you will find a lot of different implementations. That’s because they have an agreement to keep a somehow different naming convention and also maybe those APIs are not built as public APIs.
If you are building a public API, I would always suggest following the REST naming convention since the consumer will know right away what this endpoint will get to them. At least, this is something I would do.
Would I need to apply this pattern in the Service logic i.e. if I wanted to get all tasks for a particular employee would it be feasible to check if both Company and Employee exists before getting the Tasks.
I’m questioning myself why I would need to check if a Company exists since the Task is the dependent resource of the Employee.
Therefore to get round the issue of having to supply the companyId parameter in the GetEmployee(companyId, id) repo method – I would just overload this method with GetEmployee(id) since we only need to know if the Employee exists and if it does the Company must exist.
Please correct me if I’m wrong.
By the way thank you for the excellent bonus addon to the API book “Using Dapper”.
Hello David. First of all, thank you, I am glad you like the new bonus book from our premium package.
Now, regarding your use case. By REST rules, if the employee is dependent on the company, then there is not much sense to even fetch an employee from the database since it shouldn’t exist if it is not related to any company. Therefore I would always check first if the company exists, and if not, you don’t have to move forward and fetch an employee, and then the tasks.
Relying on “if an employee exists then the company must exist” is just a theory that should be true, but you can’t know that for sure, at least I couldn’t know that until checked.
Thank you Marinko,
This now makes a lot of sense.
Hi Marinko,
First of all, thank you for your awesome article.
I have a question for you.
So… If I want to create a dynamic Where query lambda expression to get some specific Owners, for example:
IQueryable<Owner> query = _context.Owners;

if (some condition)
    query = query.Where(x => x.Address == "something");
if (another condition)
    query = query.Where(x => x.Name == "something else");

var owners = query.ToList();
How can I use the same logic for example to use FindByCondition method in OwnerRepository class?
I couldn’t found nothing related to that.
Thanks 🙂
Maybe I am missing here a point, but just use the FindByCondition method instead of Where. In the RepositoryBase class, you already have the context prepared so you don’t have to use _context.Owners – that will be prepared for you while using FindByCondition. So, just don’t execute the query with FirstOrDefault or ToList, but write:
IQueryable<Owner> ownerQueryable; if (condition) { ownerQueryable = FindByCondition(x => x.Address.Equals("something")); } else { ownerQueryable = FindByCondition(x => x.Name.Equals("Something else")); } return ownerQueryable.ToList();Thank you for your awnswer.
But in my example, I want query using both condition. So I always add new query for each condition query = query.Where(…)
I just create a new method as you can see below. But if I query both Name and DateOfBirth, ownerQueryable will be replaced to the last condition and return only DateOfBirth query.
public IEnumerable<Owner> GetOwnerByNameOrDateOfBirth(GetOwnersByNameOrDateOfBirth query)
    {
      IQueryable<Owner> ownerQueryable = FindByCondition(e => true);

      if (!string.IsNullOrEmpty(query.Name))
        ownerQueryable = FindByCondition(e => e.Name!.Contains(query.Name));
      if (query.DateOfBirth != default)
        ownerQueryable = FindByCondition(e => e.DateOfBirth == query.DateOfBirth);

      return ownerQueryable.ToList();
    }
Maybe, we need to create a dynamic lambda expression to pass as parameter in FindByCondition method.
I searched on google how to create a dynamic lambda expression Expression.Lambda<Func<T, bool>>. From my point of view it is so complicated to create and handle with a lot of if conditions.
What do you think? is there another possibility?
To be honest, it can be done, but yes, you have to play a bit with a logic. That said, IMO I would never create such a method. Your method should do one thing only and be easy for consumers to understand. So, I see no reason why you shouldn’t create two simple methods for the Name and for the BirthDate. At least this is something I would do in my projects.
Hi Sir, Thanks for this great tutorial.
I am using SQL server for this project and getting error during testing of get Api that is
“https://localhost:44393/api/owner“. In postman i got error that , its an internal server eror. When I checked it in log file, it was “ERROR Something went wrong inside GetAllOwners action: Unable to cast object of type ‘System.String’ to type ‘System.Guid’.”
Please guide me to get out of it.Thanks again.
Hello. Well, I can’t be 100% sure here, but as the error states, there is a problem with your GUID value. SQL supports GUID (uniqueidentifier) so you don’t have to use CHAR(36) as I did here.
nice
Great article simple and precise
I am pleased to get the information in the consolidated form.
Thanks a lot! Helpful information.
You are most welcome.
Hello Marinko,
Why do you return IEnumerable in GetAllOwners() anh not IQueryable ?
You use IQueryable when you fetch the data from the database. Once the data is fetched, you should use IEnumerable to have all the different options to work with on your collection.
For the AutoMapper you need to add the configuration.
Add the following code to ServiceExtensions.cs
public static void ConfigureAutoMapper(this IServiceCollection services)

        {

            var mapperConfig = new MapperConfiguration(mc =>

            {

                mc.AddProfile(new MappingProfile());

            });
IMapper mapper = mapperConfig.CreateMapper();
services.AddSingleton(mapper);
}
Then add is the Startup.cs
services.ConfigureAutoMapper();Extension method AddAutoMapper solves that for you, also you can use the Action delegate as a parameter for that method to provide configuration other then a default one, if you need it. If this was the point of the comment.
I did this in Startup.cs
services.AddAutoMapper(typeof(Startup));For some weird reason it refused to work. Any idea why?
I must say, I am not sure. Without a code it is hard to say. Did you create a separate custom Profile class that inherits from the AutoMapper’s Profile class? You can always download our source code and compare it to yours, that way you can find differences.
I did exactly what was explained in the tutorial.
I don’t doubt that at all. But many times we forget something or who knows what, so the best idea is to compare with our solution. You can run our project, it must work, so the AutoMapper registration works as well.
Same thing happened to me. Thought it was something to do with the version for automapper as installing from the pmc installed the latest one but even after changing to the used version which is 7.0.0 it still didn’t work. Did you manage to find a way out?
I realized my mistake, I was not calling CreateMap from inside the constructor of MappingProfile. I think you are doing the same.
Thanks, for this tutorial Marinko, Now I know how to configure Project with .net core web api
You are very welcome. Thank you for reading the articles.
Hi Marinko,
First of all thanks a lot for this tutorial.
While debugging the code it returned the desired list of owners but,
When I send the request in Postman as below :
http://localhost:5000/api/owner/GetAllOwners
Then, I get 400 Bad Request,
HTTP Error 400. The request hostname is invalid
What more is required to set?
What is missing?
Hi Ajay. Could you tell me why would you send such a request. If you want to get all the owners, the route is http://localhost:5000/api/owner. You don’t need the last part.
Thanks for your prompt response.
Sorry, it’s my mistake,
in below request
http://localhost:5000/api/owner
Resonse : HTTP Error 400. The request hostname is invalid
I would have to take a look at least at your controller code, I can’t tell why you have that error. Or even better, you can download our source code and try compare it with your solution.
Good post for learners.
There is some problem with Postman tool settings, it’s working perfect with Fire-fox poster and even in Fiddler.
I am really impressed with your effort
Hello, I am loving this tutorial! I have a question though – I created my domain objects and DTOs in the Entities project, created the repository classes, controllers, etc. Now I am at the part of this tutorial(part 5) where I want to get details for an object(i.e. Application, Application Details). I added the property for the ApplicationDetailDTO in the ApplicationDTO object, and when I go to create the method that returns a type of Application, adding the “.include” to include the ApplicationDetails in the ApplicationRepository class, I get an error that “Application does not contain a definition for the ApplicationDetails…”. This is true, because my domain object doesn’t have that property for the ApplicationDetails – the ApplicationDTO object does, and I would rather have my domain objects just represent their corresponding table, and have my DTOs include any related data. Is this possible? What am I doing wrong? Do I need to do the .include in the ApplicationController instead? Thank you!
Hi T Svobo. Well your ApplicationDTO has a connection to the ApplicationDetailsDTO and that’s fine because this helps automapper to map the Dtos properly. But your main entity Application must have a relation to the ApplicationDetails. Please have a look at our Owner model it heas a relation to the Account through the public ICollection Accounts { get; set; } property. When you have this, EF Core know what to include for you, and then you can map this object to the required Dto object.
Thank you! That is what I did and everything is happy now.
Well done. First time I’ve used the ‘Include’. Had to figure out the right namespace. Very handy option.
Hello, a fantastic tutorial. Thank you very much for the effort and time dedicated.
I’m going through part 5 and I have a question.
Why in the MappingProfile class do you put CreateMap (); twice?
Hi Usario. First of all, thank you a lot for reading this series and for these kind words. Secondly, thanks a lot fot that suggestion. It was my mistake, I don’t know how that happened but it did. You don’t need that extra rule, even though it will work with it, you don’t need it, you already have that one. Take care, and best regards.
Awesome tutorial, thanks it’s really helpful and informative. Just noticed a small issue though; the class definition examples of Owner and Account in this part (part 5) are incorrect. In this part, foreign key ref is in the Owner class example, and ICollection Accounts is in the Account class.
Hello Ben. Thank you very much and for the kind words and for the suggestion. It is fixed now. I assume this happend during the version transfer to 3.1, it’s my bad.
You shouldn’t be doing database access from the controllers.
This is not correct. We have entire repositroy around the database and context. Additionally, this is a small project and having a Business Layer would be just an overhead. But for the larger projects, introducing that business layer is a good approach.
Dear Marinko,
Have any article with Business Layer approach with same OwnerAccount db.
Hello Suresh. Please take a look at this one: https://code-maze.com/onion-architecture-in-aspnetcore/
Also in our Web API book, we use this architecture in a full production-ready project.
I could use some help with something a bit tangential.
Up to here, I’ve got everything working great when I run it from my IDE. But when I build an executable or try to run the dll with the dotnet command, nothing works. As much as I could see, it’s not getting the right configuration file. I mean, when I try to display the connection string from the configuration file, I get nothing.
Hello Eran, I just tried it and it is working. Build the app in VS (in debug mode) went to the project’s debug folder, opened a cmd window on that location and executed
dotnet AccountOwnerServer.dllit started my app and I was able to send a request from a browser.I followed your tutorial and wrote everything myself. I tried copying your project and everything works fine there.
But mine is not working. I did skip the logging phase as I’m mostly trying to get something working as fast as possible. Can you suggest something I might have missed or broke?
After some testing, it’s obviously reading a wrong configuration file.
The first key is ALLUSERSPROFILE and the value is C:ProgramData.
So… it’s reading the Environment Variables?
I found that the build wasn’t copying my config file to the final directory. I fixed it now and everything works great. Thanks for the tutorial! 🙂
Hi Marinko.
Another high quality article.
I am just wondering something small, that gets me mad in my project.
In your code you do
[HttpGet("{id}")]

public IActionResult GetOwnerById(Guid id)

{

  ....

}
and you can request it through `/api/owner/[guid id]`
Inside my project I have to specify `[FromRoute]` in the method signature in the params list, otherwise I get a 404 response
Am I missing some set ups?
Hello Francesco. Thank you for the kind words, I am glad that you find our articles useful. About your issue, all I can think right now is to ask have you placed the “id” parameter in the HttpGet attribute? And if you do, do the names of the parameters match (in HttpGet and in a method signature)? Other than that, you can share your code, and I will try to look at it and maybe figure it out.
Thanks for the reply and your time,
Yes, I put a matched parameter in the param list and [httpget] attribute, but for some reasons It returns me 404 if not specialized with [FroumRoute] decorator.
here is the code-sample:
// GET: api/addresses/{addressID}

[HttpGet("{addressID}")]

        public async Task GetAddress([FromRoute] int addressID)

        {

            try

            {

                var address = await _Repository.GetAddressAsync(addressID);
if (address != null)
{
return Ok(address);
}
return NotFound(new ApiError
{
Message = $"No address was found with this ID: {addressID}"
});
}
catch (Exception ex)
{
return BadRequest(new ApiError
{
Message = ex.Message
});
}
}
I think it should be something to do with
app.UseMvc()in my startup.csI am Sorry for the bad indentation but it’s pretty hard to share code through this “editor”
Hi Francesco. I see the code but can’t see anything wrong with it. But to be honest I didn’t want your code like this, but I thought if you could share your entire code via GitHub, so I could look in the Startup file as well or even download it and run it localy on my computer. It probably has something to do with the configuration in the Startup class, but it is hard to tell.
Hi Marinko, I though that you wanted the code in github, but I can’t share it. It’s the corporate’s code, I had to change it in order to share it here. Anyway I appreciated your help. I will do some checks in the startup file. Thanks for your time.
I understand. I hope you will fix it, and please if you do, share it with us here, it would be great to know what caused the issue. Best regards.
FYI – I finally figure it out!
The problem was related to other “actions” I added in some controllers. The fun part is that one of this “broken” controller was the first one I made, that’s why I decided to specify the [FromRoute] all the times.
Basically it was a routing issue, In my case I had two “routes”
*
/api/addresses/{addressID}*
/api/addresses/GetEmployeeFromAddressI know, these are not following REST principles but I needed the second URI for a specific purpose.
The problem was that this type of URI :
/api/addresses/5was recognized as the same of :
/api/addresses/GetEmployeeFromAddressbecause I did a wrong set up inside the [Http*] attributes, but specifying [FromRoute] did the work.
Said that, I was sure that this was the framework’s “default” behavior, and I kept adding [FromRoute] in the new Controllers, but actually If I remove them it works perfectly. Of course this is valid only where there is no routing double match
I hope this help someone else too!
Thanks Marinko
Thank you Francesco, for shering this with us. I am sure it will be helpful for other readers facing the same problem. All the best.
Thank you very much for very details tutorial. I have something come up to ask you.
Assume that I have two table:
AccountTbl: AccountId, AccountType, DateTime
OwnerTbl: OwnerId, AccountType(foreign key from AccountTbl), Name….
Like this:
How can I get details in the AccountTbl with Owner details in the api/owner/id/account? in postman?

If I understood you correctly, you want to fetch an account object with the related owner. If this is a case, and with tables as you have right now, you should create another accountDto object with all of account properties and a single property of type owner. Then you can create a query to fetch an account by id map it to your new dto object and fetch the owner with the same account type as the fetched one. The same thing we did with the OwnerDto, you can do with the AccountDto object.
Thank for your respond. That’s quick :love:
So then if I have 10 FK in OwnerTbl, then I need to create 10 Dto?
You are welcome. No, you don’t have to create a Dto object for each fk. You use dto objects to transfer data between your layers, so when you need one, you create it. Dto can have multiple fk’s inside, just one, or it can be the copy of the main entity with a fewer properties. As I said, when you need them yiu create them.
@Marinko Spasojević : I still dont get it. OwnerTbl has Owner ID, Account ID, however, AccountTbl doesnt has OwnerID, just account Types. OwnerTbl has FK AccountType, AccountTbl has PK AccountTypeID. How can I fetch data from AccountTbl to OwnerTbl ?
In the OwnerRepository.cs file. OwnerExtended GetOwnerWithDetails(int id).
public OwnerExtended GetOwnerWithDetails(int id) // this Id = Owner ID{
return new OwnerExtended(GetOwnerById(id))
{
Account = RepositoryContext.AccountTbl
.Where(a => a.OwnerId == id)
};
}
How can I map Account to OwnerId == id if in the accountTbl doesnt have OwnerId in it. The relationship between OwnerTbl and AccountTbl is by using FK AccountType and PK AccountTypeId @AccountTbl?
The relation is wrong. One owner has multiple accounts and this means that OwnerId field should be inside the Account table as a FK, not other way around. If you had a setup like so, than the above mentioned query would work without any problem. In your case if you have the AccountType property as a FK inside the Owner table, than you should first Fetch the owner object by Id and then find the account that matches the type inside that owner object. Or you can fetch an Account and than find the Owner object that has the account type same as the one in youf account object.
Can you explain a bit more please?
Like this, if you have an owner in a database with the Id 1 and AccountType = SomeType, in your C# you would write:
var owner = _context.Owners.SingleOrDefault(x => x.Id == 1);
With this you have the owner object with Id 1 and Type SomeType. Now you can write something like this:
var account = _context.Accounts.SingleOrDefault(a => a.Type == owner.AccountType);
That way you can connect those two objects. Finally if you have a DTO object, as I suggested in one of previous comments, you could populate that object in a same manner for sure.
Yehoo. I fixed it with your help. A thousand thank to you.
Here is complete code that I did:
public OwnerExtended GetOwnerWithDetails(int id){
var owner = RepositoryContext.OwnerTbl.SingleOrDefault(x => x.OwnerId == id);
var accountDetails = RepositoryContext.AccountTbl.SingleOrDefault(p => p.AccountId == Owner.Account);
return new OwnerExtended(GetOwnerById(id))
{
Account = RepositoryContext.AccountTbl
.Where(p => p.AccountId == accountDetails.AccountId)
};
}
—–
I want to go up one more level in this situation. Link/chain reference( Correct me if i’m wrong about naming)
WHat If account table has references from different tables. For example, OwnerTbl reference from AccountTbl, AccountTbl reference from CreatedByTbl ( I made up a scenario, that we record who created what account type). And CreatedBy reference from EmployeeId which has EmpId to show who created that account type for the Owner.) What do you think in this case.
With relational databases it is all about relationships between tables, so having relations like in your scenario is quite ok. Just don’t create EmployeeId table or CreatedBy table 😀 😀
I’m thinking about how to reuse the code. I don’t know if it is otherway to do it. Right now we have to create two obj ( owner and accountdetails. Then map them with FK. I’m thinking about the way to solve multiple FK in one main tbl, and how can we not have a lot of declarations. Any advance idea?
Honestly I see nothing wrong with the current setup. As I said in my previous comment, you have relational database and you have to have objects that are related via the foreign key attribute.
hello
when I run the project ,and put http://localhost:5000/api/owner as url in postman and send request to debug,it gives me internal server error and throws exception of invalid object owner after it passes by getallowners() in owner repository any explain?
by the way error no is 208,i haven’t mysql but have another engine and used o.UseSqlServer(connectionString) instead of
o.UseMySql(connectionString) cause i use package of .EntityFrameworkCore.SqlServer cause i don’t have mysql on my device
It is pretty hard for me to try to help you without your code. Having SQL instead of MySQL has nothing to do with that. Check the log files to see if something is written in there. Or you can post your code and share it with us, so we could analyze.
Hello guys,
Its been a long ago since my last question.
I have a code permission problem. I wish to add one more layer of inheritance between RepoBase and user classes. Is this doable?
Let me explain: the idea is to add some common methods for some tables that have common properties. Like FindByTheseCommonProperties, without need to create FindByX to each user repository class.
Edit: I have made the implementation but my code brings error at FindByCondition inside by function where: T cannot be converted to T
Hi Marinko, I’ve been following with this series and have found it incredibly useful so far. I have one issue so far.
During the final step for retrieving the Owner with their Accounts, I seem to have an empty array of accounts that doesn’t even have a closing ‘]’
i.e. It has the form:{
…..
…..
“accounts”:[
}
No errors are thrown while debugging and the logger simply states that the program returned the owner with the details as it was meant to.
Postman tells me that it is a “Bad Array” which I assume is from the missing closing bracket
I know this is an old post but any ideas on how this issue could be resolved or even an area to research myself for an answer would be appreciated. Thanks. 🙂
Hello Dan. Thank you for going along with this tutorial, I am so glad it is helpful to you. About your error, well you got me puzzled so hard here. This is the first time I see something like this (incomplete array in a response). I can suggest two things:
The first one is to download our source code and to check is there any difference between our and your project.
The second one is to send us your code, so we could test it.
I would really like to help you, but this way, it is quite hard for me to do it. If you find a solution for your problem, please write another comment with a solution, I would really like to know why this happens to you.
All the best.
Hello Marinko. Thanks for your reply.
I’ve restarted and the problem is no longer present. Reading online it seems to be a result of one of the types coming back from database not being supported in the JSON object we return within our Action method. So we return everything else but due to it not being able to be mapped completely it skips that array. Not sure what I did to cause it in your example but a fresh restart seems to have fixed it for me.
Many thanks.
Thank you for replying back. Have a great coding, all the best.
Hi Marinko! First of all, thank you very much for all these posts, they are helping me a lot! I have a question regarding this post, why don’t you inherit OwnerExtended class from Owner, instead of creating all properties again?
Hello Matias. I am so glad that you like this series and that it is useful for you. About your question, yes you can do that, it would work as well. I just wanted to show how DTO’s should look like. In this case this DTO has all the properties as the main object, but in many cases DTO’s have different objects so you have to create those properties, and that is something I wanted to show here. Again, your idea is completely valid. All the best.
Clear as water! Thanks Marinko…
What if i skip the IOwnerRepository methods, OwnerRepository implementations and handle the FindAll() method directly in the controller?
like, _repository.Candidate.FindAll()
Can you brief the use of the interface class and implementation classes here?
You can’t expose your RepositoryBase class directly in the controller, it needs to know which type it is working with, and Repository class provides that for it. Don’t change this structure in yor app or at least don’t take anything from it. If you want you can add a service layer between repo and controller part, if you have a bigger app. For the app this size, this structure is a good design (we didn’t want to make it more complicated with the service layer).
Thanks & understood. But out of curiosity i’m asking that if there is any use case where the Repository classes are used well? apart from the common methods.
Its going more interesting with the .NetCore material. Thanks for the series.
I get exception when this line of code gets executed,
return FindAll().OrderBy(em => em.Name);
Exception: entity type has composite primary key defined with data annotations
As your error states, you can’t define a composite key with data annotations. You should use the fluent api to define a composite key. Check your model, you maybe have more [Key] attributes.
Thanks a lot, worked
Hello guys I have this question which I am stuck for hours and I cannot resolve.
I am in a point where I need to expose one API for three tables that have the exact same structure and value types.
For example tables FemaleNames, MaleNames, ChildNames (Exact same DbSets properties).
Now I want to expose the URL: GET names/{gender} and from that function it should be passing the string {gender}, then the repoWrapper should return the right I{Gender}Repository property and then use the function FindByCondition.. But FindByCondition is not in the scope.
I have implemented a factory method that uses the {gender} string and withing a case returns a type of
What am I doing wrong? Is the idea wrong in the first place? I am pretty sure you have met this issue before. Also note that I need the three diffrent I{Gender}Repositories in order to attach new specific functions.
Example to understand better:
GetGenderName(string gender){
[Route("name/{gender}")]public async Task
code...
response = await _repoWrapper.GenderFactory(gender).FindByConditionAsync(expression goes here);
code...
}
I am sorry Jurgen, but I need to ask, why do you need three tables FemaleNames, MaleNames and ChildNames? Shouldn’t be better if you had only one table for example PersonalData with columns Name and Gender where in the Name column you would have all the names and in the Gender column you would have all the genders per name ? By having that structure, you would have to query only one table and then to return all the names by the gender, as your Action does already.
Ah yeah it seems unnecessary but, each table then is going to be distributed to different applications. My real case does not store actually Names but integers that correspond to a different metric type so each table has a different logic but the structure ends up the same. Pretty much i am trying to serve all by one dynamic function.Repository would solve that and would be a great example as well on the series
So I guess a factory that creates an I
Hello Jurgen. I understand what are you trying to do, though it is still a little confusing but that is just because I know a little about your project. But the idea behind the factory seams legit to me, and from your code example from the previous comment, I can see what are you trying to accomplish. Now about FindByCondition out of scope problem, it might be the problem that it is not accessible from the controller because the property return type (Interface) of the RepositoryWrapper class doesn’t have a reference towards that method (Again I’m saying this because I don’t know your implementation).
Hi @disqus_GtEeIZUUDN:disqus ,
    return new OwnerExtended(GetOwnerById(ownerId))

    {

        Accounts = RepositoryContext.Accounts

            .Where(a => a.OwnerId == ownerId)

    };
This will result in n+1 queries, where n is the number of owners. So, if you want to get all owners with accounts you will get n + 1 queries.
I’m trying to accomplish something similar:
            var jobsCategories = this.RepositoryContext.JobCategories.Select(c => new JobCategory(c)

            {

                OpenJobsCount = c.Jobs.Where(j => j.IsActive == true).Count(j => j.IsActive)

            });
So, if I have 10 categories, I get 11 queries
1st query:
SELECT c.id, c.name FROM job_categories AS c
And 1 query for each category (10 in total):
SELECT COUNT(*)::INT

FROM jobs AS j0

WHERE ((j0.is_active = TRUE) AND (j0.is_active = TRUE)) AND (@_outer_Id = j0.category_id)
While in Sql one query will do the job:
select c.id, c.name, (select count(*) from jobs as j where j.category_id = c.id AND j.is_active = true) as openJobs from job_categories as c;
So, how to accomplish this in EF Core?
Hello Hussain. You can use include to solve that, but to do that you need a navigation properties in your model classes. Our project was not created in that manner, so you can’t use it here. Here is a good article for that https://www.brentozar.com/archive/2018/07/common-entity-framework-problems-n-1/
Allt he best.
Hey Marinko. I’ve been trying for a few days to get your api tutorial to work and can’t manage it. I’m fairly new to the whole thing. I’ve reached ‘How to Handle Get Request’ and the api does build but it bounces me over to http://localhost:5000/ and promptly tells me ‘This localhost page can’t be found’. It’s probably an easy fix I can’t see. Any tips? (I have it hosted on bitbucket and can share if you provide your username).
Hello Luke. Well, it seems to me that your launchSettings.json file is not set up as we suggested in the second part of this tutorial. Please refer to that article and set the launchBrowser proberty to false. Then once you start your app it shouldn’t be starting browser at all. And once you start your API you can use the Postman to send requests, as explained in this tutorial. I hope this helps. If not, you can attach a code on your GitHub and we can check it out.
Thanks for getting back to me. I had changed it to remove the launchBrowser but re-enabled it through properties at some point. My launch settings is just:
{
“iisSettings”: {
“windowsAuthentication”: false,
“anonymousAuthentication”: true,
“iisExpress”: {
“applicationUrl”: “http://localhost:5000”,
“sslPort”: 0
}
},
“$schema”: “http://json.schemastore.org/launchsettings.json”,
“profiles”: {
“IIS Express”: {
“commandName”: “IISExpress”,
“launchBrowser”: true,
“environmentVariables”: {
“ASPNETCORE_ENVIRONMENT”: “Development”
}
},
“WebApi”: {
“commandName”: “Project”,
“environmentVariables”: {
“ASPNETCORE_ENVIRONMENT”: “Development”
},
“applicationUrl”: “http://localhost:5000”
}
}
}
I am always glad to help, after all, that’s why this tutorial is here for. Right now, you should be OK as long as you start your app as WebApi and not IIS Express, due to the fact that you still have launchBrowser on true for the IIS. All the best and keep up the hard work.
If I run it as IIS without launch browser, postman comes back with ‘could not get any response’. If I run as WebApi, postman alerts ‘could not beautify’ and returns a ‘bad array’. The first error in the console says fail: An error occurred using the connection to database ‘location’ on server ‘localhost’.
Ah, I’ve fixed it. The issue was with your use of GUID but my table using int, and also that I had included my table name as the database name in the database connectionString. The lesson I learned is to build it in the console as that showed actual errors I could troubleshoot – thanks for pointing that out. And thanks for this tutorial, it’s helping a load.
Hi Luke. Thank you for reading. I hope you can find a lot more interesting stuff on our blog related to .net core. Have a great day.
Hi Marinko,
I have a dielam. Is Guid better for the Id primary key then int, or is it just modern to use it these days?
Hello Mikara, let me share with you one answer from the StackOverflow:
https://dba.stackexchange.com/questions/264/guid-vs-int-which-is-better-as-a-primary-key
In there you will find why should you use Guids. My opinion is that for the app this small, you can use int for sure, but for the larger ones, GUID is better due to the mentioned reasons from the link above.
Thank you for your opinion.
By the way, a great website.
I didn’t think that maybe this question wasn’t for this blog but more for Stack Overflow. Anyway thanks on link too.
Best regards.
Every question is a good question, on this blog or Stack, that is not important. I just shared with you the existing answer, I could type it by my self as well 🙂 Thank you for reading our articles and we hope you will enjoy our other articles as well. Best regards.
Hi Marinko,
Great Post! I had a quick question on setting up a a grandchild table in the ‘OwnerRepository’. So if in this example ‘Accounts’ had a child table that had a List to it.
public async Task GetOwnerWithDetailsAsync(int ownerId)
{
var owner = await GetOwnerByIdAsync(ownerId);
return new OwnerExtended(owner)
{
Accounts = await RepositoryContext.Accounts
.Where(a => a.OwnerId == ownerId).ToListAsync()
// Add Nested List to the Accounts Here
};
}
Thanks again.
Adam
Hi Adam. You are right it could be done like you shown above. Of course you should try it for real but it looks all good to me. One more thing, if you create a List as navigation property inside the Accounts class then you could use Include() as well (something EF Core provides for you) or you can create AccountsExtended DTO and fill it up as we did with the OwnerExtended class.
All the best.
Hi Marinko,
Your post is always and always help ful for implementing new thing .net core as well as Angular. I follow your all article and I am able to complete the crud operation using both technology. Now I have to practise identity in my application. for this i refered lots of article, _signInManager;
each and every article provide code implementation using below code in controller level.
private readonly SignInManager
private readonly UserManager _userManager;
private readonly IConfiguration _configuration;
public AccountController(
UserManager userManager,
SignInManager signInManager,
IConfiguration configuration
)
{
_userManager = userManager;
_signInManager = signInManager;
_configuration = configuration;
}
how ever I don’t want to expose this class inside my controller, I have to provide the repository wrapper over this classes. How can provide repository wrapper over these classes. Can you guide my for this.
So That one repository class will work for my both MVC and WebApi Application.
Thanks in advance.
Omkar.
Hello omkar. If you ask me, I would leave it as it is. As you can see the SignInManager and UserManager are classes that you can already use with dependency injection, and you are using it in one maybe two places in your project, so I wouldn’t wrap it at all. It would be overload for sure. I am not saying that you can’t wrap them, but on my opinion you shouldn’t be doing that.
Very nice set of articles. I’m glad I found it now when I’m learning .Net Core. I verified my knowledge and also found some nice techniques and good practises to use. Maybe I’m nibbling but I would remove that ‘else’ statement in your controllers since there’s return in ‘if’, which means ‘else’ is just waste of code. Anyway I appreciate this article and I’m waiting for more ^^
Hello Queary. Thank you very much for reading our articles and for your comment as well. About your suggestion, it is just a coding style. Obviously you like guards and I like to close my if statements as much as I can. Either way is correct (or at least I can’t find a reason why not using guards). But I stand behind that the else statement is not waste of code 😀
Thank you Queary. And you are not nibbling, but this is just a preference point. It is not a waste of code for sure. You will find a lot of developers who like having the else statement before just guards (single if statements). But, anyhow, you are not wrong. Your approach would work too 😀 😀 Thanks for the comment.
Hello Sauce. First of all, I am really glad that you have found this useful to you and that you learned a lot. It is always a pleasure to read something like that. I am sorry for the late response, but the time difference did its thing. Now, about your problem. I have created an updated version of the project and you can find it here:
https://github.com/CodeMazeBlog/.NET-Core-Series/tree/master/Part%205%20-%20Update%20-%20OwnersByName
This error message says something to me but I am sure we would spend much more time on solving the problem that I have spent by just extending my project. So please visit the link and you are going to find updated project OwnersByName. All I did was: Update IOwner interface, then modified the OwnerRepository class and finally modified the OwnerController. Now you can see how I did it and where you made mistake. And don’t worry, mistakes are good. I made a ton of it while writing all my projects. You learn better with your mistakes, so just keep it going with hard work and the progress will come on its own.
One more time, thank you so much for reading the posts and if you like it you may subscribe so you could be informed whenever a new article goes live.
All the best mate.
Thanks a lot! Great insights.
Hi Collins K. Thank you a lot for reading and posting this comment. I am very glad that you found it useful. All the best mate.