

As we saw in the previous article, the .razor file consists of an HTML and C# code in the same file. But if we want, we can split this file into two files, one for the HTML logic and another one for the C# logic. So, in this article, we are going to learn how to use Partial Classes to split the .razor file, and additionally, we are going to talk about using the RenderFragment parameters to send content to the component. Finally, we have to mention the lifecycle in the Blazor WebAssembly applications.
That said, we are going to explain different lifecycle methods we can use while developing a Blazor application.
For the complete navigation for this series, you can visit the Blazor Series page.

Let’s get going.
Blazor Partial Classes Implementation
With the .NET Core 3.1 framework, we can separate our .razor file into two separate (but still connected) files. To accomplish that, we have to add a new class to the .razor file. Let’s use the Home.razor file for this example.
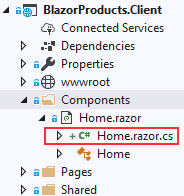
If we inspect this file, we can see the C# logic in the @code part. This is a small file and having both parts in the same file is not an issue at all. But as our projects grow, we are ending up with more and more HTML and C# logic and that can become hard to read and maintain. So, it is good practice to separate these two parts. To do that, we have to create a new class in the Component folder and name it Home.razor.cs:
As we can see, Visual Studio attaches this file to the Home.razor file. But, if we inspect our new class, we are going to see an error. That’s because this new class has to be a partial one. So, let’s add a partial keyword:
public partial class Home
{
}
Now, we can open the Home component file, and cut all the code from the @code section and remove the @code directive:
<div style="text-align:center">
    <h1 style="color: @Color">
        @Title
    </h1>
    <p>
        Feel free to
        <a href="https://www.redbubble.com/people/vpecanac/works/44764889-code-maze-merch?asc=u" target="_blank">visit our shop</a>
        any time you want.
    </p>
    <p>
        <img @attributes="AdditionalAttributes" class="img-fluid" />
    </p>
</div>
And finally, paste the code in the Home class:
public partial class Home
{
    [Parameter]
    public string Title { get; set; }

    [Parameter(CaptureUnmatchedValues = true)]
    public Dictionary<string, object> AdditionalAttributes { get; set; }

    [CascadingParameter]
    public string Color { get; set; }
}
Of course, we have to add the using Microsoft.AspNetCore.Components statement to remove all the attribute errors.
Excellent.
If we build and run our application, everything should work as it supposed to, without a single problem.
One more thing. We can use multiple partial classes if we need them. The important part is to name them differently, for example, Home.razor.data.cs, Home.razor.internal.cs etc. Of course, all of these files have to be partial.
Using RenderFragment Parameters in Blazor WebAssembly
In addition to sending parameters to the component, we can send the content as well. This is very useful when we have an HTML markup that we want to use inside the component. It is a bad solution trying to send the HTML code through the parameters to the component because it would be so hard to maintain and it is not readable at all. The better solution is to use RenderFragment.
Let’s see, how we can use the RenderFragment parameter in our Home component.
The first thing we are going to do is to modify the Home class:
public partial class Home
{
    [Parameter]
    public string Title { get; set; }

    [Parameter(CaptureUnmatchedValues = true)]
    public Dictionary<string, object> AdditionalAttributes { get; set; }

    [CascadingParameter]
    public string Color { get; set; }

    [Parameter]
    public RenderFragment ChildContent { get; set; }
}
So, there is another property of type RenderFragment and we decorate it with the [Parameter] attribute. The Blazor will use this property to attach embedded content. This content may be plain text, HTML elements, or any other Blazor component.
The next thing we want to do is to modify the Home component file, by replacing the code inside the first p tag with our newly created property:
<div style="text-align:center">
    <h1 style="color: @Color">
        @Title
    </h1>
    <p>
        @ChildContent
    </p>
    <p>
        <img @attributes="AdditionalAttributes" class="img-fluid" />
    </p>
</div>
And finally, let’s modify the Index file:
@page "/"
@using BlazorProducts.Client.Components

    <Home Title="Welcome to the BlazorProducts.Client application." @attributes="AdditionalAttributes">
        Feel free to
        <a href="https://www.redbubble.com/people/vpecanac/works/44764889-code-maze-merch?asc=u" target="_blank">visit our shop</a>
        any time you want.
    </Home>

@code{
    public Dictionary<string, object> AdditionalAttributes { get; set; } = new Dictionary<string, object>
    {
        { "src", "/assets/products.png" },
        { "alt", "products image for the Home component" }
    };
}
As you can see, we’ve placed the content we want to send to the component, between the open and close component tags. By doing that, we’re binding that content to the ChildContent property inside the Home component.
As soon as we do that, we can start our application and confirm that it runs as expected.
Now, we have to mention one thing here. The RenderFragment property must have the ChildContent name for this to work. So, to see this in action, let’s modify the name of the ChildContent property to the VisitShopContent in both .cs and .razor files:
public partial class Home
{
    [Parameter]
    public string Title { get; set; }

    [Parameter(CaptureUnmatchedValues = true)]
    public Dictionary<string, object> AdditionalAttributes { get; set; }

    [CascadingParameter]
    public string Color { get; set; }

    [Parameter]
    public RenderFragment VisitShopContent { get; set; }
}
<div style="text-align:center">
    <h1 style="color: @Color">
        @Title
    </h1>
    <p>
        @VisitShopContent
    </p>
    <p>
        <img @attributes="AdditionalAttributes" class="img-fluid" />
    </p>

</div>
Now, if we start our application, we don’t get any error messages, but we don’t get the content either:

To make this work, we have to explicitly specify the name of the RenderFragment property in the Index.razor file:
@page "/"
@using BlazorProducts.Client.Components

    <Home Title="Welcome to the BlazorProducts.Client application." @attributes="AdditionalAttributes">
        <VisitShopContent>
            Feel free to
            <a href="https://www.redbubble.com/people/vpecanac/works/44764889-code-maze-merch?asc=u" target="_blank">visit our shop</a>
            any time you want.
        </VisitShopContent>
    </Home>

@code{
    public Dictionary<string, object> AdditionalAttributes { get; set; } = new Dictionary<string, object>
    {
        { "src", "/assets/products.png" },
        { "alt", "products image for the Home component" }
    };
}
Now, if we start our application once again, the missing part reappears. This way, we can use multiple RenderFragment parameters for a single component.
Blazor Lifecycle Methods
Blazor has several actions that we can execute in certain stages of the application’s lifecycle. These methods can be synchronous or asynchronous. If we want to use them, we have to override them in our code. Of course, we have to use async lifecycle methods only if we have async actions in these methods.
SetParameterAsync
This method will trigger first, as soon as the component is created. All the parameters sent to the component will be stored in the ParameterView object. So, if we want to take some async actions before any parameter value is assigned to the respective properties, this is the place to do it:
public override Task SetParametersAsync(ParameterView parameters)
{
    return base.SetParametersAsync(parameters);
}
OnInitialized and OnInitializedAsync
These methods trigger as soon as the component initializes and receives all the parameters from the parent component:
protected override void OnInitialized()
{
    base.OnInitialized();
}

protected override Task OnInitializedAsync()
{
    return base.OnInitializedAsync();
}
OnParameterSet and OnParameterSetAsync
These methods trigger after the component receives its parameters and their values are assigned to their respective properties. These methods will trigger repeatedly as soon as the parameter’s value gets updated:
protected override void OnParametersSet()
{
    base.OnParametersSet();
}
protected override Task OnParametersSetAsync()
{
    return base.OnParametersSetAsync();
}
OnAfterRender and OnAfterRenderAsync
As soon as the component finishes rendering, these methods get called. We should use this stage to perform additional initialization steps using the rendered content. These methods have the firstRender parameter set to true only the first time the method executes. Every other time the value is false:
protected override void OnAfterRender(bool firstRender)
{
    base.OnAfterRender(firstRender);
}

protected override Task OnAfterRenderAsync(bool firstRender)
{
    return base.OnAfterRenderAsync(firstRender);
}
StateHasChanged
We can call this method whenever we want to notify Blazor that something has changed in our component and we want to rerender that component. For example, if want to show or hide our modal window, based on the user’s actions, we have to rerender our component every time the modal receives an order to show or hide. To see this exact example in practice, you can read our Blazor WebAssembly Forms article.
ShouldRender
We can use this method to suppress UI refreshing. This method is called each time the component is rendered. Also, no matter if we set this method to return false, the component is always initially rendered:
protected override bool ShouldRender()
{
    return base.ShouldRender();
}
Dispose
Even though this is not strictly one of Blazor’s lifecycle methods, we can use it to do something after the component is removed from its parent’s render tree. If a component implements an IDisposable interface it will execute the Dispose method as soon as we navigate away from that component:
public partial class SignalRCharts : IDisposable
{
    private HubConnection _hubConnection;

    ...

    public void Dispose()
    {
        _hubConnection.DisposeAsync();
    }
}
This is just part of the code, where we dispose of our SignalR hub connection as soon as we navigate away from our component.
Lifecycle Example
To see this in a concrete example, we are going to modify the Counter.razor file and create a new CounterPrint component. So, let’s first create a new component and modify it:
<h1>@Title</h1>

<p>Current count: @CurrentCount</p>

@code {
    [Parameter]
    public string Title { get; set; }
    [Parameter]
    public int CurrentCount { get; set; }

    protected override void OnInitialized()
    {
        Console.WriteLine($"OnInitialized => Title: {Title}, CurrentCount: {CurrentCount}");
    }

    protected override void OnParametersSet()
    {
    	Console.WriteLine($"OnParameterSet => Title: {Title}, CurrentCount: {CurrentCount}");
    }

    protected override void OnAfterRender(bool firstRender)
    {
        if(firstRender)
        {
            Console.WriteLine("This is the first render of the component");
        }
    }

    protected override bool ShouldRender()
    {
        return true;
    }
}
So, we have two parameters and our lifecycle methods that print some output to the console.
Now, let’s modify the Counter.razor file:
@page "/counter"

<CounterPrint CurrentCount="currentCount" Title="Counter" />

<button class="btn btn-primary" @onclick="IncrementCount">Click me</button>

@code {
    private int currentCount = 0;

    private void IncrementCount()
    {
        currentCount++;
    }
}
As you can see, we are using our new component here and pass the Title and the CurrentCountvalues to it. The CurrentCount increments every time we click the Click me button. Also, since we’ve created the new component inside the Components folder, we can add the using directive inside the Imports.razor file, and remove the same using directive from the Index.razor file.
Now, let’s start the application open the developer console window, and navigate to the Counter page:

We can see that on initial load all three lifecycle methods trigger and we can confirm this is the first render. But as soon as we click the Click me button:
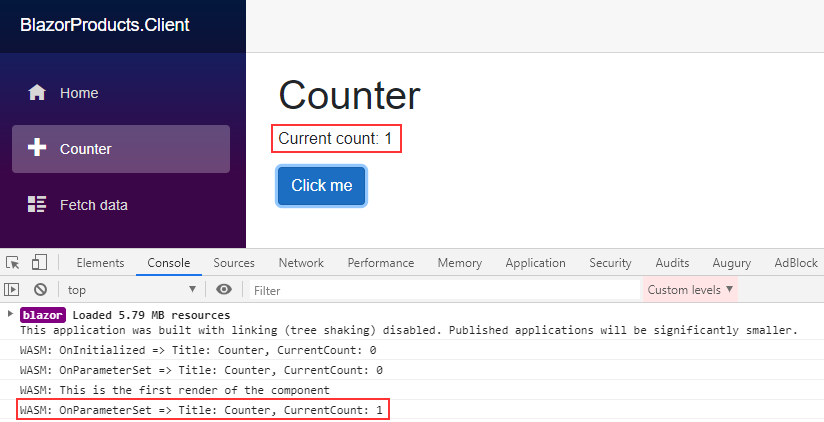
Only the OnParameterSet method triggers because the CurrentCount parameter is updated. Of course, we can confirm this is not the first render anymore. Additionally, the current count in the UI is updated from 0 to 1.
Now, let’s stop the application, and modify the CounterPrint component by returning false in the ShouldRender method:
protected override bool ShouldRender()
{
    return false;
}
We can start the application again, press F12, navigate to the counter and press the Click me button:
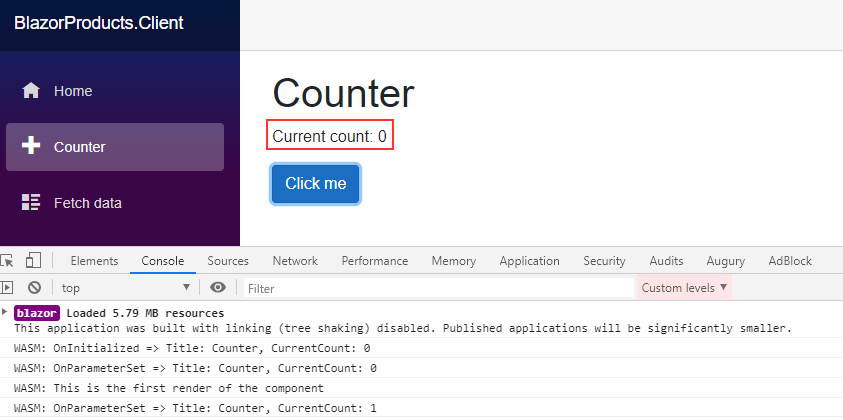
This time the UI doesn’t update the current count value and thus we can see how to control the render actions on our pages.
Conclusion
In this article, we have learned:
- How to use partial classes to separate the C# and HTML logic in a component
- How to use RenderFragment parameters to pass dynamic content to the component
- About lifecycle methods and their execution in the Blazor application
In the next article, we are going to talk about Routing and how to navigate to different pages.