
So far in this series, we’ve gone through a lot of different concepts and learned a thing or two about Docker. We’ve learned how powerful it can be and how to build and run images in several different ways. We dockerized our ASP.NET Core application and added MySQL image to it using Docker Compose. We had to clear some air around concepts like repositories and registries and learned how to set up and push to our own registry.
All the things we have learned up till now led to this exact moment. Now we need to tie everything up in a neat little bundle of joy and connect our containerized application to the continuous integration server.
Docker revolutionized the way we think about developing applications, but at the same time, it improved the entire continuous delivery lifecycle. We can deploy applications easier than ever and that’s all because of the power of Docker.

In this part, we’re going to learn why we need CI in our lives, what makes a good CI tool, install TeamCity using Docker and prepare our continuous integration environment. In the end, we are going to run the whole process to see what we have accomplished.
The starting point for this part is the docker-series-local-registry-end branch of the docker-series repo on our GitHub.
Here are some of the things we are going to learn in this part:
- Why do we do Continuous Integration
- What Makes a Modern CI Tool and Which One We’re Going to Use
- Installing TeamCity
- Building and Running our App with TeamCity
- The Final Result
Why Do We Do Continuous Integration?
If you are still not sure why we need to do continuous integration, I suggest you read through our article about continuous integration and its importance.
Simply put, continuous integration is a process that helps us find problems in our applications sooner than later. When we develop an application locally on your machine, the environment is configured to your needs and “polluted” with a lot of different libraries, SDKs, and whatnot, and that’s not the ideal environment to test if we want a production-ready application.
We’ve all heard the expression “But it works on my machine!”.

That’s what continuous integration is all about. It needs to work on every machine!
Now that we clarified that, let’s move on.
What Makes a Modern CI Tool and Which One We’re Going to Use
There are a lot of excellent CI tools out there. Some are here for a long time (in terms of IT), and some are relatively fresh. It’s a bit redundant to say that a modern CI tool must be fast, user-friendly and flexible since those are the features we already expect out of the box.
To stay on top of the game, every tool needs to follow the trends and integrate with the newest technologies, Docker being one of them. You can’t possibly expect any DevOps today without Docker, so it has become a key factor for a CI tool to jump on that bandwagon.
We’ve described our favorite CI tools, and all of them support Docker integration to a degree. Some of them are even made ground up around Docker.
For this article and series, our tool of choice will be TeamCity.
Why TeamCity you may ask?
As you know there are two types of CI tools. Those hosted and maintained by another company, and those that you can host yourself. TeamCity is a latter type, and that will enable us to try out all of the concepts we’ve talked about so far. That, and the fact TeamCity is a mature and excellent tool that can be used both by small teams and enterprises alike.
So if you aren’t familiar with TeamCity, I recommend you download it and try it out on your local machine first. We have an introductory article about TeamCity that can help you understand how the tool works.
Of course, you can use your own tool of choice to follow along, but it might be a bit harder since some concepts may differ between tools.
Onto the fun part.
Installing TeamCity
Hopefully, you did install and try out TeamCity on your machine before this chapter. If you haven’t and it’s your first time configuring TeamCity, you might find this chapter a bit confusing, but we’ll do our best to explain it as simple as possible.
Instead of downloading TeamCity directly from the website, we are going to use the Docker images provided by JetBrains on their official DockerHub account.
So we are going to run TeamCity Server and Agent as Docker containers. And then, we’ll use them to build and test our application by utilizing TeamCity’s Docker features.
Sounds a bit complicated, but stay with us, it’s not that bad. You’ll get what’s going on soon enough.
Pulling the Images
First things first. Let’s pull the images we need.
We’ll need a TeamCity Server, which can be found on the jetbrains/teamcity-server repo. So we are going to pull it by typing the docker pull jetbrains/teamcity-server command.
We’ll also need the TeamCity Agent, which we can acquire by pulling the official TeamCity Agent image form the jetbrains/teamcity-agent repo. So, we need to type docker pull jetbrains/teamcity-agent to pull the image to the local machine.
That’s all we need.
Creating the docker-compose.yml File
If you’ve visited the pages of the TeamCity Server and Agent, you’ve probably seen the instructions on how to run them.
It looks something like this for the server:
docker run -it --name teamcity-server-instance  \
    -v <path to data directory>:/data/teamcity_server/datadir \
    -v <path to logs directory>:/opt/teamcity/logs  \
    -p <port on host>:8111 \
    jetbrains/teamcity-server
And for the agent:
docker run -it -e SERVER_URL="<url to TeamCity server>"  \
    -v <path to agent config folder>:/data/teamcity_agent/conf  \
    jetbrains/teamcity-agent
Not that complicated, but we know the better way since we’ve learned a tool we can use when we need to run multiple containers that are connected.
Yes, the tool we’ve talked about in part 4 of the series, Docker Compose.
So let’s see how we can translate this into the compose file.
First, let’s create a new folder inside our existing Infrastructure folder and name it TeamCity. After that create a docker-compose.yml file inside it.
Now let’s add the TeamCity Server configuration first:
version: '3.1'

services:
  teamcity:
    image: jetbrains/teamcity-server:latest
    volumes:
      - teamcity-server-datadir:/data/teamcity-server/datadir
      - teamcity-server-logs:/opt/teamcity/logs
    ports:
      - 8111:8111

volumes:
  teamcity-server-datadir:
  teamcity-server-logs:
As you can see, we are telling Docker Compose to pull the
jetbrains/teamcity-server:latest image, create two volumes: one for data, and another for logs, and to expose the 8111 port so we can access the server at our http://localhost:8111 later.
Ok, that was easy.
Let’s continue on by adding the TeamCity agent to the same file:
version: '3.1'

services:
  teamcity:
    image: jetbrains/teamcity-server:latest
    volumes:
      - teamcity-server-datadir:/data/teamcity-server/datadir
      - teamcity-server-logs:/opt/teamcity/logs
    ports:
      - 8111:8111
  teamcity-agent:
    image: jetbrains/teamcity-agent:latest
    environment:
      SERVER_URL: http://teamcity:8111
    volumes:
      - teamcity-agent-conf:/data/teamcity_agent/conf
      - /var/run/docker.sock:/var/run/docker.sock

volumes:
  teamcity-server-datadir:
  teamcity-server-logs:
  teamcity-agent-conf:
So, by doing this we added the TeamCity agent to our compose file. We told Docker Compose to pull the
jetbrains/teamcity-agent:latest image, set the environment variable SERVER_URL to the URL of our TeamCity server, and then, finally, provided the volumes for agent configuration and the location of the docker.sock so that the agent can build and run Docker images.
That’s it, we successfully configured our Docker Compose.
All that is left is to run it and see if it actually works.
Running the TeamCity Server and Agent
Open your PowerShell and navigate to the /Infrastructure/TeamCity folder if you already haven’t done that.
Let’s try our luck and run spin up our containers by running the docker-compose up -d command. This should run the Server and the Agent in the background. If it’s your first time running the command it might take a while since both images need to be downloaded to your local environment first.
Now, you might run into the bug with some of the latest versions of Docker Compose and it might be something like this:
ERROR: for teamcity-agent Cannot create container for service teamcity-agent: b'Mount denied:\nThe source path "\\\\var\\\\run\\\\docker.sock:/var/run/docker.sock"\nis not a valid Windows path'
If you see this message, you can quickly fix it by setting the COMPOSE_CONVERT_WINDOWS_PATHS environment variable to something truthy in your PowerShell:
$Env:COMPOSE_CONVERT_WINDOWS_PATHS=1
After that, run the
docker-compose up -d again, and you should not have the same problem anymore.
If everything started correctly you should be able to access the TeamCity server on http://localhost:8111.
TeamCity has a pretty straightforward setup, but if you are not sure what to do, you can check out our article on setting up TeamCity to learn how to do it step-by-step.
Once you’ve finished the setup part, the only thing that remains is to authorize the TeamCity agent with the Server.:
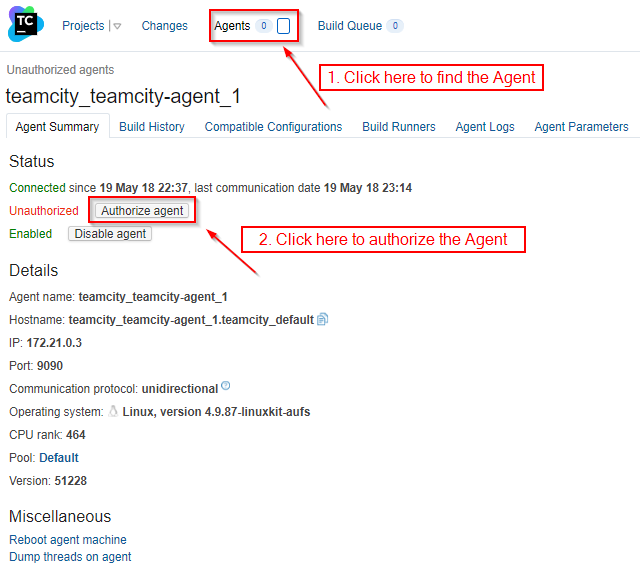
Once you click the Authorize agent button, your TeamCity Server should be ready to use.
Building and Running our App with TeamCity
To wrap this article up, we are going to set up a TeamCity project with a build configuration to pull and build our image from a local registry.
Hopefully, you still have your local registry running, if not, refer to the previous part of the series to refresh your memory on how to create it.
To start out with TeamCity, let’s set up a new TeamCity project:
You can use our repository or your own.
We’ll start out with the command line build step, and see what other options are available to us later.
To test things out we’ve put the docker version command. We’ll change it later to something more appropriate, but for now, let’s run our build and see if it actually works. Just make sure to set the branch to the right one before running the build. You can use the docker-series-docker-compose-end branch from our repo.
Let’s change the default branch:
And we’re all set to run the build. Just press the little run button at the top, and see how it goes.
If you’ve done everything correctly, you should see the docker version output in your build log:
[12:14:38]	[Step 1/1] Starting: /opt/buildagent/temp/agentTmp/custom_script6146963977557132132
[12:14:38]	[Step 1/1] in directory: /opt/buildagent/work/8e843e245d8634bd
[12:14:38]	[Step 1/1] Client:
[12:14:38]	[Step 1/1]  Version:	17.12.0-ce
[12:14:38]	[Step 1/1]  API version:	1.35
[12:14:38]	[Step 1/1]  Go version:	go1.9.2
[12:14:38]	[Step 1/1]  Git commit:	c97c6d6
[12:14:38]	[Step 1/1]  Built:	Wed Dec 27 20:11:19 2017
[12:14:38]	[Step 1/1]  OS/Arch:	linux/amd64
[12:14:38]	[Step 1/1]
[12:14:38]	[Step 1/1] Server:
[12:14:38]	[Step 1/1]  Engine:
[12:14:38]	[Step 1/1]   Version:	18.03.1-ce
[12:14:38]	[Step 1/1]   API version:	1.37 (minimum version 1.12)
[12:14:38]	[Step 1/1]   Go version:	go1.9.5
[12:14:38]	[Step 1/1]   Git commit:	9ee9f40
[12:14:38]	[Step 1/1]   Built:	Thu Apr 26 07:22:38 2018
[12:14:38]	[Step 1/1]   OS/Arch:	linux/amd64
[12:14:38]	[Step 1/1]   Experimental:	false
[12:14:38]	[Step 1/1] Process exited with code 0
Great!
Now let’s replace the docker version command with something more useful:
image="my-registry:50000/codemazeblog/accountowner:build-%build.number%"
docker build -t $image .

docker push $image
So what’s happening here?
First, we are going to set the image variable to the one we pushed to the local registry in the last post. But, not only that, we’ll add one of the predefined TeamCity variables to it, to tag each built image differently by appending :build-%build.number%. You’ll see in a minute how that works.
After that, we are going to build and tag the image with the docker build -t $image . command.
And finally, we are going to push the newly built and tagged image back to the local registry.
So, save the configuration and press the button again.
This time it should take longer to build the image, and if you look at the build log, you should see all the build steps we defined in our Dockerfile, including the tests and publishing to runtime image.
The Final Result
Once you kick off a few of those builds and try changing the project, navigate once again to the registry at http://my-registry:50000/v2/codemazeblog/accountowner/tags/list and see how it changed.
For us it looks something like this:
// 20191219180458
// http://localhost:50000/v2/codemazeblog/accountowner/tags/list

{
  "name": "codemazeblog/accountowner",
  "tags": [
    "build-3",
    "runtime"
  ]
}
And of course, there are new images on the file system since we are using local registry.
And if you’ve followed these instructions, your repo will trigger the build on every check-in, since the VCS trigger is automatically configured by the TeamCity server.
There you go, a fully functioning TeamCity powered continuous integration process, and everything thanks to Docker containers.
Conclusion
This has been a brief introduction to the Continuous Integration with Docker and TeamCity. We did everything locally, but since everything is done using Docker, this setup is easily portable to any other machine.
You could for example provision an AWS EC or GCE instance and host the entire setup there. Mind you, that in the production environments, it’s not wise to host both the TeamCity Server and TeamCity Agent on the same machine.
There are still things we need to cover, so in the next part, we are going to add some integration tests and learn how to play around with Docker Compose to trigger the build every time instead of using Docker cache. We are also going to learn how to make dependent configurations and make our own environment variable that we can use with TeamCity.
So stay tuned, a lot of good stuff coming your way!
Full source code with the modifications we made throughout this article can be found on the docker-series-ci-prepared-end branch of our docker-series repo.
Preparing for CI. I am getting this error from TeamCity when I click the run button: ‘Cannot connect to the Docker daemon at unix:///var/run/docker.sock. Is the docker daemon running?’
Any ideas?
Could you post a screenshot on where do you see this message?
Thanks for the assist. Image here:

Log:
[18:24:34]
The build is removed from the queue to be prepared for the start
[18:24:34]
Collecting changes in 1 VCS root (1s)
[18:24:36]
Starting the build on the agent “teamcity-agent1”
[18:24:36]
Updating tools for build
[18:24:36]
Clearing temporary directory: /opt/buildagent/temp/buildTmp
[18:24:36]
Publishing internal artifacts (3s)
[18:24:36]
Using vcs information from agent file: db119b91f729f5bc.xml
[18:24:36]
Checkout directory: /opt/buildagent/work/db119b91f729f5bc
[18:24:36]
Updating sources: auto checkout (on agent) (3s)
[18:24:40]
Step 1/1: Build (Command Line)
[18:24:40]
[Step 1/1] Starting: /opt/buildagent/temp/agentTmp/custom_script1745883539884273447
[18:24:40]
[Step 1/1] in directory: /opt/buildagent/work/db119b91f729f5bc
[18:24:40]
[Step 1/1] Cannot connect to the Docker daemon at unix:///var/run/docker.sock. Is the docker daemon running?
[18:24:40]
[Step 1/1] Cannot connect to the Docker daemon at unix:///var/run/docker.sock. Is the docker daemon running?
[18:24:40]
[Step 1/1] Process exited with code 1
[18:24:40]
[Step 1/1] Process exited with code 1 (Step: Build (Command Line))
[18:24:40]
[Step 1/1] Step Build (Command Line) failed
[18:24:40]
Publishing internal artifacts (5s)
[18:24:45]
Build finished
Hello,
It looks like you’re running some shell script which tries to execute a docker command on a build agent. And looks like there is no docker daemon running on the TeamCity build agent machine.
As a solution, you need to install and run docker on the build agent machine.
Also, TeamCity has a dedicated docker support.
Hope this helps,
The script is the one provided by your blog which I have followed EXACTLY. The TeamCity server & agent are on THE SAME MACHINE (a ubuntu 16.04 virtual machine). As I am interacting with TeamCity on that machine I conclude that Docker is running
Russel, I’m not the blog author, I’m a developer of TeamCity/Docker support there. So that’s why I tried to help.
And yes, kudos to the blog author 🙂
I have switched to a Ubuntu 18.04 VM running TeamCity 2018 and everything works OK. You blogs are very helpful – keep up the good work.
If someone else comes across this issue (and doesn’t understand this comment) what i did to make the tutorial work was changing the teamcity-agent in the docker-compose file from jetbrains/teamcity-agent:latest to jetbrains/teamcity-agent:2021.2-linux-sudo. and i had to add sudo before the docker command in the build script 😀
Hello,
Thanks for the article! Just in case, you may want to show usage of “Docker Build” runner which is available out of the box in TeamCity. Also, another cool thing to show is a Docker Wrapper extension which can execute your build step in the given docker image.
Thanks again 🙂
Hey Max,
Thanks for reading and suggestions!
This part is only about preparation of the environment and one small example.
Next article in the series will go into detail on how to build and the project in different ways, use environment variables and run integration tests, so stay tuned and check it out on Monday!
Cheers
Thanks 🙂
If you have any questions regarding TeamCity/Docker support, don’t hesitate to ask – I’m one of the developers there ([email protected]).
Best,
Hey thanks, I might just take you up on that offer! 😀
You’ve done a great job with Docker integration, keep it up and make it even better!