

In this article, we are going to learn how to send an email in ASP.NET Core. We are going to start with simple project creation and creating a basic email configuration. Once we are finished with that, we are going to install the required MailKit library and create the logic to send email messages from ASP.NET Core.
We are going to send email messages in ASP.NET Core synchronously and asynchronously and change the email body from plain text to pure HTML.
Finally, we are going to learn how to add attachments to the email body.

VIDEO: How to Send an Email with Attachments in ASP.NET Core.
Let’s start.
Configure an SMTP Server
We are going to start with a new ASP.NET Core Web API project. After the project creation, we are going to add the .NET Class Library project with the name EmailService. Of course, we have to add a reference to the main project:
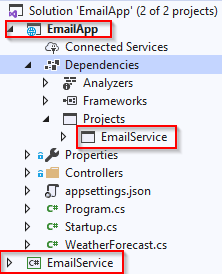
Let’s add the EmailConfiguration class inside that project:
public class EmailConfiguration
{
    public string From { get; set; }
    public string SmtpServer { get; set; }
    public int Port { get; set; }
    public string UserName { get; set; }
    public string Password { get; set; }
}
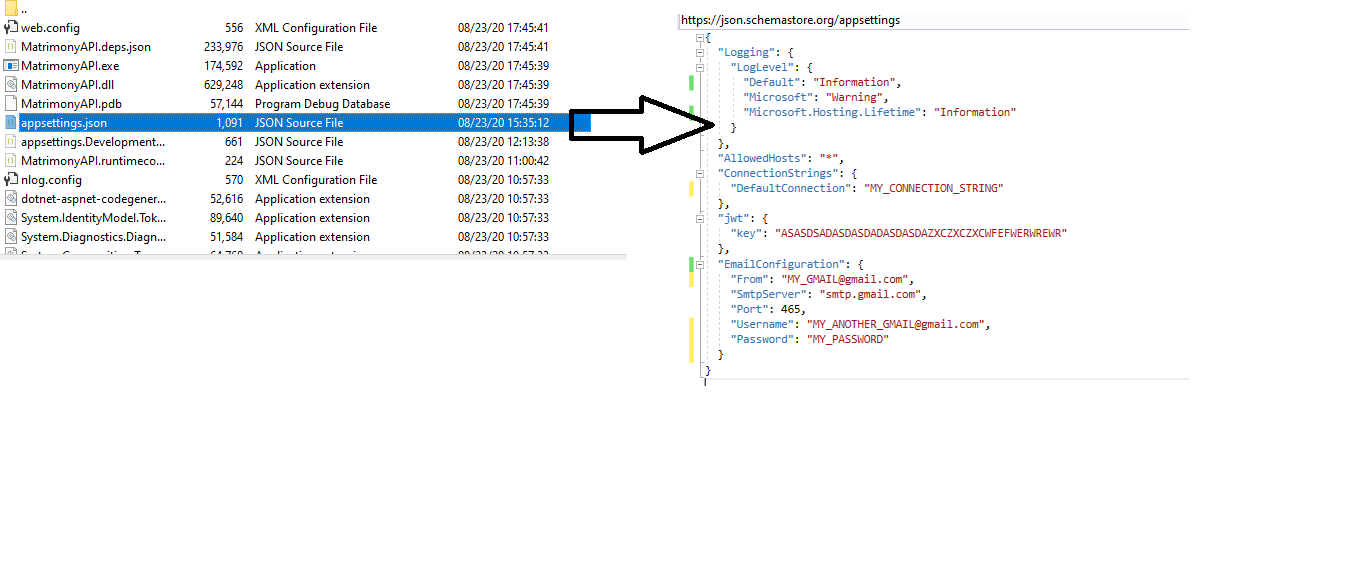
This class contains properties needed to configure sending email messages from our application. We are going to use the appsettings.json file to populate these properties, and in order to do that, we have to modify that file:
{
  "Logging": {
    "LogLevel": {
      "Default": "Information",
      "Microsoft": "Warning",
      "Microsoft.Hosting.Lifetime": "Information"
    }
  },
  "EmailConfiguration": {
    "From": "[email protected]",
    "SmtpServer": "smtp.gmail.com",
    "Port": 465,
    "Username": "[email protected]",
    "Password": "our test password"
  },
    "AllowedHosts": "*"
}
To finish with the configuration process, we are going to modify the ConfigureServices method in the Startup.cs class:
public void ConfigureServices(IServiceCollection services)
{
    var emailConfig = Configuration
        .GetSection("EmailConfiguration")
        .Get<EmailConfiguration>();
    services.AddSingleton(emailConfig);

    services.AddControllers();
}
In .NET 6, we have to modify the Program class:
var emailConfig = builder.Configuration
        .GetSection("EmailConfiguration")
        .Get<EmailConfiguration>();
builder.Services.AddSingleton(emailConfig);

builder.Services.AddControllers();
So, we extract configuration values from the appsettings file and register EmailConfiguration as a singleton. And that’s all we need to configure our email service.
How to Enable Less Secure Apps with Gmail
Starting on May 30, 2022, Google no longer supports the use of third-party apps or devices which ask you to sign in to your Google Account using only your username and password. So, we have to use a different solution for our application. To do this, we need to enable 2-step verification for our Gmail account first and then we can use the App Password feature to overcome this issue.
So, to enable 2-step verification, we have to:
- Navigate to our Google Account – the account you will send the emails from (https://myaccount.google.com/)
- In the menu on the left, we should select Security
- Then under the “Signing in to Google” section, we can see that 2-Step Verification is off – so we have to click on it
- Click Get Started, provide your password, and confirm the code by providing a mobile number
- If everything goes well, you should see the Turn On option, so just click on it
At this point, we have enabled our 2-Step verification and we can return to the Security page. There, under the same “Signing in to Google” section, we can find the App passwords option set to None.
So, we have to:
- Click on it
- Provide a password
- Click the Select app menu and choose the Other (Custom Name) option
- Now, all we have to do is to provide any name we like for our app and click the Generate button
This will generate a new password for us, which we should use in our appsettings.json file instead of our personal password.
With this in place, we are enabled again to send emails with our third-party apps.
Add the MailKit Library
Before starting any other operation in our project, we have to add the NETCore.MailKit library to the EmailService project:

This library is going to help us send the email.
The imports we’ll be using are:
using MailKit.Net.Smtp;
using MimeKit;
Send a Test Email
Next, in the same project, we are going to create a Message class:
public class Message
{
    public List<MailboxAddress> To { get; set; }
    public string Subject { get; set; }
    public string Content { get; set; }

    public Message(IEnumerable<string> to, string subject, string content)
    {
        To = new List<MailboxAddress>();

        To.AddRange(to.Select(x => new MailboxAddress(x)));
        Subject = subject;
        Content = content;
    }
}
We are going to use this class to set the data related to our email recipients, subject, and content.
Then, let’s create a new interface:
public interface IEmailSender
{
    void SendEmail(Message message);
}
And a class that implements this interface:
public class EmailSender : IEmailSender
{
    private readonly EmailConfiguration _emailConfig;

    public EmailSender(EmailConfiguration emailConfig)
    {
        _emailConfig = emailConfig;
    }

    public void SendEmail(Message message)
    {
        var emailMessage = CreateEmailMessage(message);

        Send(emailMessage);
    }
}
As you can see, we inject email configuration into EmailSender class and then we call two different methods to create an email message and to send the email respectively. Now, let’s implement those two missing methods:
private MimeMessage CreateEmailMessage(Message message)
{
    var emailMessage = new MimeMessage();
    emailMessage.From.Add(new MailboxAddress(_emailConfig.From));
    emailMessage.To.AddRange(message.To);
    emailMessage.Subject = message.Subject;
    emailMessage.Body = new TextPart(MimeKit.Text.TextFormat.Text) { Text = message.Content };

    return emailMessage;
}

private void Send(MimeMessage mailMessage)
{
    using (var client = new SmtpClient())
    {
        try
        {
            client.Connect(_emailConfig.SmtpServer, _emailConfig.Port, true);
            client.AuthenticationMechanisms.Remove("XOAUTH2");
            client.Authenticate(_emailConfig.UserName, _emailConfig.Password);

            client.Send(mailMessage);
        }
        catch
        {
            //log an error message or throw an exception or both.
            throw;
        }
        finally
        {
            client.Disconnect(true);
            client.Dispose();
        }
    }
}
Note: If you are using the newest Mailkit package, you may want to modify the .From.Add line to:
emailMessage.From.Add(new MailboxAddress("email", _emailConfig.From));
We use the first method to create an object of type MimeMessage and to configure the required properties. Then, we pass that object to the second method and use the SmtpClient class to connect to the email server, authenticate and send the email.
Just pay attention that the SmtpClient class comes from the MailKit.Net.Smtp namespace. So, you should use that one instead of System.Net.Mail.
Now, we have to register this service in the Startup.cs class if you are using .NET 5 or some of the previous versions:
services.AddScoped<IEmailSender, EmailSender>();
Or for .NET 6, we have to modify the Program class:
builder.Services.AddScoped<IEmailSender, EmailSender>();
We have one more step to do. Let’s modify the Get action in the WeatherForecastController:
[HttpGet]
public IEnumerable<WeatherForecast> Get()
{
    var rng = new Random();

    var message = new Message(new string[] { "[email protected]" }, "Test email", "This is the content from our email.");
    _emailSender.SendEmail(message);

    return Enumerable.Range(1, 5).Select(index => new WeatherForecast
    {
        Date = DateTime.Now.AddDays(index),
        TemperatureC = rng.Next(-20, 55),
        Summary = Summaries[rng.Next(Summaries.Length)]
    })
    .ToArray();
}
That’s it. Let’s test this now:

We get a 200 OK response. So, let’s check the source email server:
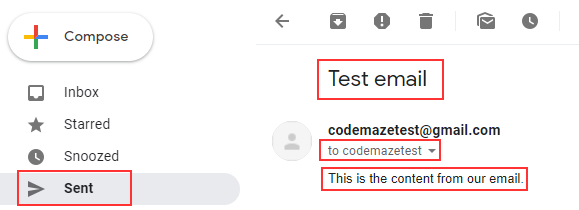
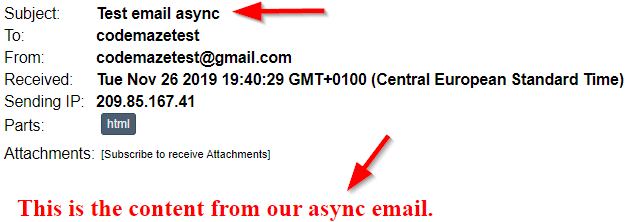
And let’s check the destination server:
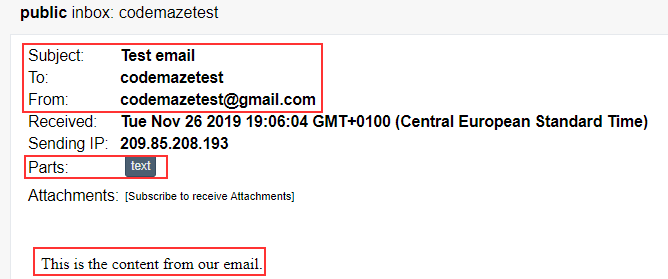
Excellent. Everything works as expected.
Using HTML in the Email Body
In the previous example, we have been using Plain Text as a body format. But we can use HTML as well with a few modifications to our code.
So, all we have to do is to modify the CreateEmailMessage method:
private MimeMessage CreateEmailMessage(Message message)
{
    var emailMessage = new MimeMessage();
    emailMessage.From.Add(new MailboxAddress(_emailConfig.From));
    emailMessage.To.AddRange(message.To);
    emailMessage.Subject = message.Subject;
    emailMessage.Body = new TextPart(MimeKit.Text.TextFormat.Html) { Text = string.Format("<h2 style='color:red;'>{0}</h2>", message.Content) };

    return emailMessage;
}
And that’s all it takes. A simple change of the body text format and the content itself.
We can try sending the same request one more time from Postman:
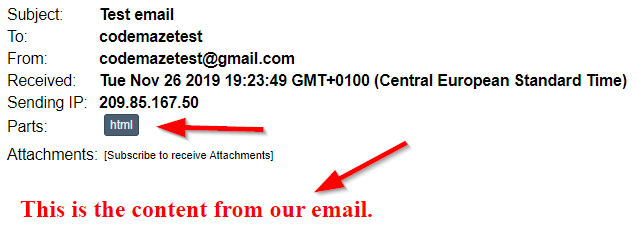
It doesn’t get any easier than that.
Sending an Email in ASP.NET Core Asynchronously
If we want to send email messages asynchronously, we have to make some changes to our project. If you are not familiar with the asynchronous programming in ASP.NET Core Web API, we strongly recommend reading our article about Asynchronous Repository Pattern in ASP.NET Core Web API.
Let’s start with the interface modification:
public interface IEmailSender
{
    void SendEmail(Message message);
    Task SendEmailAsync(Message message);
}
Next, let’s modify the EmalSender class:
public async Task SendEmailAsync(Message message)
{
    var mailMessage = CreateEmailMessage(message);

    await SendAsync(mailMessage);
}
As you can see, we use the same method to create an email message but a different method to send that email. So, we have to implement that one:
private async Task SendAsync(MimeMessage mailMessage)
{
    using (var client = new SmtpClient())
    {
        try
        {
            await client.ConnectAsync(_emailConfig.SmtpServer, _emailConfig.Port, true);
            client.AuthenticationMechanisms.Remove("XOAUTH2");
            await client.AuthenticateAsync(_emailConfig.UserName, _emailConfig.Password);

            await client.SendAsync(mailMessage);
        }
        catch
        {
            //log an error message or throw an exception, or both.
            throw;
        }
        finally
        {
            await client.DisconnectAsync(true);
            client.Dispose();
        }
    }
}
Finally, we have to modify the Get action:
[HttpGet]
public async Task<IEnumerable<WeatherForecast>> Get()
{
    var rng = new Random();

    var message = new Message(new string[] { "[email protected]" }, "Test email async", "This is the content from our async email.");
    await _emailSender.SendEmailAsync(message);

    return Enumerable.Range(1, 5).Select(index => new WeatherForecast
    {
        Date = DateTime.Now.AddDays(index),
        TemperatureC = rng.Next(-20, 55),
        Summary = Summaries[rng.Next(Summaries.Length)]
    })
    .ToArray();
}
Awesome. Now let’s try this out with the same request from Postman:
Adding File Attachments
In order to include attachments to our email messages, we have to provide a way for our app to process the attached files.
So, let’s start by adding a new POST action to our controller:
[HttpPost]
public async Task<IEnumerable<WeatherForecast>> Post()
{
    var rng = new Random();

    var files = Request.Form.Files.Any() ? Request.Form.Files : new FormFileCollection();

    var message = new Message(new string[] { "[email protected]" }, "Test mail with Attachments", "This is the content from our mail with attachments.", files);
    await _emailSender.SendEmailAsync(message);

    return Enumerable.Range(1, 5).Select(index => new WeatherForecast
    {
        Date = DateTime.Now.AddDays(index),
        TemperatureC = rng.Next(-20, 55),
        Summary = Summaries[rng.Next(Summaries.Length)]
    })
    .ToArray();
}
This action is almost the same as the previous one, but it has some important modifications. The first thing to notice is that this is a POST action. The second change is the part where we extract files from the request, if any, or return an empty file collection. The third change is related to the Message constructor, it now accepts an additional parameter.
Of course, we have to modify the Message class:
public class Message
{
    public List<MailboxAddress> To { get; set; }
    public string Subject { get; set; }
    public string Content { get; set; }

    public IFormFileCollection Attachments { get; set; }

    public Message(IEnumerable<string> to, string subject, string content, IFormFileCollection attachments)
    {
        To = new List<MailboxAddress>();

        To.AddRange(to.Select(x => new MailboxAddress(x)));
        Subject = subject;
        Content = content;
        Attachments = attachments;
    }
}
As you can see, we’ve added the additional IFormCollection parameter. Now, let’s move on to the EmailSender class:
private MimeMessage CreateEmailMessage(Message message)
{
    var emailMessage = new MimeMessage();
    emailMessage.From.Add(new MailboxAddress(_emailConfig.From));
    emailMessage.To.AddRange(message.To);
    emailMessage.Subject = message.Subject;

    var bodyBuilder = new BodyBuilder { HtmlBody = string.Format("<h2 style='color:red;'>{0}</h2>", message.Content) };

    if (message.Attachments != null && message.Attachments.Any())
    {
        byte[] fileBytes;
        foreach (var attachment in message.Attachments)
        {
            using (var ms = new MemoryStream())
            {
                attachment.CopyTo(ms);
                fileBytes = ms.ToArray();
            }

            bodyBuilder.Attachments.Add(attachment.FileName, fileBytes, ContentType.Parse(attachment.ContentType));
        }
    }

    emailMessage.Body = bodyBuilder.ToMessageBody();
    return emailMessage;
}
We now use the BodyBuilder class to create a body for the email message. Additionally, we check for the attachment files and if they exist, we convert each of them to the byte array and add it to the Attachments part from the bodyBuilder object. Finally, we convert the bodyBuilder object to the message body and return that message.
Now, before we use Postman to send a request, we are going to add the FormOptions configuration to the ConfigureServices method:
public void ConfigureServices(IServiceCollection services)
{
    var emailConfig = Configuration
        .GetSection("EmailConfiguration")
        .Get<EmailConfiguration>();
    services.AddSingleton(emailConfig);
    services.AddScoped<IEmailSender, EmailSender>();

    services.Configure<FormOptions>(o => {
        o.ValueLengthLimit = int.MaxValue;
        o.MultipartBodyLengthLimit = int.MaxValue;
        o.MemoryBufferThreshold = int.MaxValue;
    });

    services.AddControllers();
}
In .NET 6, we have to use the builder variable in the Program class:
builder.Services.Configure<FormOptions>(o => {
    o.ValueLengthLimit = int.MaxValue;
    o.MultipartBodyLengthLimit = int.MaxValue;
    o.MemoryBufferThreshold = int.MaxValue;
});
With the FormOptions configuration, we set the limit for its different properties to the maximum value.
One more thing. We have to modify the call to the Message constructor in the Get action because now it accepts four parameters.
var message = new Message(new string[] { "[email protected]" },
    "Test email async",
    "This is the content from our async email.",
    null);
To prepare a request in Postman, we have to choose the POST method option and use the form-data options to send files with the request:

And let’s inspect our email:

Excellent work.
Conclusion
We did a great job here. Now we have a fully functional Web API service that we can use in our projects to send email messages using C#.
So to sum up, we’ve learned:
- How to create a basic SMTP configuration
- The way to send email messages with plain text or an HTML body
- How to send email messages asynchronously
- How to include attachments in an email message
How would you embed an image in the email?
Hi Stuart. You can provide html content as an email’s body, so you can add an image as well there.
is it safe to store email and password directly in the code ?
It is not the safest thing to do, especially if you deploy your aap outside of your organization. You can use some env variables to store those credentials and use them in your code.
Hi everyone,
I’m using that tuto under .net7.0
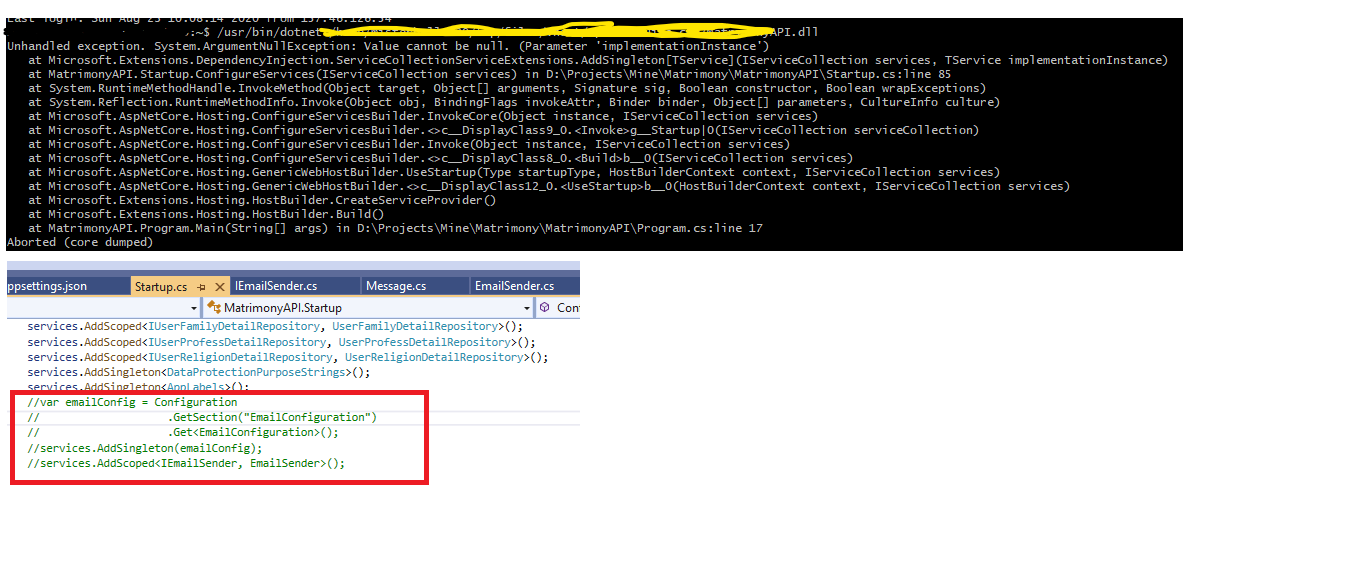
I got an error in Program.cs on the line “builder.Services.AddSingleton(emailConfig);”
and can’t figure it out.
The error message is “”type argument nullability ‘EmailService.EmailConfiguration?’ doesn’t match ‘class’ constraint.
Can you help me please ?!
Thank you
Is there any chance to download our source code and compare it to yours? I believe this would be the easiest way to find out if you missed something
Observation: Please kindly make this change for .NeT 6.
var emailConfig = builder.Configuration.GetSection(“EmailConfiguration”).Get<EmailConfiguration>();
builder.Services.AddSingleton(emailConfig);
Yeah, I missed that while updating the article. Thank you. It’s fixed now, just CTRL+F5 the page if you can’t see the change.
Thanks, one more time.
Thank you guys.
I am getting the error in Configuration in program.cs Im using .net 6
Hello. It doesn’t matter that you are using .NET 6, you shouldn.’t be having any errors. Implementation is the same and you can find .NET 6 config implementation in the article. Try comparing your solution with our source code. Program.cs is only difference in .NET 6 and it has been covered in the article.
why should i set form options to maximum
if i had requirement says that any uploaded file should not exceed 3mb
will this cause any problem while sending attachments?
Don’t set it to maximum right away. Test it with your requirements and see how it works. Then, if needed adjust the configuration.
when making the message constructor andadding the to.range function it gives an exception
mailboxaddress’ does not contain a constructor that takes 1 arguments
at the To.AddRange(to.Select(x=> new MailboxAddress(x)));
statment
In the beginning of the article, I’ve stated that in a new library version you might get this error:
Note: If you are using the newest Mailkit package, you may want to modify the
.From.Addline to:emailMessage.From.Add(new MailboxAddress(“email”, _emailConfig.From));
So, you have to do the same for your example, because you are using the same MilboxAddress constructor.
To help keep your account secure, from May 30, 2022, Google no longer supports the use of third-party apps or devices which ask you to sign in to your Google Account using only your username and password.
Please read an entire article or hard refresh it CTRL + F5 if you see the old version. I have updated an article with a new section that explains how to resolve that issue. This is a new section title How to Enable Less Secure Apps with Gmail
Hello great course thank you,
i wanted to ask about the architecture of this project?
Well it is a simple project with a single external service. You can find the source code at the top of the article (link to GitHub repo).
what are the chances you could do this tutorial in blazor?
Hello Daveg. To be honest I see no purpose in repeating the same article just for Blazor. The implementation is the same. We’ve used exactly this project (as an external service) as part of our Blazor WebAssembly video course.
Ok, I bought the course (great content!). I see that the section on consuming api with httpclient used similar coding to this, but it’s not the same project. So I am still a little vague on this and will have to do some more experimentation.
Hi Daveg. To be honest, I am a bit confused now. What this email service has with the mentioned section from the course? Wi didn’t use it there, we used this email service in the chapter 15 (user management) section for sending email messages for reset password and other functionalities. So, as I said, it was enough to include this project as an external service in the Web API project and in combination with Blazor WASM everything works great as you can see from the course.
Thanks for another well written article 👍
I would have liked to see the controller signatures taking in maybe a json object with attachments.
Wow this is a great tutorial. Question. I see that all the settings are set in the appsettings Json file. I am working with Blazor pages and was wondering if those settings can be provided in a Blazor page?
Yes, they can. You can make them as static settings on your page, but then they won’t be reusable if you need them to.
Guys with the new NuGet
NETCore.MailKit2.1.0 this is not working anymore.Can we get an update on how will it look with the new NuGet thank you so much for everything btw 🙂
Hi Darko, can you tell me what is not working. I’ve tested this with the newest MailKit and left one note in the article:
Note: If you are using the newest Mailkit package, you may want to modify the
.From.Addline to:emailMessage.From.Add(new MailboxAddress(“email”, _emailConfig.From));
You are right!.
The project was not building and was asking for 4 params but I saw the one with the name only and it works now 🙂
can you tell me how to make the CC part as well pls you guys are epicly amazing.
does this thing below is ok?
public class Message { public List<MailboxAddress> To { get; set; } = new(); public string Subject { get; set; } public string Content { get; set; } public List<MailboxAddress>? Cc { get; set; } public IFormFileCollection? Attachments { get; set; } public Message(IEnumerable<string> to, string subject, string content, IFormFileCollection? attachments, IEnumerable<string>? cc) { To.AddRange(to.Select(x => new MailboxAddress("email",x))); Subject = subject; Content = content; Attachments = attachments; if (cc is not null) { Cc = new List<MailboxAddress>(); Cc.AddRange(cc.Select(x => new MailboxAddress("cc",x))); }To be honest, I didn’t try that at all, but to me, it looks like you are on point here. Just use your CC property with the CC property of the MimeMessage when you really sending your email.
Hi,
How I can configure it to send email to Exchange Server?
In this case I don’t have SmtpServer and port parameters.
Hi can you please explain how to consume this API into MVC project
Basically do the same thing as the last Postman image shows. Use any client to consume API, send a request to the same address as shown in the image and add your files to the request. You can add a file using MultipartFormDataContent
I finally figured how to get this mail sending application working. I have one more question. How secure is this? I am wondering because using the Gmail API is a lot more complicated since it conform to the OAUTH 2 standards. Thanks in advance!
I believe it is secure enough for sending emails. It has several layers of credential security and you can include the OAuth token if you have it of course. Well, this authentication is included by default, and that’s why we had to remove it – we don’t have an OAuth token.
I get the same error Message=535: 5.7.8 Username and Password not accepted. Learn more at bla bla
Can you help me how did you solve this?
This process simply does not work. I keep getting the error: MailKit.Security.AuthenticationException: ‘535: 5.7.8 Username and Password not accepted. Learn more at
5.7.8 https://support.google.com/mail/?p=BadCredentials l8-20020a05622a174800b002e1e3f7d4easm1513965qtk.86 – gsmtp’
The directions on this page make no sense because there is no way to enter this password in the Gmail application.
There just has to be a simpler way to send email.
I have to say, that I am using exactly this project on a daily basis to send emails and to test apps that send emails. So it works for sure. I am not sure why you are getting your error though. Even though it means that you are using the wrong credentials, this is something I can’t confirm.
Hi,
I found the article very enlightening, like all the others I have read. My question is:
I have a pdf that is returned by a web api:
string physicalPath = Path.Combine(_webHostEnvironment.ContentRootPath, “reports”, “pdfs”, pdfFilename);
byte[] pdfBytes = System.IO.File.ReadAllBytes(physicalPath);
MemoryStream ms = new MemoryStream(pdfBytes);
var streamResultFile = File(ms, “application/pdf”, pdfFilename);
return streamResultFile;
What I’d like to to is something like this:
var pdfFile = await reportService.GetPdf(PdfPath);
var testMessage = new Message(new string[] { “[email protected]” }, “Test email async”, “This is the content from my async email.”, pdfFile);
_emailSender.SendEmail(testMessage);
I already realized that I have to change the Message class and the CreateEmailMessage method, but I’m not sure how to do it.
Can you help please?
Thanks in advance
Fausto
Hi,
Did my question deserved any attention from you?
Hello.
Yes, it did, but for comments like this one, we have to spare our time to test the implementation and to see how it works, etc. We simply, don’t have that free time.
Without any testing, I can just guess because I didn’t do anything as you do. Basically, if your GetPdf method returns a stream instead of a real file result, you have to change the Message class to have a stream property, and you have to change the CreateEmailMessage class, not to iterate through the attachments, but just to convert your stream to a byte array, and then provide all the necessary data for the Add method.
Again, this is just from my quick look at your solution.
Ok.
I will try your suggestions. I’ll get back to you if I need more assistance.
Thanks once more.
Fausto
Sorry I make typo error: should be Marinko oops!..
Wow Marink! You did this in real time – faster than light typing no mistakes – very impressive!!
Thanks for the great article and code this is excellent.
I think for he first time that I look for a solution on the net I got one with out unnecessary extra complications.
Well done mate and thanks again.
I’m glad you like it. Thank you too for the kind words. Wish you all the best.
Hi everyone!
I created a local project to test what you mention in this blog, and everything worked correctly.
But I have a problem now because I created another project to do practically the same thing but as a “lambda function in AWS“, and I am not being able to make it work. I get “Exception: MailKit.Security.AuthenticationException: 534″ as an error. I am using the same email and server (smtp.gmail.com).
I think it is a connectivity problem of the same lambda function. Has anyone had the same problem?
Hallo. I have an error message in Postman
An error occurred while attempting to establish an SSL or TLS connection.
The server’s SSL certificate could not be validated for the following reasons:
• The server certificate has the following errors:
• The revocation function was unable to check revocation for the certificate.
This is the first time I have tried to do something like this and someone help. The code it’s same, except in controller:
[HttpGet]
public ActionResult<IEnumerable<BookDto>> Get()
{
try
{
var message = new Message(new string[] { “[email protected]” }, “Test email”, “This is connection from our email” );
_emailSender.SendEmail(message);
var books = _bookService.GetAll();
return Ok(books);
}
catch (Exception ex)
{
return StatusCode(StatusCodes.Status500InternalServerError, ex.Message);
}
}
Hi there. Maybe this can help you: https://stackoverflow.com/questions/59026301/sslhandshakeexception-an-error-occurred-while-attempting-to-establish-an-ssl-or
Also, have you tried running our project? It is tested so many times and the code works without a single problem
Thanks a lot. It’s work 🙂 When I run you project, and has same problem, but I made some changes in gmail security, enable app password for another device, test first here https://www.gmass.co/smtp-test and from stackoveflow link which you gave me, the second solution helped me: 2. The mail server that you are connecting to is using an expired (or otherwise untrusted) SSL certificate.and Change only
client.ServerCertificateValidationCallback = (s, c, h, e) => true;
client.Connect(_emailConfig.SmtpServer, _emailConfig.Port, SecureSocketOptions.Auto);
Hvala ti puno
You are most welcome (Nema na cemu 🙂 ). It is interesting that you had any issue with the SSL certificate since we are using this email project for our different projects all the time and everything works without a single issue. But again, I’m glad you solved your issue and posted the solution so it can help other readers as well.
Error CS1579 foreach statement cannot operate on variables of type ‘IFormFileCollection’ because ‘IFormFileCollection’ does not contain a public instance or extension definition for ‘GetEnumerator’ EmailService
Could you please download our source code and compare it to yours? I am pretty sure that this is the easiest way for you to find the reason for your error.
I have used this procedure to sent registration successful email to the user after registration. I am getting the following error “message = invalid addr-spec token at offset 0”. I don’t know what this error is all about. Can you please help me out !
Hello. I must say that I am not sure about that. But in this article: https://code-maze.com/email-confirmation-aspnet-core-identity/ we use this project to send emails to users after a successful registration. So, you can inspect the article and the source code of that article and see how it should be done.
Hi,
I’m getting error when Publish in AWS ec2 server.
If I commented out those lines in startup.cs, the error doesn’t comes.
But it works well in my local as debug mode.
Could you any one help me?
As you defined the emailConfig variable in startup.cs, where it is accessing,
As by my sight, I couldn’t see any reference, yet it’s using in someway.
Hello. The Configuration is collected from the appsetting.json file. So, the question is, have you published that file as well?
Yes, That file also uploaded along with published files from my FTP.
Well, it is strange. Some argument is missing by the error printed in the console and it prints which line number it is as well, but I don’t know why.
Could you able to help me to fix this error?
Your tutorial way is very simple to implement, I love it, but this error getting me tensed.
Please look into this error, if you are free.
Or this tutorial would be great only for local development purpose only, not good for apply in real time projects. 🙁
Please do not make your assumptions just based on your project. We have tested this and verified it on the production environment as well. But you can’t expect us to test it on every single environemt (IIS, AWS, Azure etc.). I tried to help, but I am not familiar with AWS deployment, so I couldn’t help you more than I did.
Hi, c2 server.
I’m getting error when Publish in AWS e
Could you any one help me?
Hi Marinko, I wonder if it has happened to anyone else. My single email gets sent twice.
Hello lokumas. This is strange and I haven’t noticed something like that. You can add breakpoint to the action and check whether your action is called twice or just the logic is executed twice. Then, at least, you will norrow your field to work on.
Hi, Thank your for this article. I would like to ask if we could send image files with e-mail attached in the same way. I have my multiple images in byte array form already in memory.. I was wondering if the email server would convert them back to png or jpeg images.
Thanks.
Hi lokumas. But we are using image files as attachments in this article. Also, we convert them to byte array and then use them with the email server. So, you shouldn’t have any problem there.
Sorry about the silly question I asked.. I noticed that later when I have read the article fully. Thank you.
Hi, i’m trying to use office 365 email adress as a sender i’ve changed the port to 587 and smtpserver to smtp.office365.com but when i send request i get this error message –> ” MailKit.Security.SslHandshakeException: An error occurred while attempting to establish an SSL or TLS connection.
One possibility is that you are trying to connect to a port which does not support SSL/TLS.
The other possibility is that the SSL certificate presented by the server is not trusted by the system for one or more of the following reasons:
1. The server is using a self-signed certificate which cannot be verified.
2. The local system is missing a Root or Intermediate certificate needed to verify the server’s certificate.
3. The certificate presented by the server is expired or invalid. ”
and the error in the EmailSender.cs file in this line –> await client.ConnectAsync(_emailConfig.SmtpServer, _emailConfig.Port, true);
PS: microsoft 365 use STARTTLS encryption in the SMTP Settings
Hi omar. Well, I don’t know about Office 365 but obviously it requires some security and maybe it doesn’t trust your application to use it for sending emails. The same thing Google does as “less secure application” error, but with google this is easy to overcome. The comment is here, so if anyone know the solution, it would be great to post it.
thanks for your answer, ive changed the connection parametres to SecureSocketOptions.StartTls like that –> await client.ConnectAsync(_emailConfig.SmtpServer, _emailConfig.Port, SecureSocketOptions.StartTls);
now it’s not a connection problem it became authentication problem –> await client.AuthenticateAsync(_emailConfig.UserName, _emailConfig.Password);
( userName & password are correct)
Hi, I am new to asp.net mvc and I am trying to add a file to this call
var message = new Message(new string[] { “[email protected]” }, “Test email async”, “This is the content from our async email.”, MYFILE);
can someone explain how to do that?
thanks a lot
Hello Andreas. I am not really sure what the problem is? You have everything explained in the article and you have a free source code to download. If you have a problem specifically with the MVC, then you can read our article to see how to send a file from the view to the controller: https://code-maze.com/file-upload-aspnetcore-mvc/
Hello Marinko,
thanks a lot for your reply.
What I want to do is calling the api from within a method and attach e.g. a logfile on it. So I dont have an upload component.
Like I have said, I am very new to asp.net core mvc and also to c#. In the passt I have dealt with VisualBasic and webforms.
It would be really realy kind from you if you can help me at this final (little step) I have to go.
Thank you very much for your understanding
It is not a problem for me to help, it’s just too hard without a code. Because all I can see here is that you need an HttpClient to send request to the API and you must have that file to add it as a payload. So, you have to get that file somehow (either through the form or with the code from it’s location), then you must have an HttpClient injected inside of your controller and finally to send the request using that HttpClient and with the file as a content. But again, I am not even sure if I am answering your question at all.
Hello Marinko,
here is the method for that I have included the call to the api. Everything is working and I can send the Email. All I need is to attach the file from my folder e.g. c:/reports to the email and I am not able to figure out how it will works.
With postman i have send the mail successfully with the attached file, but I have no idea how to get it in this code attached.
Thanks again for your help 🙂
[HttpPost] ForgotPassword(ForgotPasswordViewModel model, IFormFile file) [AllowAnonymous]
public async Task
{
if (ModelState.IsValid)
{
// Find the user by email
var user = await userManager.FindByEmailAsync(model.Email);
// If the user is found AND Email is confirmed
if (user != null && await userManager.IsEmailConfirmedAsync(user))
{
// Generate the reset password token
var token = await userManager.GeneratePasswordResetTokenAsync(user);
// Build the password reset link
var passwordResetLink = Url.Action("ResetPassword", "Account",
new { email = model.Email, token = token }, Request.Scheme);
// Log the password reset link
logger.Log(LogLevel.Warning, passwordResetLink);
var files = Request.Form.Files.Any() ? Request.Form.Files : new FormFileCollection();
var message = new Message(new string[] { "Email.office.com" }, "Password recovery", passwordResetLink, files);
await emailSender.SendEmailAsync(message);
return View("ForgotPasswordConfirmation");
}
return View("ForgotPasswordConfirmation");
}
return View(model);
}
Ok. So what you need is to read your file from the C: drive and turn it into the byte array, because this is the type required for the attachment. To do that you can use this code:
var path = @"D:TestDoc.txt";
var file = System.IO.File.ReadAllBytes(path);
in the file variable you will have an array of bytes, and then you can add it to the call.
Hi,
this dont work,
The Type of byte [] kan not be converted into Mircrosoft.AspNetCore.Http.IFormFile
Any idea?
Hello. Well it doesn’t work because if you are using our implementation it expects a IFormFile type. This is an abstraction for the Http file transfer. In your situation you don’t have that, but you are taking your file from the disk with the code as a byte array, so, all you have to do is to modify our implementation a bit. Instead of using IFormFile type you could use bit[] . The most important thing is that the process of sending emails expects byte[] type, and that’s excactly the type you have with my example from previous comment. You can add additional constructor for the Message class and additional property of type byte[]. Your new constructor will have all the params but the last one won’t be IFormFile but byte[]. Then in the implementation (CreateEMailMessage method), you don’t have to loop through all the attachment files (as it is now in the code) but you can just copy it into the stream.
Hello,
I got it. Thank you so much 🙂
Ok. So what you need is to read your file from the C: drive and turn it into the byte array, because this is the type required for the attachment. To do that you can use this code:
var path = @"D:TestDoc.txt";
var file = System.IO.File.ReadAllBytes(path);
in the file variable you will have an array of bytes, and then you can add it to the call.
On the WeatherForecastController it is using _emailSender but I guess is missing instantiate the class, how I do that?
Hello Rafael. This object is instantiated in the constructor using dependency injection.
Please check our source code.
You can check the picture as well:
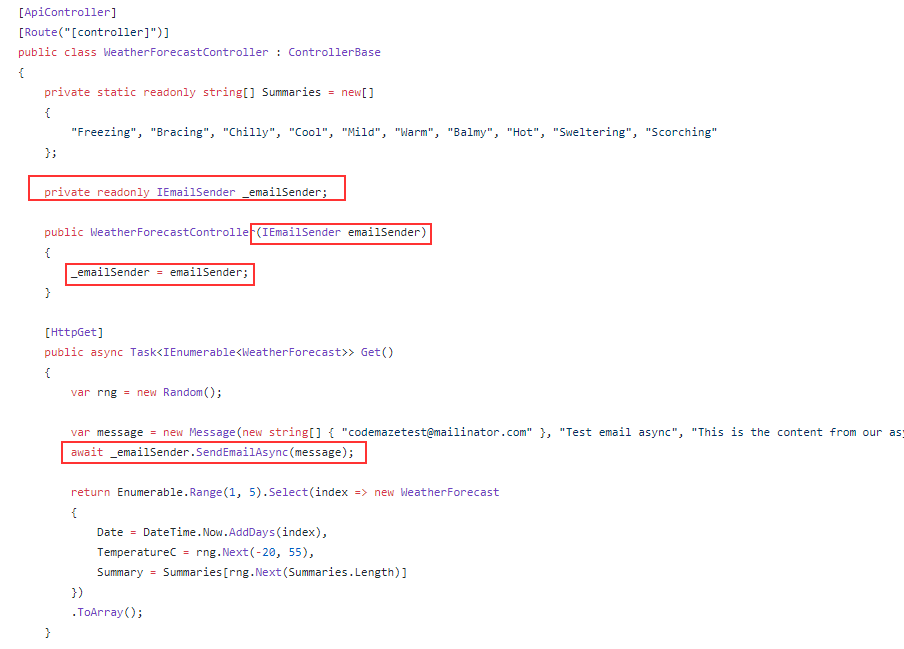
Basically, IEmailSender is registered in IOC in the Startup.cs class and then via Dependency injection you can inject it in any class in your project. You can read more about that in this section of the Logging in ASP.NET Core article.
Dear ,
I am getting this error when client.Authenticate(username,password)
“AuthenticationMechanismTooWeak: 5.7.9 Application-specific password required. Learn more atn5.7.9 https://support.google.com/mail/?p=InvalidSecondFactor i23sm790147pfq.157
any help here ?!
Have you enabled less secure apps in the google account you are using to send the message from? We explained in the article how to do that.
exactly what I need ,many thanx
What if I wanted to set the Body (To, From, Subject, and Body) in Postman instead of it being hard coded in the class?
Just send it as a text through the form data. Use key value pair for each parameter. But of course, you must have a bit different logic while mapping parameters in your controller, prior to creating the message object. Just extract them from the files variable and map them to the message parameters.
Hi thanks for the info, do you have any problem when you publish on server? in my local is working perfectly but in server is throwing “No connection could be made because the target machine actively refused it”
Hello. I must say, I haven’t deployed this app but never had any problem with similar ones. This error is probably related to the deployment process rather than sending email.
Hi @josalvaradogarca:disqus
I’ve stumbled with the same issue while deploying into an Azure WebApp.
Perhaps It could be possible that you may require to re-verify your client/device to Google besides allowing for less secure apps.
That worked for me.
Cheers
[HttpGet]> Get()
public async Task
{
var rng = new Random();
var message = new Message(new string[] { “[email protected]” }, “Test email async”, “This is the content from our async email.”, null);
This is a NullReferenceException: Object reference not set to an instance of an object. How do I handle this when you can only have one constructor and you don’t have an attachment for the get.
Hello TseviYAH. You can now check the code in the article, it is fixed now. The source code had that protection but for some reason it was not included in the article. So just include this: if (message.Attachments != null && message.Attachments.Any()) in the CreateEmailMessage method. Thanks for suggestion.
That does not fix the issue. .NET Core 3.1 only lets you have 1 Constructor. So the method requires 3 parameters even for the get. In your Git you have it set to null and here you have no parameter for the Message DI. What is a work around for this?
If you refer to the Message class, then it has 4 params supported. At first it had three parameters, but later on it was modified to support 4. You can find that in the article for sure (we added Attachments property and a param for the constructor). After that, I had to modify the constructor call in the Get action, to pass additional parameter.
Not exactly the Message class, but that is the origin of the error. In the Weather…Controller class, HttpGet Get() method requires an attachment after the code change as to where it did not before just to send an email message. There is no file needed so it throws a null exception error. I have tried so many things, but I can’t figure out how to get rid of that error so that the code works again. One thing I tried is a nullable reference to no avail. Any other suggestions?
Ok. let me try to break this down for you. I’ve just tested our source code and it works just fine.
So, your Get method:
var message = new Message(new string[] { "[email protected]" }, "Test email async", "This is the content from our async email.", null);The Message constructor:
to, string subject, string content, IFormFileCollection attachments)();
public Message(IEnumerable
{
To = new List
To.AddRange(to.Select(x => new MailboxAddress(x)));
Subject = subject;
Content = content;
Attachments = attachments;
}
Finally, the check in the CreateEmailMessage method:
if (message.Attachments != null && message.Attachments.Any())With this, there is no exception. Everything works. And this is the way explained in the article.
I hope this will help you.
Ahh, the only thing I missed was the To = new List(); I chalk it up to lack of sleep! Although I did catch the needing not null. It is working now! Thank you so much this really helps me!!!
You are very welcome. I’m glad I could help. Best regards.
You Guys are amazing. Thanks alot for every post You made this far. You helped me with my graduation work, and now I still learn from this page.
Thank you very much Grzegorz. We can’t express how great we feel to hear something like that. We are so proud and happy for you. We hope you will learn more from our posts and improve your knowledge even further. Best regards from Code Maze Team.
GitHub repo not exsits with url: https://github.com/CodeMazeBlog/email-attachments-aspnet-core
Hello Naji. The repo exists, but by mistake we made it private. It will be solved ASAP. Thank you for your suggestion. Best regards.