

HTTP is a stateless protocol. So HTTP requests are independent messages that don’t retain user values or app states. We need to take additional steps to manage state between the requests. In this article, we are going to look at various approaches to HTTP state management that we can use in our application.
We strongly recommend visiting the complete navigation of this series: ASP.NET Core MVC Series.
To download this article’s source code visit: State Management in ASP.NET Core Source Code.

Cookies
Cookies store data in the user’s browser. Browsers send cookies with every request and hence their size should be kept to a minimum. Ideally, we should only store an identifier in the cookie and we should store the corresponding data using the application. Most browsers restrict cookie size to 4096 bytes and only a limited number of cookies are available for each domain.
Users can easily tamper with or delete a cookie. Cookies can also expire on their own. Hence we should not use them to store sensitive information and their values should not be blindly trusted or used without proper validation.
We often use cookies to personalize the content for a known user especially when we just identify a user without authentication. We can use the cookie to store some basic information like the user’s name. Then we can use the cookie to access the user’s personalized settings, such as their preferred color theme.
A Cookie Example
Let’s create a new project and add a controller with endpoints to read and write values into cookies.
public class HomeController : Controller
{
    public IActionResult Index()
    {
        //read cookie from Request object
        string userName = Request.Cookies["UserName"];
        return View("Index", userName);
    }

    [HttpPost]
    public IActionResult Index(IFormCollection form)
    {
        string userName = form["userName"].ToString();

        //set the key value in Cookie
        CookieOptions option = new CookieOptions();
        option.Expires = DateTime.Now.AddMinutes(10);
        Response.Cookies.Append("UserName", userName, option);

        return RedirectToAction(nameof(Index));
    }

    public IActionResult RemoveCookie()
    {
        //Delete the cookie
        Response.Cookies.Delete("UserName");
        return View("Index");
    }
}
The Get version of the Index() method reads the UserName from the cookie and pass it to the view.
We use the Post version of the Index() method to get the value for userName from the form collection and assign it to the cookie.
For removing the cookie value, we use the RemoveCookie() endpoint.
Now let’s create the view:
@model string

@{
   ViewData["Title"] = "Home Page";
}

@if (!string.IsNullOrWhiteSpace(Model))
{
   @:<div>Welcome back, @Model</div>
   @Html.ActionLink("Forget Me", "RemoveCookie")
}
else
{
   @:
   <form asp-action="Index">
       <span>Hey, seems like it's your first time here!</span><br />
       <label>Please provide your name:</label>
       @Html.TextBox("userName")
       <div class="form-group">
           <input type="submit" value="Update" class="btn btn-primary" />
       </div>
   </form>
}
Here, we pass the UserName value into the View as the model.
If the UserName has a value, we greet the user by that name and give the user an option to forget the value by removing it from the cookie.
In case the UserName is empty, we show an input field for the user to enter his name and a submit button to update this in the cookie.
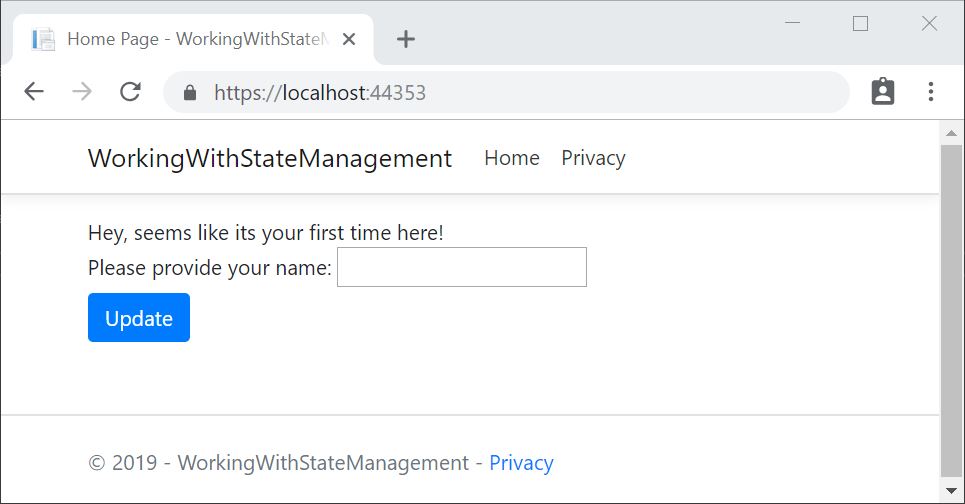
Now let’s run the application. Initially, the application asks the user to provide a name:
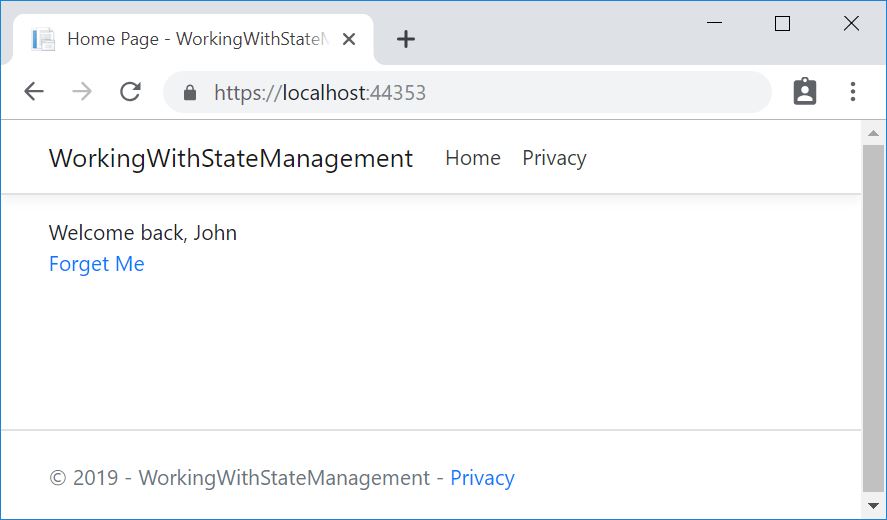
Once we provide a name and click update, the application greets us:
Even if we close and reopen the application, we can see that the cookie value persists. Once we click “Forget Me”, the application removes the cookie and asks for the name again.
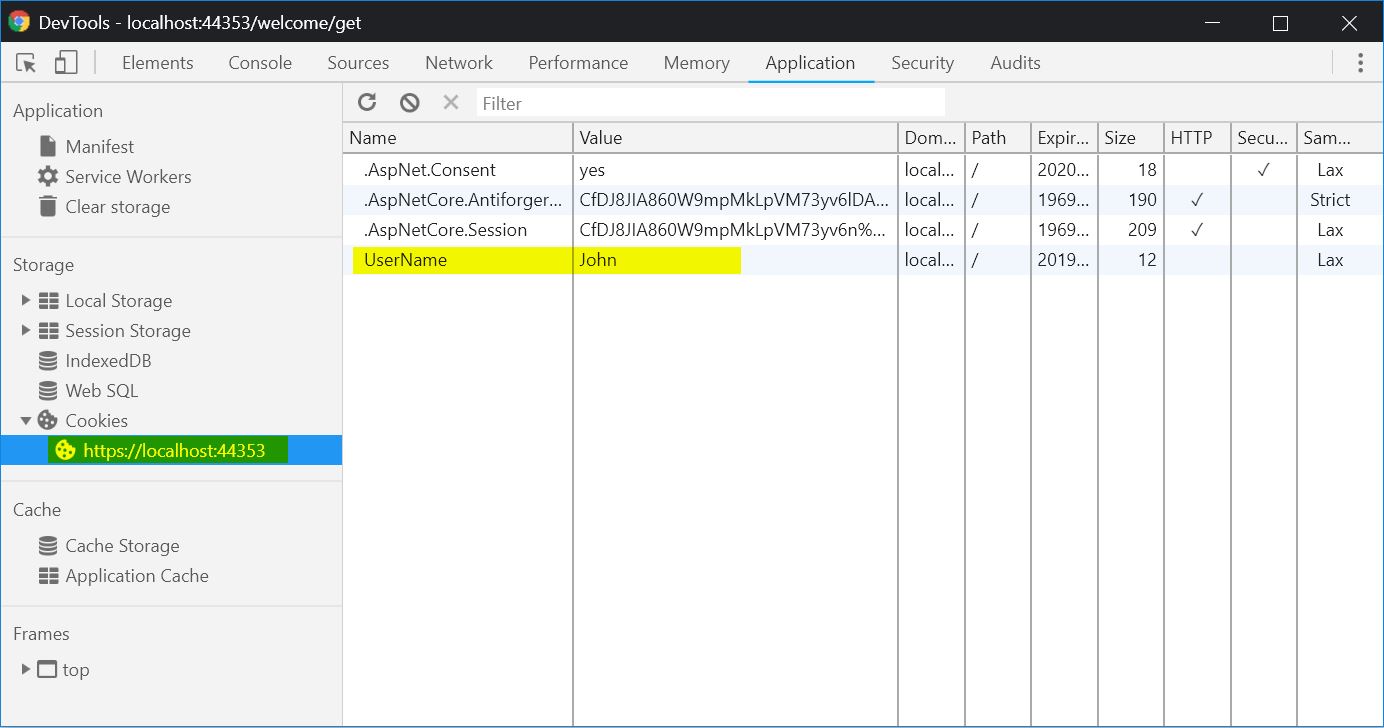
Inspecting the Cookies
Now, where does the application store the cookies? It is stored in the user’s browser. To inspect a value from a cookie, let’s get into the Chrome DevTools window by clicking the F12 key and navigating to the Application tab. We can see that the browser stores cookies for each application:
We should be mindful of the European Union General Data Protection Regulations (GDPR) when issuing cookies and dealing with privacy concerns. For more information about the APIs and templates provided by ASP.NET Core to support GDPR requirements, visit: General Data Protection Regulation (GDPR) support in ASP.NET Core
In this section, we have learned how to use cookies in our application.
Session State
Session state is an ASP.NET Core mechanism to store user data while the user browses the application. It uses a store maintained by the application to persist data across requests from a client. We should store critical application data in the user’s database and we should cache it in a session only as a performance optimization if required.
ASP.NET Core maintains the session state by providing a cookie to the client that contains a session ID. The browser sends this cookie to the application with each request. The application uses the session ID to fetch the session data.
While working with the Session state, we should keep the following things in mind:
- A Session cookie is specific to the browser session
- When a browser session ends, it deletes the session cookie
- If the application receives a cookie for an expired session, it creates a new session that uses the same session cookie
- An Application doesn’t retain empty sessions
- The application retains a session for a limited time after the last request. The app either sets the session timeout or uses the default value of 20 minutes
- Session state is ideal for storing user data that are specific to a particular session but doesn’t require permanent storage across sessions
- An application deletes the data stored in session either when we call the
ISession.Clearimplementation or when the session expires - There’s no default mechanism to inform the application that a client has closed the browser or deleted the session cookie or it is expired
A Session State Example
We need to configure the session state before using it in our application. This can be done in the ConfigureServices() method in the Startup.cs class:
services.AddSession();
Then, we need to enable the session state in the Configure() method in the same class:
app.UseSession();
The order of configuration is important and we should invoke the UseSession() before invoking UseMVC().
Let’s create a controller with endpoints to set and read a value from the session:
public class WelcomeController : Controller
{
    public IActionResult Index()
    {
        HttpContext.Session.SetString("Name", "John");
        HttpContext.Session.SetInt32("Age", 32);

        return View();
    }

    public IActionResult Get()
    {
        User newUser = new User()
        {
            Name = HttpContext.Session.GetString("Name"),
            Age = HttpContext.Session.GetInt32("Age").Value
        };

        return View(newUser);
    }
}
The Index() method sets the values into session and Get() method reads the values from the session and passes them into the view.
Let’s auto-generate a view to display the model values by right-clicking on the Get() method and using the “Add View” option.
Now let’s run the application and navigate to /welcome.
This will set the session values.
Now let’s navigate to /welcome/get:
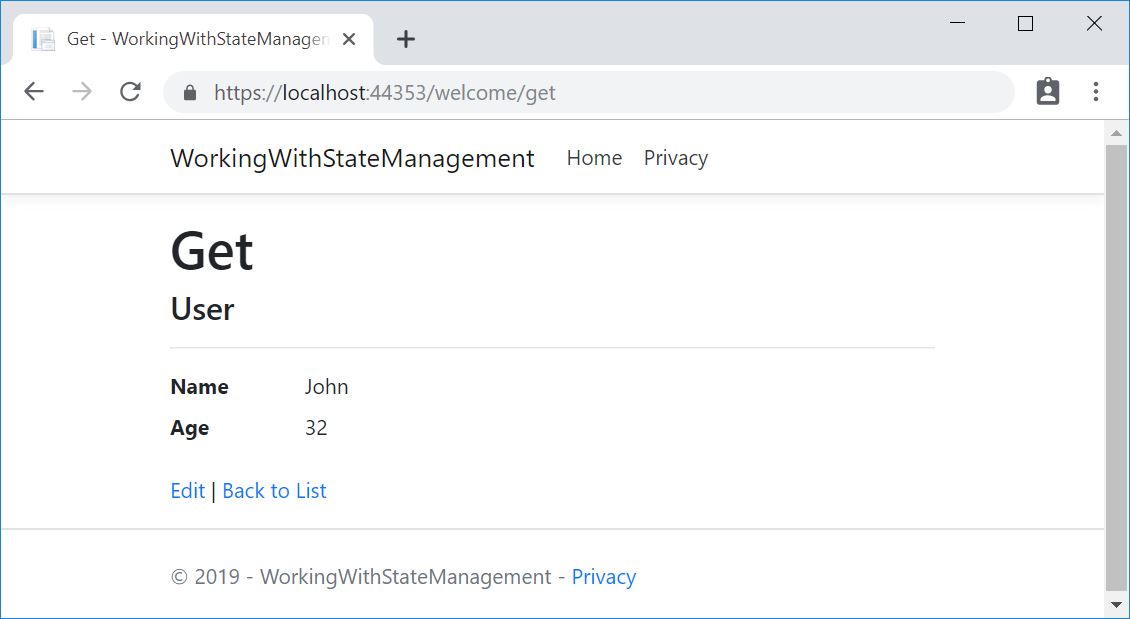
We retrieve values from the session and display it on the page.
In this section, we have seen how to set data in the session and retrieve it.
Query strings
We can pass a limited amount of data from one request to another by adding it to the query string of the new request. This is useful for capturing the state in a persistent manner and allows the sharing of links with the embedded state.
Let’s add a new method in our WelcomeController:
public IActionResult GetQueryString(string name, int age)
{
    User newUser = new User()
    {
        Name = name,
        Age = age
    };
    return View(newUser);
}
Model binding maps data from HTTP requests to action method parameters. So if we provide the values for name and age as either form values, route values or query strings, we can bind those to the parameters of our action method.
For displaying the model values let’s auto-generate a view as we did in the previous section.
Now let’s invoke this method by passing query string parameters:
/welcome/getquerystring?name=John&age=31
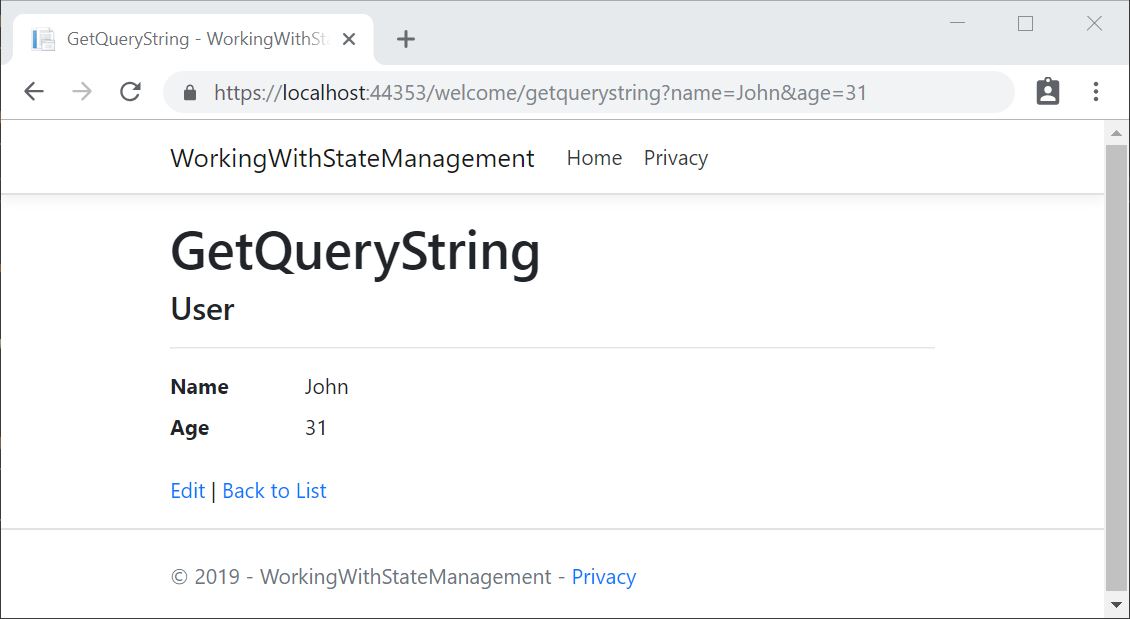
We can retrieve both the name and age values from the query string and display it on the page.
As URL query strings are public, we should never use query strings for sensitive data.
In addition to unintended sharing, including data in query strings will make our application vulnerable to Cross-Site Request Forgery (CSRF) attacks, which can trick users into visiting malicious sites while authenticated. Attackers can then steal user data or take malicious actions on behalf of the user. For knowing more about protecting our application against CSRF attacks, visit Prevent Cross-Site Request Forgery (XSRF/CSRF) attacks.
In this section, we have learned how to pass parameters as query strings and read them in our application.
Hidden Fields
We can save data in hidden form fields and send it back in the next request. Sometimes we require some data to be stored on the client side without displaying it on the page. Later when the user takes some action, we’ll need that data to be passed on to the server side. This is a common scenario in many applications and hidden fields provide a good solution for this.
Let’s add two methods in our WelcomeController:
[HttpGet]
public IActionResult SetHiddenFieldValue()
{
    User newUser = new User()
    {
        Id = 101,
        Name = "John",
        Age = 31
    };
    return View(newUser);
}

[HttpPost]
public IActionResult SetHiddenFieldValue(IFormCollection keyValues)
{
    var id = keyValues["Id"];
    return View();
}
The GET version of the SetHiddenValue() method creates a user object and passes that into the view.
We use the POST version of the SetHiddenValue() method to read the value of a hidden field Id from FormCollection.
In the View, we can create a hidden field and bind the Id value from Model:
@Html.HiddenFor(model => model.Id)
Then we can use a submit button to submit the form:
<input type="submit" value="Submit" />|
Now let’s run the application and navigate to /Welcome/SetHiddenFieldValue:
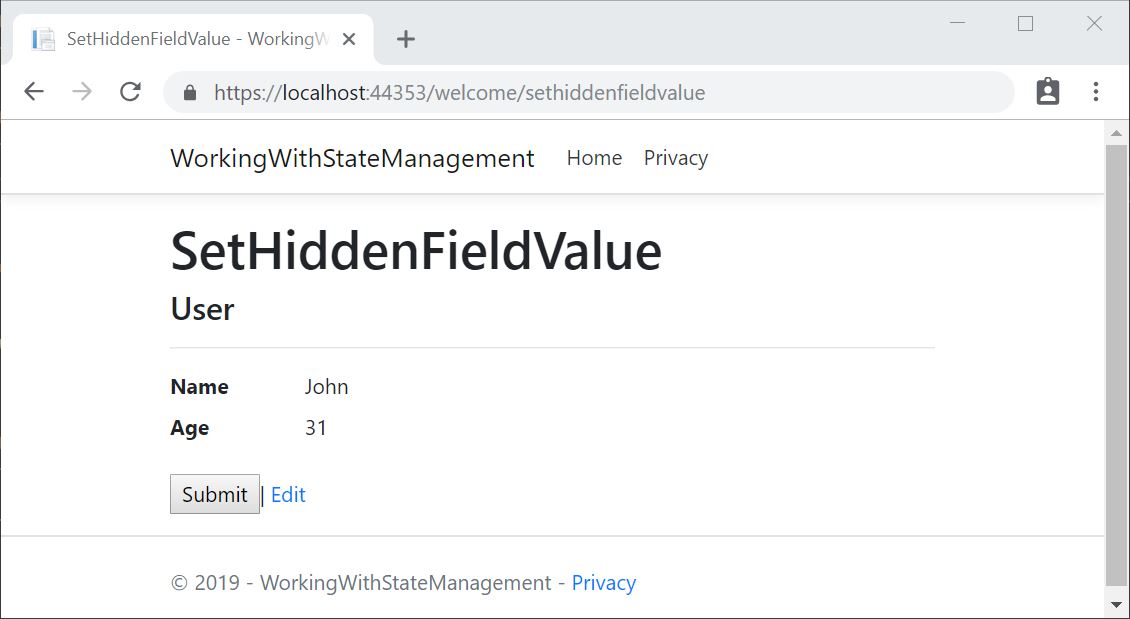
On inspecting the page source, we can see that a hidden field is generated on the page with the Id as the value:
<input id="Id" name="Id" type="hidden" value="101">
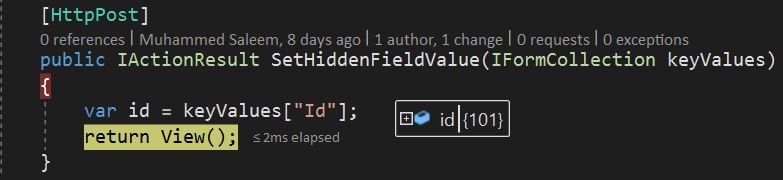
Now let’s click the submit button after putting a breakpoint in the POST method. We can retrieve the Id value from the FormCollection:
Since the client can potentially tamper with the data, our application must always revalidate the data stored in hidden fields.
In this section, we have learned how to store data in hidden fields and how to retrieve them.
TempData
ASP.NET Core exposes the TempData property which can be used to store data until it is read. We can use the Keep() and Peek() methods to examine the data without deletion. TempData is particularly useful when we require the data for more than a single request. We can access them from controllers and views.
TempData is implemented by TempData providers using either cookies or session state.
A TempData Example
Let’s create a controller with three endpoints. In the First() method, let’s set a value into TempData. Then let’s try to read it in Second() and Third() methods:
public class TempDataController : Controller
{
    public IActionResult First()
    {
        TempData["UserId"] = 101;
        return View();
    }

    public IActionResult Second()
    {
        var userId = TempData["UserId"] ?? null;
        return View();
    }

    public IActionResult Third()
    {
        var userId = TempData["UserId"] ?? null;
        return View();
    }
}
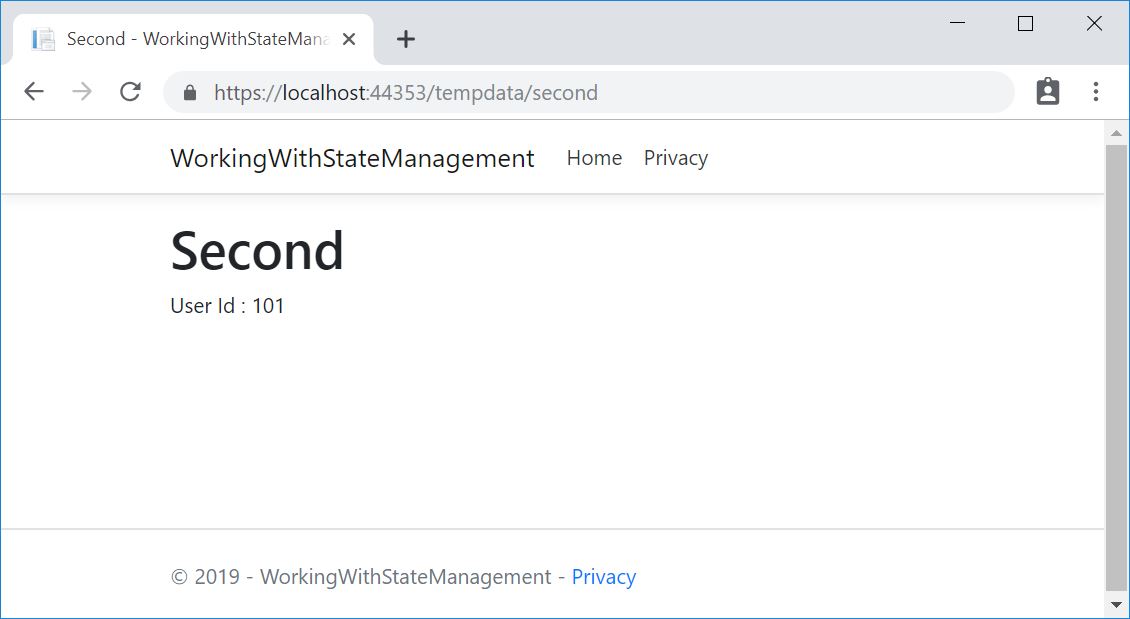
Now let’s run the application by placing breakpoints in the Second() and Third() methods.
We can see that the TempData is set in the First() request and when we try to access it in the Second() method, it is available. But when we try to access it in the Third() method, it is unavailable as is retains its value only till its read.
Now let’s move the code to access TempData from the controller methods to the views.
Let’s create a view for the Second() action method:
@{
    ViewData["Title"] = "Second";
    var userId = TempData["UserId"]?.ToString();
}

<h1>Second</h1>
User Id : @userId
Similarly, let’s create a view for the Third() action method:
@{
    ViewData["Title"] = "Third";
    var userId= TempData["UserId"]?.ToString();
}

<h1>Third</h1>
User Id : @userId
Let’s run the application and navigate to /first, /second and /third
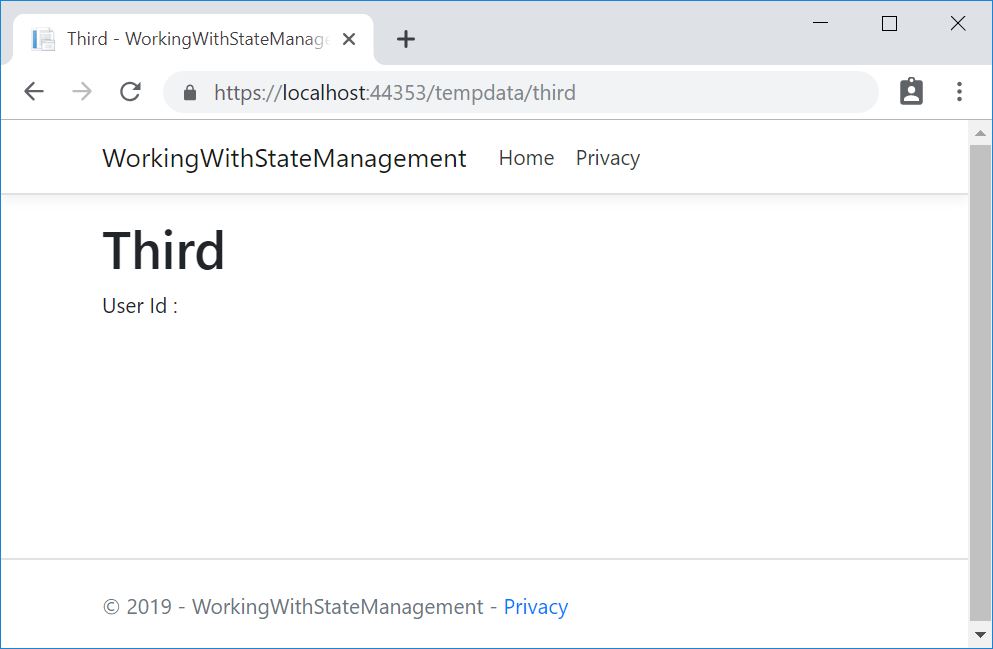
We can see that TempData is available when we read it for the first time and then it loses its value. Now, what if we need to persist the value of TempData even after we read it? We have two ways to do that:
TempData.Keep()/TempData.Keep(string key)– This method retains the value corresponding to the key passed inTempData. If no key is passed, it retains all values inTempData.TempData.Peek(string key)– This method gets the value of the passed key fromTempDataand retains it for the next request.
Let’s slightly modify our second view with one of these methods:
var userId = TempData["UserId"]?.ToString();
TempData.Keep();
Or
var userId = TempData.Peek("UserId")?.ToString();
Now let’s run the application and navigate to /first, /second and /third.
We can see that the TempData value persists in the third page even after its read on the second page. Great!
In this section, we have learned how to pass values from one controller action method to another or to the view using TempData.
Passing Data into Views
For passing data from the controller into the views, we can use two approaches:
- Strongly Typed Data
- Weakly Typed Data
Strongly Typed Data
In this approach, we pass a model from the controller into the view. We have explained this in detail in the first part of this series:
return View(model);
The advantage of this method is that we get a strongly typed model to work within the view:
@model BookStore.Models.Book
Then we can access the model properties from the view:
@Model.Title
Weakly Typed Data
There are two approaches to passing a weakly typed data into the views:
- ViewData
- ViewBag
ViewData
ViewData is a dictionary object and we can get/set values using a key. ViewData exposes an instance of the ViewDataDictionary class.
Let’s create a controller action method and set a value for UserId inside ViewData:
public class ViewDataController : Controller
{
    public IActionResult Index()
    {
        ViewData["UserId"] = 101;
        return View();
    }
}
Now let’s try to access the userId value inside the View:
@{
    ViewData["Title"] = "Index";
    var userId = ViewData["UserId"]?.ToString();
}

<h1>ViewData</h1>

User Id : @userId
Then let’s run the application and navigate to /viewdata:
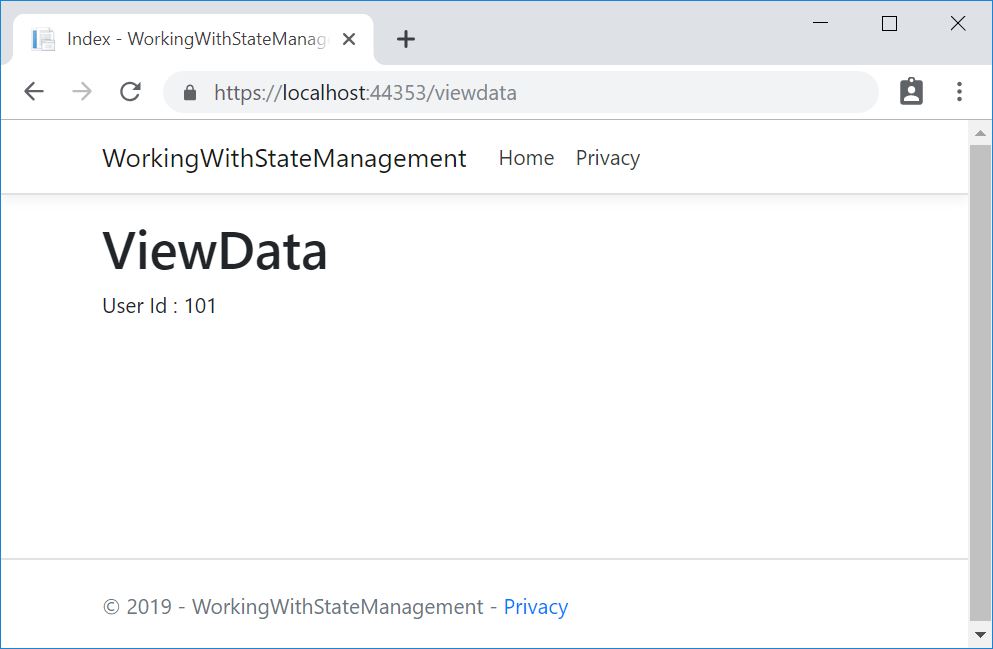
We can see the UserId value is read from ViewData and displayed on the page.
ViewBag
ViewBag is similar to ViewData but it is a dynamic object and we can add data into it without converting to a strongly typed object. In other words, ViewBag is just a dynamic wrapper around the ViewData.
Let’s add a controller action method to set a few values in ViewBag:
public class ViewBagController : Controller
{
    public IActionResult Index()
    {
        ViewBag.UserId = 101;
        ViewBag.Name = "John";
        ViewBag.Age = 31;

        return View();
    }
}
Then let’s access it from the View and display the values:
{
ViewData["Title"] = "Index";
var userId = ViewBag.UserId;
var name = ViewBag.Name;
var age = ViewBag.Age;
}
<h1>ViewBag</h1>
User Id : @userId<br />
Name : @name<br />
Age : @age<br />
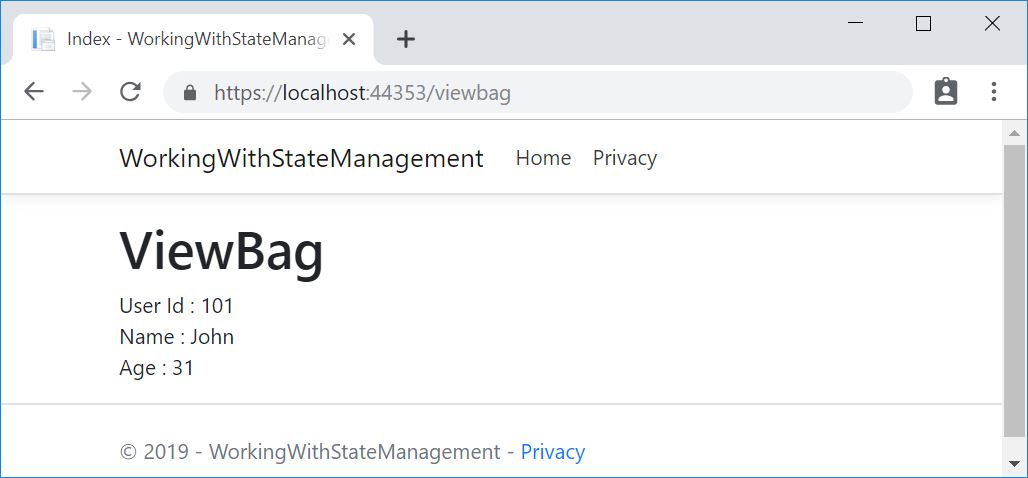
Now let’s run the application and navigate to /viewbag:
That’s it!
In this section, we’ve learned how to set values in ViewData and ViewBag and how to display them in the Views.
Conclusion
In this article, we’ve learned the following topics:
- Storing user-specific data in browser Cookies.
- Using Session State to store data related to a user session.
- Passing data between requests using Query Strings.
- Using Hidden Fields to store data that are not displayed on a page.
- Use TempData to pass data from a controller action method to another or a View.
- Passing Data from a Controller into a View using strongly typed and weakly typed data such as ViewData and ViewBag.
In the next part of the series, we will learn about routing capabilities in ASP.NET Core MVC.
Thank you for summing up all the possible options! Great job.
Thank you. I’m glad you like the article.
For anyone who is wondering why “‘IServiceCollection’ does not contain a definition for ‘AddSession'” when attempting to add “services.AddSession()” in the “A Session State Example” section, you need to install the NuGet package “Microsoft.AspNetCore.Session”. It does not come pre-installed with a new ASP.NET Core Web Application. Great article!