

The two-step verification is a process where a user enters credentials, and after successful password validation, receives an OTP (one-time-password) via email or SMS. Then, they enter that OTP in the Two-Step Verification form on our site to log in successfully.
We just have to make one thing clear before we start. Even though many people think that this type of verification is based on something you know (the password) and something you have (device to access Email or SMS), that’s not the case. The ownership of the device is not part of the verification process, on the other hand, the OTP is. Therefore, the OTP is still something we know and it raises some security concerns over email or SMS. But it is still more secure than a one-time password process.
So, in this article, we are going to learn how to implement a two-step verification process in our project by using ASP.NET Core Identity.

To navigate through the entire series, visit the ASP.NET Core Identity series page.
Code Preparation for Two-Step Verification Process
Before we continue, we have to make sure that our user has an email confirmed and a two factor enabled. If we check our only user in the database, we are going to see this is the case:
![]()
If these columns are not set to true (1), you can set them manually.
Now, we can modify the Login action:
[HttpPost]
[ValidateAntiForgeryToken]
public async Task<IActionResult> Login(UserLoginModel userModel, string returnUrl = null)
{
    //code removed for clarity reasons
    var result = await _signInManager.PasswordSignInAsync(userModel.Email, userModel.Password, userModel.RememberMe, lockoutOnFailure: true);
    if (result.Succeeded)
    {
        return RedirectToLocal(returnUrl);
    }

    if(result.RequiresTwoFactor)
    {
        return RedirectToAction(nameof(LoginTwoStep), new { userModel.Email, userModel.RememberMe, returnUrl});
    }
    //code removed for clarity reasons
}
So, one of the properties that our result variable contains is RequiresTwoFactor. The PasswordSignInAsync method will set that property to true if the TwoFactorEnabled column for the current user is set to true, and the Succeeded property will be set to false. Therefore, we check if the RequiresTwoFactor property is true and if it is, we redirect a user to a different action with the email, rememberMe and returnUrl parameters.
It is important to mention that as soon as a user gets redirected to the LoginTwoStep action, the new Identity.TwoFactorUserId cookie will be created in our browser. This cookie contains important data about the current user.
Before we create additional actions, let’s create a new model class for the LoginTwoStep action:
public class TwoStepModel
{
    [Required]
    [DataType(DataType.Text)]
    public string TwoFactorCode { get; set; }
    public bool RememberMe { get; set; }
}
Now, we can add two required actions in the Account controller:
[HttpGet]
public async Task<IActionResult> LoginTwoStep(string email, bool rememberMe, string returnUrl = null)
{
    return View();
}

[HttpPost]
[ValidateAntiForgeryToken]
public async Task<IActionResult> LoginTwoStep(TwoStepModel twoStepModel, string returnUrl = null)
{
    return View();
}
Excellent.
We have prepared everything for the two-step verification process. So, let’s implement it.
Implementation of the Two-Step Verification Process
It’s time to modify the GET LoginTwoStep action:
[HttpGet]
public async Task<IActionResult> LoginTwoStep(string email, bool rememberMe, string returnUrl = null)
{
    var user = await _userManager.FindByEmailAsync(email);
    if (user == null)
    {
        return View(nameof(Error));
    }

    var providers = await _userManager.GetValidTwoFactorProvidersAsync(user);
    if (!providers.Contains("Email"))
    {
        return View(nameof(Error));
    }

    var token = await _userManager.GenerateTwoFactorTokenAsync(user, "Email");

    var message = new Message(new string[] { email }, "Authentication token", token, null);
    await _emailSender.SendEmailAsync(message);

    ViewData["ReturnUrl"] = returnUrl;
    return View();
}
We check if the current user exists in the database. If that’s not the case, we display the error page. But if we find a user, we have to check is there a provider for Email because we want to send our two-step code using an email message. After that check, we just create a token with the GenerateTwoFactorTokenAsync method and send an email message.
Now, let’s just create a view for this action:
@model IdentityByExamples.Models.TwoStepModel

<h1>LoginTwoStep</h1>
<hr />

<p> Please enter your authentication code in the field below</p>

<div class="row">
    <div class="col-md-4">
        <form asp-action="LoginTwoStep" asp-route-returnUrl ="@ViewData["ReturnUrl"]">
            <div asp-validation-summary="All" class="text-danger"></div>
            <div class="form-group">
                <label asp-for="TwoFactorCode" class="control-label"></label>
                <input asp-for="TwoFactorCode" class="form-control" />
                <span asp-validation-for="TwoFactorCode" class="text-danger"></span>
            </div>
            <input asp-for="RememberMe" type="hidden" />
            <div class="form-group">
                <input type="submit" value="Log in" class="btn btn-primary" />
            </div>
        </form>
    </div>
</div>

@section Scripts {
    @await Html.PartialAsync("_ValidationScriptsPartial")
}
This process is quite familiar.
LoginTwoStep POST Implementation
Finally, let’s modify the POST LoginTwoStep action:
[HttpPost]
[ValidateAntiForgeryToken]
public async Task<IActionResult> LoginTwoStep(TwoStepModel twoStepModel, string returnUrl = null)
{
    if (!ModelState.IsValid)
    {
        return View(twoStepModel);
    }

    var user = await _signInManager.GetTwoFactorAuthenticationUserAsync();
    if(user == null)
    {
        return RedirectToAction(nameof(Error));
    }

    var result = await _signInManager.TwoFactorSignInAsync("Email", twoStepModel.TwoFactorCode, twoStepModel.RememberMe, rememberClient: false);
    if(result.Succeeded)
    {
        return RedirectToLocal(returnUrl);
    }
    else if(result.IsLockedOut)
    {
        //Same logic as in the Login action
        ModelState.AddModelError("", "The account is locked out");
        return View();
    }
    else
    {
        ModelState.AddModelError("", "Invalid Login Attempt");
        return View();
    }
}
So, first, we check the model validity. If it’s valid, we use the GetTwoFactorAuthenticationUserAsync method to get the current user. We do that with the help of our Identity.TwoFactorUserId cookie, created in the first part of this article. This will prove to us that the user indeed went through all the verification steps to get to this point. If we find that user, we use the TwoFactorSignInAsync method to verify the TwoFactorToken value and sign in the user.
If the result is successful, we use the returnUrl parameter to redirect the user. Otherwise, we apply additional checks on the result variable and force appropriate actions.
We don’t want to repeat the same code – that’s why you see the comment in the code sample. But it would be a good practice to extract the code from the Lockout part in the Login action in its own method and then just call that method in the Login and LoginTwoStep actions.
Testing the Entire Process
With everything in place, we can test our functionality.
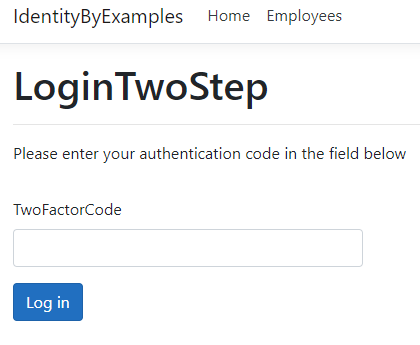
As soon as we enter valid credentials, we are going to see a new view:
Then if we check our email:
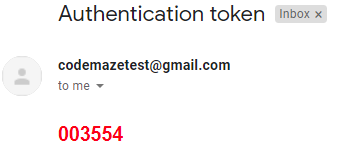
We can see a new token.
Finally, after we enter that token in the input field, we are going to be redirected either to the home view or the protected view. This depends on what we tried to access without authentication:
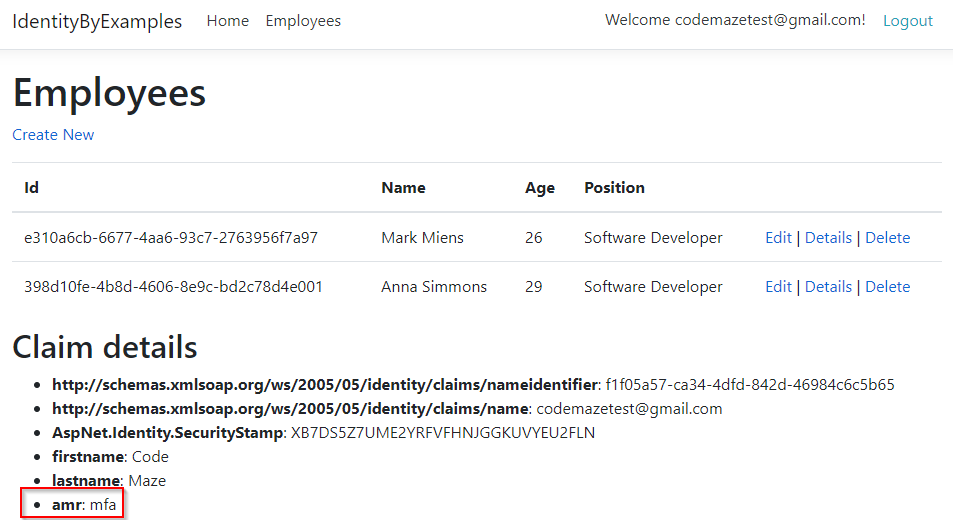
Take notice that the amr property (Authentication Method Reference) now has the mfa value which stands for Multiple-factor Authentication.
Conclusion
So, in this article, we’ve learned how to use a two-step verification process to authenticate a user by using an email provider. But, we don’t have to use only email provider. SMS is also an option that can be used for the process. The same logic applies to the SMS provider.
In the next article, we are going to learn about external accounts and how to handle external identity providers.
So, stay tuned.
Thanks for this, its helped alot. However I am building mine on Razor Pages and my issue right now is that I can bypass the login process by simply typing in the url with the email and remember me included like so ‘https://localhost:7247/Account/LoginTwoFactor?Email=EmailHere&RememberMe=False’
What would be the way to solve this? Any help would be great thank you
Hi Daniel. Well, that’s some sort of custom logic that you have to add. Maybe, and this is just something that came up to me right now, you can pass the result as a parameter to the Login2Factor GET action. Or maybe having some private field in the controller “isLoginOccurred” and then once in the Login action set it to true, and then you can check it in the Login2Factor and after that set it to false… I don’t know, as I said, just something on top of my head, because, as I said, some custom logic is probably required.
Thank you so much. This helped me a lot. In my case, I had a PHP front-end that was not sending the cookie (Identity.TwoFactorUserId) and that was making the back-end to fail when I do the two factor signin.
Hi,
Thanks for the article. We have managed to get all this working, but an issue has been raised with the error reason when the 2fa code has expired – there is no distinct reason given, and the SignInResult doesn’t seem to contain any information to inform the user the they have entered the correct code they would just get a “Invalid code” error, but they really ran out of time. Is this something that can be derived from other information, or is it considered a security issue?
Thanks,
J
To be honest I am not sure about that. Maybe you can check the result and if it contains an Invalid code message, you can ignore it and return a different one. On the other hand, maybe they attentionally didn’t want to return any other message because of security reasons. Again, I am not sure about this one at all.
Hey Marinko, hope you are doing good. Can you tell me that what is the expiry time of this OTP. And how can we Increase or Decrease expiry timing?
Waiting for your response 🙂
Hello. This article is part of the ASP.NET Core series, and it would be best to read all the articles in that series to understand these lifespans. But in this article, we set the lifespan to 2 hours of all tokens: https://code-maze.com/password-reset-aspnet-core-identity/
Then in this one: https://code-maze.com/email-confirmation-aspnet-core-identity/ we’ve just modified the lifespan of the email token.
So, currently, this two-factor token should be valid for 2 hours (I must say I didn’t check that, but it should be like that), but you can add your custom token lifespan implementation as I did in the previously mentioned article.
Hi, I have followed your setup closely, but I’m having an issue when calling the PasswordSignInAsync, my result is NEVER returning RequiresTwoFactor = true, it is always returning success. I’m at a loss at what I’m missing. Several online sources have posted to make sure the EmailConfirmed and TwoFactorEnabled are true, which they both are. My UserManager.SupportUserTwoFactor is false so I’m not sure if that is what is causing the issue, and if so, how to fix it… any help would be great!
I am having a problem seeing where you set up the two factor providers “Email” and “Phone”. I have a different project and when I run GetValidTwoFactorProvidersAsync it comes up null. I added the startup AddScoped() and have created all of the associated classes. I’m just not seeing where you set up and named it Phone. In Asp.Net Identity there is a call to RegisterTwoFactorProvider, but that doesn’t exist in Core. What am I missing?
This is a single article in the ASP.NET Core Identity series, and we continue our story in every single article. The provider you are talking about is registered in a previous articles, because we had to register email token provider for the password reset functionality. You can check our source code and check the Startup class. You will find Identity registration with all additional extension methods. AddDefaultTOkenProviders and AddTokenProvider.
Thanks a lot for the tutorial . But how do I make the two factor code usable only once ? Here User can login with one generated two factor code several times .
Hello Ragib. Well you can always create additional table with the user’s email if it is unique or id, and the token fields, and as soon as you generate a token you can write into this table. Then in the POST TwoFactor action, you can check whether user have already used that code. It is a custom logic but will work for sure. Maybe you will require additional fields in that table, but the idea stands its point. Best regards.
Thanks a lot brother .
You are very welcome. I am glad I could help and that this article is useful to you. If you haven’t already, try the entire series, I would like to hear your opinion for sure.
Brother I have been following the entire series and I am done with it today .Thanks again this series helped me a lot understanding the ASP.Net Core Identity . You are awesome 😀
Thanks a lot for the kind words and for following our tutorials. I am so glad you liked it. Regarding the sms verification, well, the steps are all the same. All you have to do is to find some resource (since we don’t have one) on how to send sms in ASP.NET Core and just replace the email logic from this article with that one. Really nothing more than that.
Okay
Brother Can you post a tutorial on How to implement two step verification with phone number ? Or can you give me any good source from where I can learn and implement that . Thanks again