

In the previous part of this series, we built an ASP.NET Core MVC application using some mock data. In this part, we are going to look at the ways to connect the application with a database and work with data.
We are going to use the EF Core Code-First approach which is the preferred way to work with data when starting a new project.
We strongly recommend visiting the complete navigation of this series: ASP.NET Core MVC Series.

To download this article’s source code visit: Working With Data in ASP.NET Core MVC Source Code.
First, we need to create a model. Then we are going to scaffold the model to produce the controller action methods and views corresponding to the Create, Read, Update, and Delete (CRUD) operations for the model. After that, we are going to create the database using the EF Core Migrations. Finally, we are going to seed the database with some initial data.
Once these steps are completed, we’ll have a working ASP.NET Core MVC app that connects to the database.
Creating a Model in ASP.NET Core MVC
Let’s create the Book model, which is a similar object to the one we created in the previous part of this series, just without the Authors property:
public class Book
{
   public int Id { get; set; }

   [Display(Name = "Book Title")]
   [Required]
   public string Title { get; set; }

   public string Genre { get; set; }

   [DataType(DataType.Currency)]
   [Range(1, 100)]
   public decimal Price { get; set; }

   [Display(Name = "Publish Date")]
   [DataType(DataType.Date)]
   public DateTime PublishDate { get; set; }
}
This model will serve as a base for building the project.
Scaffolding the Model
The next step is to scaffold the model to generate the controller action methods and views. Scaffolding will create a new fully functional controller.
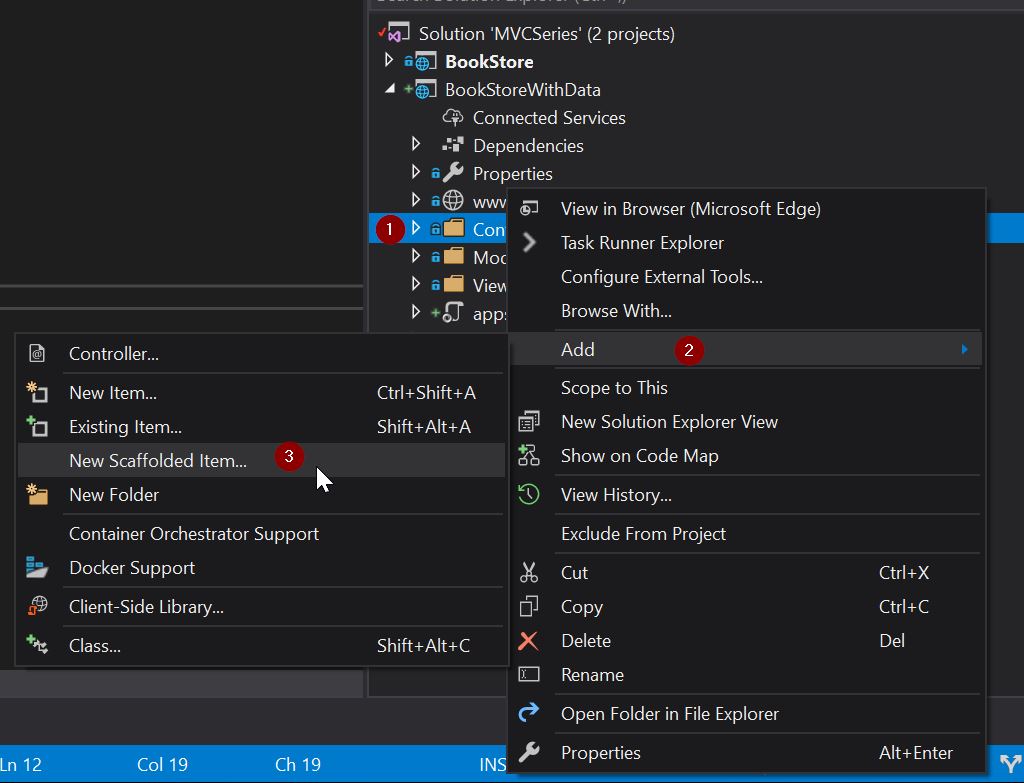
Right-click on the Controllers folder > Add > New Scaffolded Item:
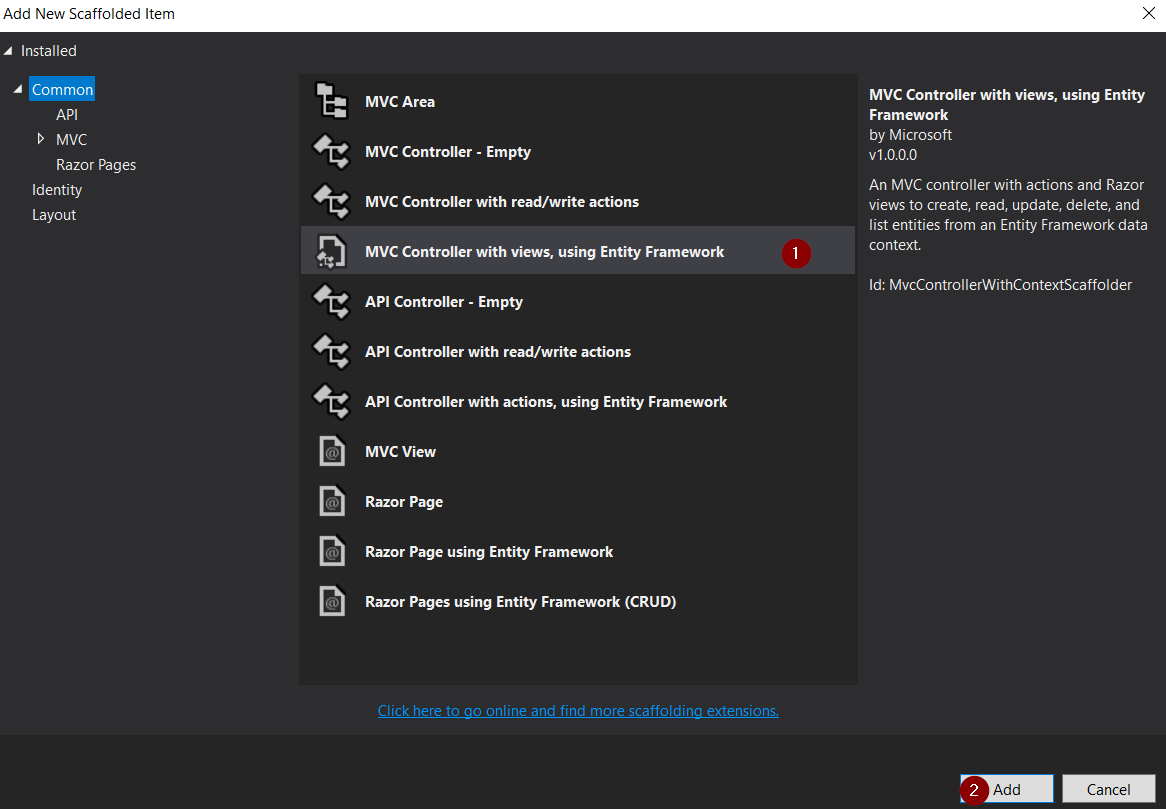
In the Add Scaffold dialog, we are going to select MVC Controller with views, using Entity Framework > Add:
Let’s complete the Add Controller dialog:
- Model class:
Book(BookStoreWithData.Models) - Data context class: Select the
+icon. - Leave the default name (
BookStoreWithData.Models.BookStoreWithDataContext) - Click
Add
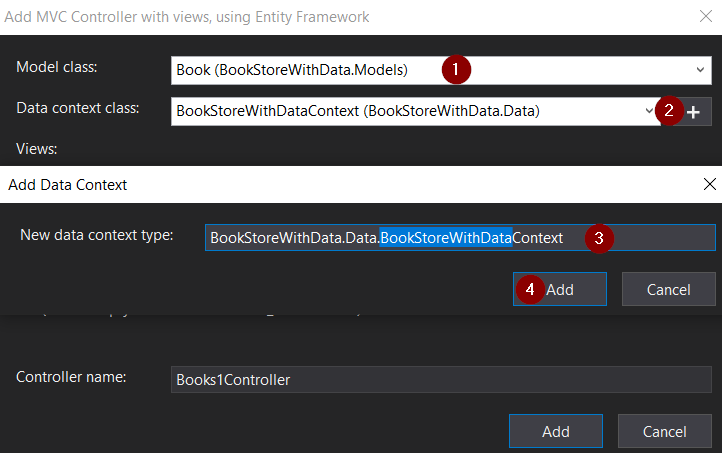
- Views: Keep the default of each option checked
- Controller name: Keep the default
BooksController - Select
Add

Visual Studio creates:
- An Entity Framework Core database context class (
Data/BookStoreWithDataContext.cs) - A Controller (
Controllers/BooksController.cs) - Razor view files for
Create,Delete,Details,Edit, andIndexpages (Views/Books/*.cshtml)
This process of automatic creation of the database context, CRUD (create, read,update and delete) action methods and views are known as scaffolding.
Scaffolding is optional, and you can do the whole process manually, too. In situations where scaffolding is not needed or appropriate, we can take control of the entire creation process.
Migrations
Migrations automate the creation of a database based on our model.
First, let’s run the following command in the Package Manager console:
Add-Migration BookStoreWithData.Data.BookStoreWithDataContext
This will create the classes for supporting migrations.
Now, we need to apply those changes to the database. Before that, make sure the connection string specified in the appsettings.json file points to the database server that we want to connect. By default, the scaffolding process makes it point to the SQL Server Express local DB.
For applying the changes to the database, let’s run the following command:
PM> update-database
This will update the database based on our models.
We have covered the way to do this in detail in the ASP.NET Core Web API with EF Core Code-First Approach article.
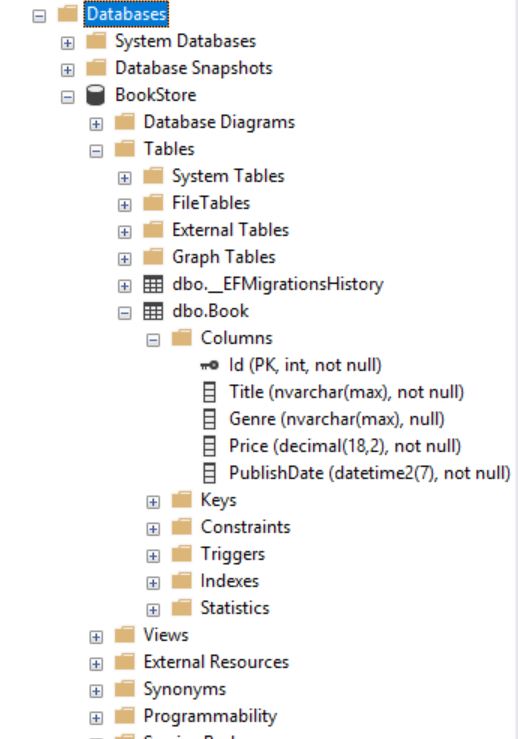
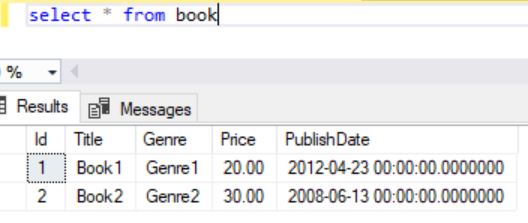
Once we complete all the steps, we are going to have the database and columns created as defined in the model. Our database table and columns will look like this:
We have successfully created the database from our code using EF Core Code-First Migrations.
Seeding the Data
The next step is to seeding the data. Data seeding allows us to provide the initial data during the creation of a database.
As mentioned in the linked article above, let’s override the OnModelCreating method in the BookContext:
      protected override void OnModelCreating(ModelBuilder modelBuilder)
        {
            modelBuilder.Entity<Book>().HasData(new Book
            {
                Id = 1,
                Title = "Book1",
                Genre = "Genre1",
                Price = 20,
                PublishDate = new DateTime(2012, 4, 23)
            }, new Book
            {
                Id = 2,
                Title = "Book2",
                Genre = "Genre2",
                Price = 30,
                PublishDate = new DateTime(2008, 6, 13)
            });
        }
Once we apply the migration and update the database, we can see that the database tables are updated with the seed data that we provided:
Running the ASP.NET Core MVC Application
Now, let’s try running the application.
Listing Page
Let’s navigate to /Books
This will invoke the Index() method in the controller:
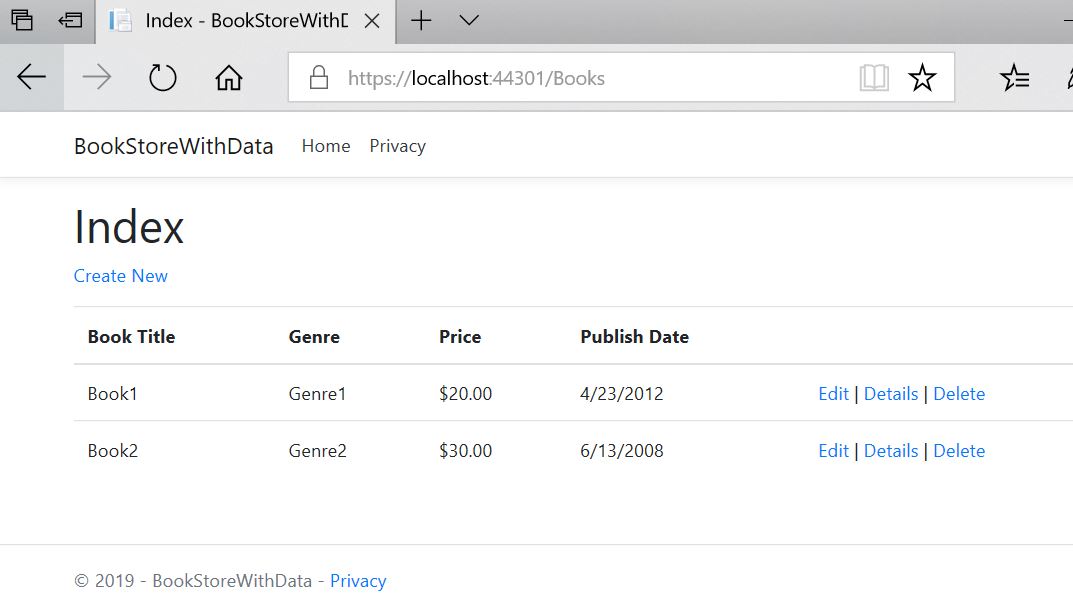
We can see that the Index page displays the list of all books in the database. There are also links for editing, viewing details, and deleting a book on the grid. At the top, there is also a link for creating a new book.
Create Page
Let’s click on the ‘Create New’ link.
Clicking on the link will take us to /Books/Create. This will invoke the Create() method in the controller using a GET request:
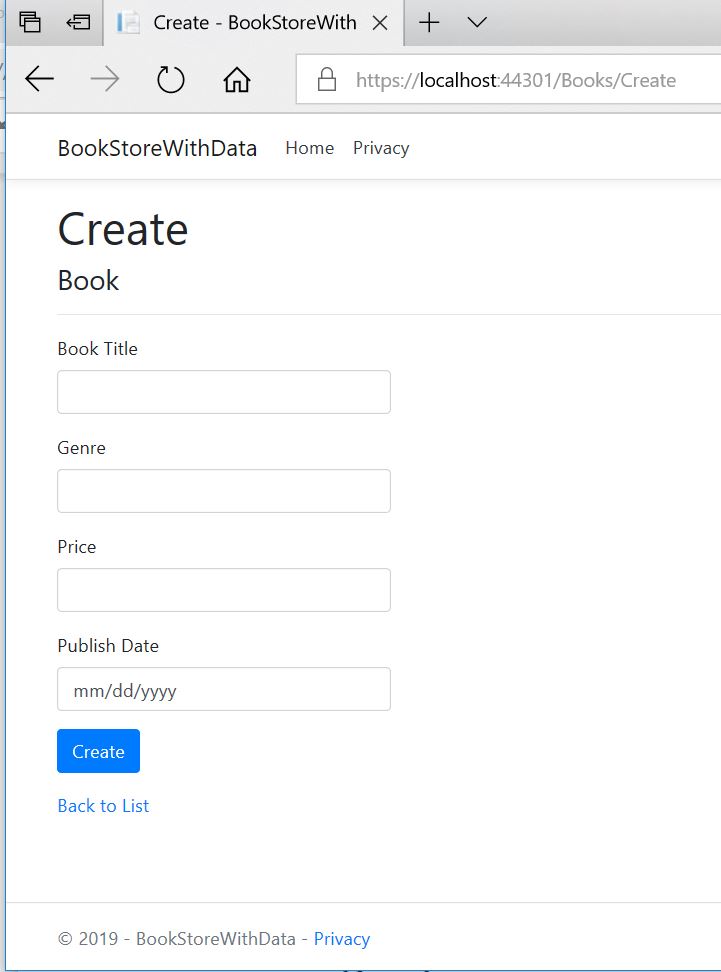
This page can be used to create a new book. After entering the book details and clicking on the Create button, the Create() method with the [HttpPost] attribute will be invoked. This will be a POST request and the form data will be submitted.
There is a link at the bottom to navigate back to the list.
Details Page
In the listing page, if we click on the details link of any book, we’ll be taken to /Books/Details/{id}.
This will invoke the Details() method in the controller:
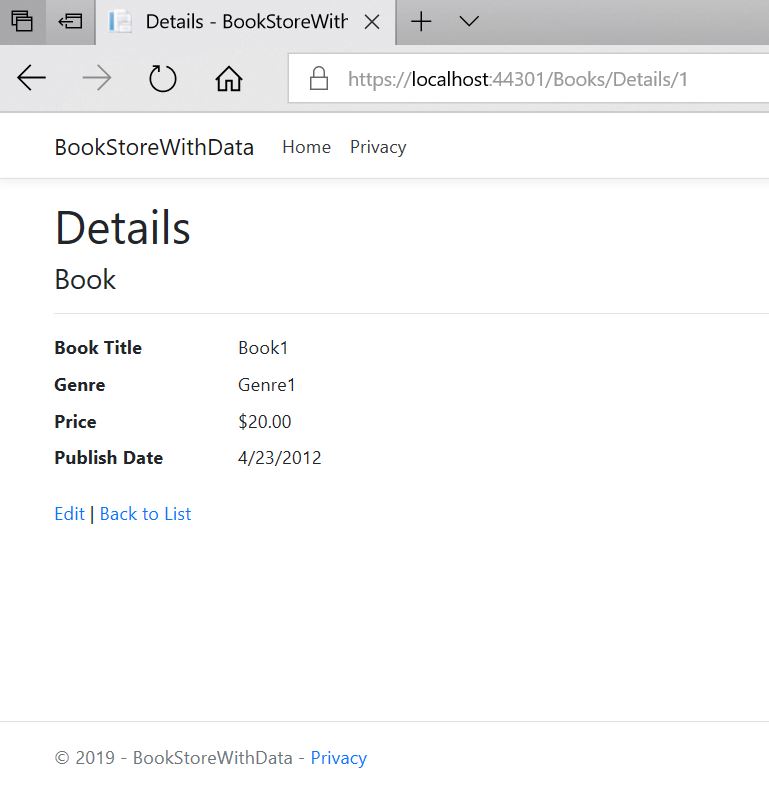
This page shows the details of a book. In the details page, we can see buttons for editing and navigate back to the list.
Edit Page
If we click on the edit link from here or the listing page, it will take us to /Book/Edit/{id}
This will invoke the first Edit() method in the controller which supports only GET requests:
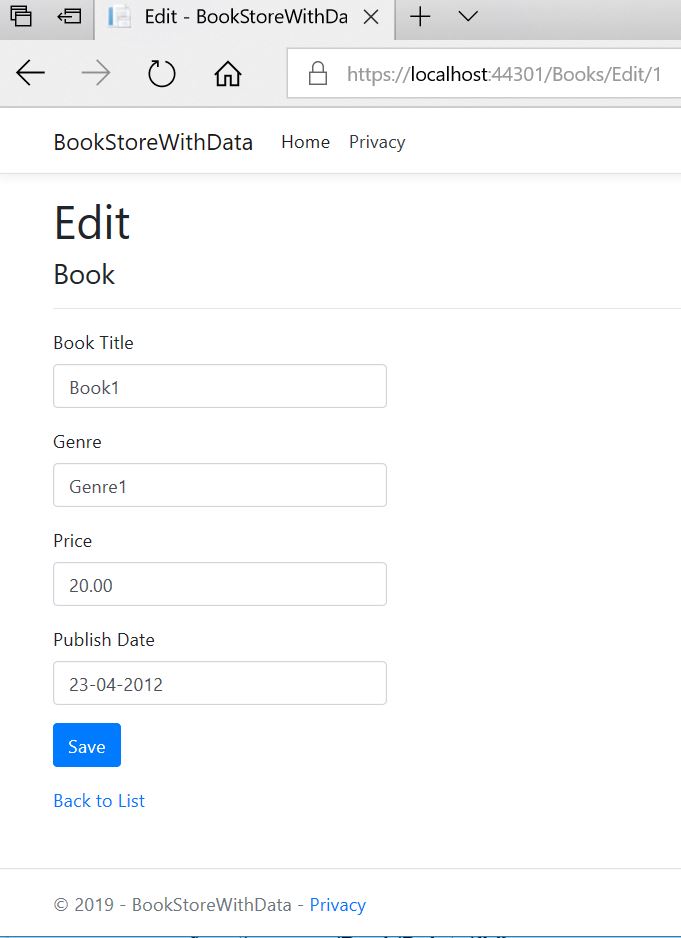
Clicking the Save button will invoke the Edit() method with the [HttpPost] attribute. This will update the record with the values we provide on the page. Depending on the request type, MVC decides which Edit method to call.
For editing a record, PUT request is the more appropriate method. But here the auto-generated code used a POST method that can also be used. However, when we are creating the controller methods by ourselves, the recommended approach is to use the PUT method for updating a record.
Delete Page
Finally, if we click on the Delete link from the listing page, we’ll be navigated to /Book/Delete/{id}
This will invoke the first Delete() method in the controller which supports only GET requests.
This is the delete confirmation page:
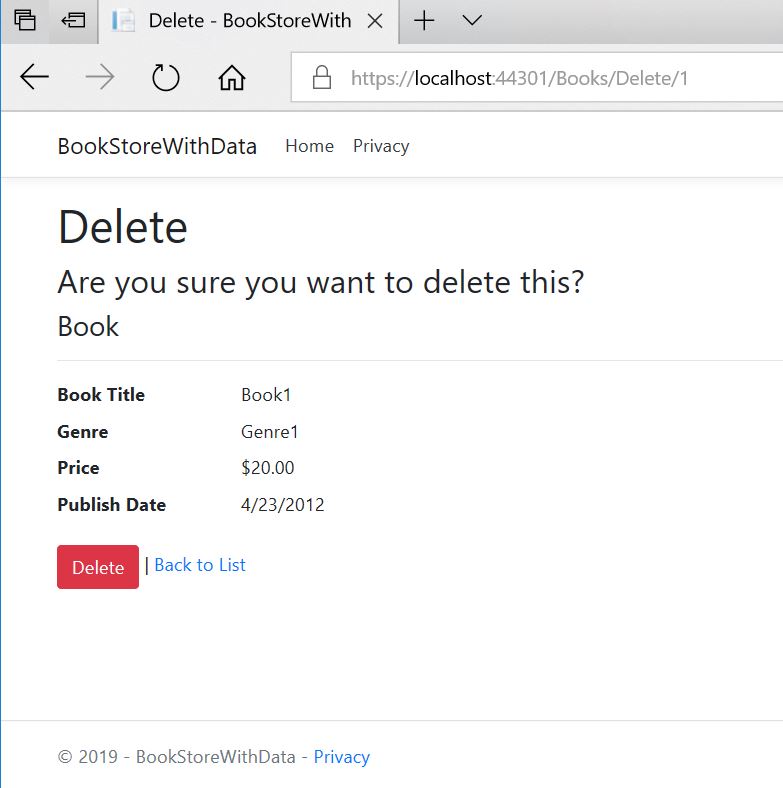
Once we confirm the delete by clicking the Delete button, the DeleteConfirmed() method with the [HttpPost] attribute will be invoked. This will delete the record from the database.
Code Explained
By following the above steps, we have successfully created a fully functional app with database integration. Now let’s take a look at the auto-generated code and try to understand how the app functions.
Visual Studio generates the following files as part of scaffolding:

DB Context
A DB Context file is responsible for facilitating all communication with the database. To learn about DBContext in more detail, check out our article: Context Class and the Database Connection.
Context file for this app is auto-generated at Data/BookStoreWithDataContext as part of the scaffolding.
Controller
A Controller file is generated at Controllers/BooksController.cs with action methods corresponding to CRUD operations. If we look at the BooksController file, we can see the following action methods:
GET api/books – Lists all the books.
GET api/books/details/{id} – Gets the details of a book.
GET api/books/create – Shows the initial create book page.
POST api/books/create – Creates a new book.
GET api/books/edit/{id} – Shows the initial edit page.
POST api/books/edit/{id} – Updates the details of a book.
GET api/books/delete/{id} – Shows the delete confirmation page.
POST api/books/delete/{id} – Deletes a book.
The action methods in the controller access the context to perform data operations.
For example, In the Details() method, we can see that the book record is fetched by accessing the context:
  var book = await _context.Book
                .FirstOrDefaultAsync(m => m.Id == id);
Similarly, in the Create() method with [HttpPost] attribute, we access the context to add a new record:
_context.Add(book);
Ideally, a controller should not directly access the context file. Instead, we should introduce a repository layer in between. We have explained the repository pattern in detail in one of our other article section: Implementing the repository pattern.
Razor view files
Inside the Views/Books folder, we can see that the view pages are created for Create, Delete, Details, Edit and Index methods. These view pages are based on the razor syntax. We’ll discuss creating the view pages using razor syntax in detail in a later article.
Conclusion
In this article, we have looked at the following:
- Creating a model.
- Scaffolding the model to generate context, controller and the view files.
- Creating the database using migration.
- Seeding the data.
- The code auto-generated by scaffolding.
In the next part of the series, we’ll look at creating the view pages using razor syntax.
Hi Marinko,
low priority request – could you please add the usual link in the: ‘In the next part of the series, we’ll look at …’ paragraph?
GJ on the tutorials
Thanks for the suggestion. We’ll do that.
Hello,this is my very first project to practice in asp.net core, i m stuck in seeding migration
can please help how to seed database in package manger console.
thanks
Hello Amreen. Please read this article about Migrations and Seed data in EF Core. Read it carefully, everything is explained inside it. Best regards.
Reusing the model as it was in the previous example generates an error on the Authors property (string array). Removing it (per the code in this example) or tagging it with NotMappable alleviates this problem. Please mention such changes explicitly. I am working though the examples with you and such changes detract from the experience.
Also, listing the changes to the appsettings file would have been useful. I have not used code first before, and it is an education. 🙂 The only real change was to the Connection string. (I browsed the referenced article and bookmarked to complete it later)
I am looking forward to the subsequent articles in the series.
Hello Ray, I can see your point there. That sentence is going to be modified in order not to cause confusion to readers. One tip if you haven’t been using Code First approach, my advice is to start, because it is so cool feature and gives a lot of advantages. We have a great article on that topic, and our EF Core series is diving even deeper into that topic. Best regards and thank you for that suggestion.
That series is next on my to-do list. It seems a lot of employers are requiring EF knowledge ans my knowledge is lacking. As an old head, I got turned off on Microsoft’s ORMs (strongly typed datasets at the time) and usually just roll my own.
Great article, I just have a doubt, in the Migration part the command:
PM> Add-Migration EFCoreCodeFirstSample.Models.EmployeeContext
Is that correct or it should be:
PM> Add-Migration BookStoreWithData.Models.BookStoreWithDataContext
Thanks for the material, and Im looking for the complete series
Hello Jose, you are right, it is our mistake. Thank you for pointing it. We are going to fix that.
Thank you.